Wednesday, March 30, 2011

This is a very long post, but it has lots of pictures and a TUTORIAL!

Over the last several weeks I have made a few projects that I thought I would share.  All of these projects are very easy to do and fun!
I am sure you all are familiar with Kathy's site, Paper Phenomenon.  If you aren't, you should do check her out, she has some of the most amazing ideas.  I, of course, couldn't help but to use her tutorials and make some for myself!  She had a video series you can find on You Tube that went through how to make this fantastic mini album.  It is made out of paper bags, and it is FABULOUS!
 I used the Graphic 45 Steampunk Debutante papers.  My spine is different than she did it because I couldn't get mine to work like hers.  But, I think it turned out just as neat.  I punched out the face and used some Crackle Accents on it.  Then attached the charm to the spine with chain.

 Every page has pockets and/or flaps to open.  There are a ton of inserts to check out.
 This is another of her paper bag creations that had a wonderful new way to put them together.  I used papers from Cosmo Cricket, Circa 1934.  LOVE THE COLORS!

 Here are all the pockets created.  Nice, huh?
 I wondered how to make one of these if you didn't have paper bags, and I came up with this.  I used Graphic 45, Domestic Goddess, papers.
I wrote a tutorial up for how I did this, it is at the end of this post.
 No Paper bags in this one, just papers, and it turned out very cool!  It has lots of tags, and I think that I am going to put our family favorite recipes in here!
 Last, but not least, she came up with this little mini book.  It is less than 3" square and uses one sheet of 8 1/2" x 11" cardstock.

 It rolls up on itself and then opens!
There are three pockets that hold teeny tiny tags.

Now for the tutorial...


Here's how I did it.  Again, Thanks to Kathy for the inspiration!!!
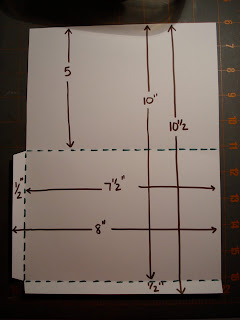
 I cut a piece of paper 10 1/2" by 8".  I scored as shown. I cut the edges as shown to create tabs.
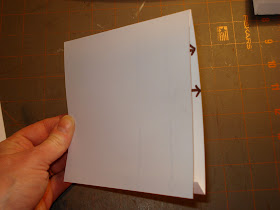
 Fold the tabs in...
 Fold the top down...and you have your first large pocket.  Adhere the tabs with a little liquid glue to the INSIDE of the pocket.
 Second pocket...cut the paper to 6" x 10 1/2".  Score and cut again as shown...
 Fold again, adhere...you have the second pocket.
 The piece that connects the two pockets you just made is done by cutting the paper to 8 1/8" x 6".  Score as shown, creating the 1/8" space in the middle.
 I didn't show this, but when I did the book for real, I cut out the 1/8" x 1/2" pieces (the ones by my thumb and finger) created with the scoring out so that it would fold better around the pockets.
 Take the larger pocket, and adhere it to the tabs on the right side of the 1/8" space.
 Take the smaller pocket and adhere it to the tabs to the left of the 1/8" space.  This creates the big space without pockets for pictures.
 This is the right side folded over so you can see that it will create a pocket.
 This is the left side folded over to show the other pocket created on the smaller pocket you adhered.  This whole thing will open in the middle to give you more space!  This is your first page.  Make as many as you want for your book.
 This is the connector piece that connects the page you just assembled to other pages you will assemble and to the front and back covers of your album.  Cut and score as shown.
Adhere a thin line of glue to the three sides, and adhere to the front of the page to create another pocket...the other side to the front cover or the previous page.

I sure hope this makes sense!  I probably should have cut the connector piece so that it would have tabs just like the other pages to create pockets.  Maybe next time.  But, this is how I made the recipe book and I hope you enjoyed it.  I hope you can use the tutorial to create your own work of art!

You could use plain cardstock, then cover with papers, I used double sided papers, but be careful of directional designs if you do that!

Thanks for coming by to see us, and please check out her site.  She always has great ideas!

Monday, March 28, 2011

New Cricut Cartridge


Just picked up a limited addition Cricut Cartridge, Mother's Day Bouquet!  
 I have been layering and inking, wow, so many possibilities.
 So much for all those flower punches!

Friday, March 25, 2011

Another Counterfeit Kit Project for March!


I had an idea the other day...so I used my March Counterfeit Kit and some grocery bags and created another mini album.  It is a combination of an accordion album with pockets built in and added on.  I will do a tutorial if you are interested, so please leave a comment and I will show you how I did it!

This album will be housing some pictures from the annual April Birthday get-together we have with my husband and one of our friends who also has an April birthday.  It started several years ago, and has become quite a tradition!  I thought I would round up pictures of past get-togethers, and add this years pictures as well.

This album is one of my recycled projects.  I used grocery bags.  Yes, grocery bags!  I cut them up and used three of them in all.  Everyone has been using those cute lunch paper bags, why not a grocery sack!


The overall size is 7 1/4" tall by 5 3/4" wide.  It has six built in pockets, and I added 9 more.  The binding is a simple ribbon binding.

The only things I added to it that weren't in my kit are one ribbon on the cover,  the black file tabs and mini file stickers (7 Gypsies), and the paper hole reinforcements.


I cut the shaped paper to make a pocket.  All of my pockets were adhered on two sides only.  The die cut shapes are what I used to make the pockets.  Some weren't big enough, so I layered them.  The album has a total of 15 pockets for 15 large tags, and 5 "blank" pages for large photos.  I love the papers and die cuts I chose for this kit because it gives me a lot of journaling area as well!


The hole reinforcements were white, I inked them to make them match the project.


The little die cut shapes on this are actually cut from the packaging and layered onto the packaging paper itself in the photo above to create the pocket!  Reuse and recycle...waste not, want not!!!


Another collage of smaller tags and pieces from the packaging to create a pocket.  I layered them on cardstock and cut the whole thing out.

Like I said, if you want me to show you how I made the pages I will create a tutorial.  It was really a cute way to make a mini, simple, and uses stuff we all have handy!

Stay crafty, my friends!

Wednesday, March 23, 2011

You've Been Framed!!

This is another challenge from the Counterfeit Kit Challenge blog...You've Been Framed is the name of this one.  You are supposed to make a project with some sort of frame on it.  I had this idea just pop into my head today, and this is what happened when I brought it to paper.


The photo is of my husband and our grandson Cooper.  It is one of my all-time favorite pictures.  They didn't pose for it, as a matter-of-fact he didn't know that I took it until we downloaded it to the computer. It was August, 2009, and we were riding on the zoo train.  Everything except the bling, buttons, and the "M is for memories" tag was from my kit, or made for my March kit.  The tag did, however, come from the pack of papers that I picked the pattern papers from.  I layered the papers and used the MS corner punch for the corners only.  The flowers and butterfly I crocheted myself.  I cut the flourishes out of brown cardstock and then sprayed them with green/gold Glimmer mist.  All of the edges I inked with Tim Holtz distress ink.

Thanks for looking!
Michelle

Monday, March 21, 2011

Sandwich Board Calendar

  Want to create a beautiful last minute gift?  
 Everybody loves a cool Calendar, get a free template here: http://www.printablecalendar.ca/  or print in your word program.   

 We used 5x7 book board, covered with vintage paper and embellished with 7Gypsies goodies!  


Friday, March 18, 2011

Paper Bag Flowers

 This is the set up I use when I use spray inks for my projects.  I have a paper grocery sack, I cut out one side, and lay that piece in the bottom for reinforcement.  I lay my stuff in the bottom, and spray without worry that it will get all over other things.  I was going to change out the bottom layer because I didn't want the red inks to bleed on the project I was working on, then an idea hit me.
 Why waste this beautiful paper with layers of lovely sprays and glittery goodness?
 I grabbed my punches and punched out some shapes...
...shaped them and used buttons and bling and TAA DAA!!!  I got some lovely flowers and embellishments for future projects and recycled some stuff at the same time!  I used some of these on my policy envelope album.
Have a crafty day!

Wednesday, March 16, 2011

March Counterfeit Kit's Etsy Challenge, Doilies, Flowers and a Mini Album

This is a four part post!


PART #1:  The Etsy Challenge

The object of this challenge is to go to Etsy, get inspiration, and make something.  So, I did.  I watched the slide show of the latest listings until this caught my eye.  Here was my inspiration.  It's called Butterfly Bliss, by babycakesanddecor.  Not knowing if I can post the picture, I just put the link to it.

I loved the colors, and the simplicity of it.  Here is my "something."  I made a card.   I chose to use a little less color choices, but I think it turned out really pretty, nonetheless.  The yellow and black make me want to yell "GO HAWKS!"  (My husband is an Iowa Hawkeye football fan!!  That's for you, DJ!)


I added the black cardstock card and the yellow background.  The crossword paper was in my kit, and it was double sided, so that is where the butterflies came from.  The leaves are from the leftovers of my "4U" card.  I think they added just that little extra pop of color.  The flower is made with Valita's owl punch rose tutorial here, but I used a scalloped shell punch and some old book pages to make it.  I thought that the words of the book matched the "theme" of the crossword puzzle.  I stamped "HELLO" in the spaces.  The bling is from my birthday buddy Vickie from Splitcoaststampers...Thanks again, Vickie!  I inked all of the edges.


I added a piece of creme cardstock for the message inside, I thought the yellow was a little too much by itself, and it tied into the front of the card.  I also used the crossword side of the paper to make a butterfly for the inside for some variety.  I punched the corners with a Martha Stewart butterfly corner punch and added bling for the bodies.  Taa Daa.  I hope you like it!

PART #2:  Doilies!

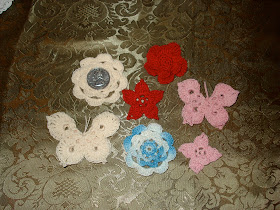
So I was thinking to myself, "Self, you could make doilies!"  Soooooo, first I gathered up numerous coaster patterns, used crochet cotton and a steel hook, and came up with these doilies.  I put a quarter on one of them so you can see the size of them.


That lead to making a couple of flowers and butterflies...


Then I got out some paper and punched some doilies.  I figure I can ink them and spray them and have a great tine with them.  They are MS punches, and some of them I experimented a little with.  She had some that you can buy, but I have never seen them here where I live.  I found a tutorial here on
Ink in the name of love.

PART #3:  Pop Can flowers


Following the punch tutorials on Counterfeit Kit Challenge, I whipped up these little beauties.

PART #4:  A Mini Album!


Using my kit (except for the letters) I whipped up this little mini album.  The letters are easy.  Just type each letter a bunch of times on your computer, print them out on paper (several colors so that you have choices, and cut them out when you need them.  Instant mini letters.


It is called a Meander Album with a Twist, and you can find the tutorial here!  I folds to make these cute little inside pockets!  I am going to decorate the tags, but I haven't decided on how to do it yet.

Stay Crafty, My Friends!