I have another project in the works. I have seen double sided mini albums around the net, where one side opens, and then you turn the book over and it is another mini album. You know, the ones where the back cover is actually the front cover of the other side of the book...are you confused? I am! HAHA! Anyway, I was playing with a new way to fold a mini album and I figured out how to do it, and I want to share it with you.
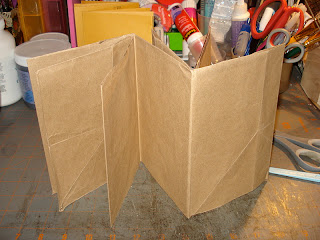
This one is made out of a paper bag, my practice model, if you will. See how the two sides have pages, and a common "back of the album" in the middle?
Just another view of the practice model. I wanted to create a "two albums in one" kind of thing, and I thought that the "zine fold" would be perfect. This is made with one sheet of paper, you can use any size you like. Here is what I did...
I have these huge 12x15 1/2" envelopes. I sealed it after removing the metal clasp.
Then I cut the right side off, and opened the sides so that it would be one long piece. You need seven equal sections to create the pages of the book. I measured the length of my now opened envelope, and did some math. I trimmed it from 31" to 29 3/4 total length. That length divided by 7 gave me 4 1/4" lengths. This is the width of my pages. Since the envelope is 12" wide, after folding in half, my pages are 6" tall.
This just shows the paper folded in half lengthwise, then sectioned off into 7 equal pages of 4 1/4" each.
I scored, and folded things to show this next part easier...you need to make two slits in the middle scoreline, keeping the left, center and right pieces intact.
Now, do the zine fold.
You will end up with this...
Now just fold one side one direction, and the other the opposite way. TAA DAA! Now you have two books in one if you want, each with 7 pages and three pockets.
Part two will show you what I came up with after using my papers and other embellishments.
Stay Crafty, My Friends!
Monday, January 30, 2012
Friday, January 27, 2012
Art Journal Page 2
I have decided that since I am NEW at art journaling, this first journal will be trying all of the new techniques I am learning. This is my second page.
I wanted to see what Glimmer Mist did on the page, so I added the three colors. Then I went around the edges with a gold paint dabber and added rub-ons. The faces are transparencies that I got in a grab bag, and I adhered them with gel medium. I colored their eyes and lips with glitter pens. It is hard to see in the picture, but the page is shimmery.
I found this list on the net, all over the place, but I can't figure where it originated. If you know, please tell me! Anyway, after I did all of the inking and the rub-on-ing (woo hoo, I made up a new word!) I stamped the numbers and hand wrote the list on the page. I think it turned out cool.
Stay crafty, my friends!
Wednesday, January 25, 2012
Fotographia Mini Album
Hello all! I am here today to show you a mini album I made out of these...
I had seen a video here by ILuvVintageScrap where she had made a mini out of one of them. I decided to use three...I used the "Never Ending Mini Album" design for it...it turned out COOL!
As you all know, these envelopes have two pockets, one making a flap.
For this design, I pulled the flap pocket down a little more to make a little more room for pulling out tags.
I inked all of my envelopes. This is Zeke, and he is helping me with the process...such a good supervisor! And please, don't look at my mess...I am getting my OWN CRAFT ROOM really soon, and it will be much nicer in just a bit!
Then I put the envelopes together in the configuration that creates the album.
Here are a couple of views of the album after I covered it with paper. I used DCWV's Timeless Time Stack. I LOVE IT! The poloroid images made me buy it!
Another view...
I wanted to challenge myself to not buying anything for this album, just using what I have. And, because of the nature of this album, I wanted to keep the embellishments to papers from the pack. So, I utilized the paper in cutouts and through the use of punches. I only added some string that I inked for some of the tags, and some hole reinforcements that I had leftover from another project.
I cut out another image of the "Fotographia" piece of paper and adhered it to the front cover over the same image, creating a pocket. I put this paper slip in to show the pocket.
Then I put things in the pocket, and layered images over the bottom of it to cover the "seam". I titled it 2012, because I am going to use it to showcase 1-3 pictures a month through the whole year. A sort of "highlight" photo album.
The tags in the front cover. This paper stack has two pages of the poloroids and postcards!
Front cover open...The tag behind the left poloroid comes out for journaling.
...then the right flap opened, showing the pockets of the envelopes.
Then that flap pocket opened. There is a TON of space for photos.
Then opening the left side to reveal flap pocket number 3!
These are the tags in this flap pocket.
Then you open the flap pocket to the right, and you get this lovely "Dream" page.
This is the flap pocket on the right opened to reveal the "Butterfly" page. I embellished these butterflies with punches from some of the typewriter key paper.
This is the middle section. I added a flap with two of the postcard pieces to create another "page".
The other side...
I had seen a video here by ILuvVintageScrap where she had made a mini out of one of them. I decided to use three...I used the "Never Ending Mini Album" design for it...it turned out COOL!
As you all know, these envelopes have two pockets, one making a flap.
For this design, I pulled the flap pocket down a little more to make a little more room for pulling out tags.
I inked all of my envelopes. This is Zeke, and he is helping me with the process...such a good supervisor! And please, don't look at my mess...I am getting my OWN CRAFT ROOM really soon, and it will be much nicer in just a bit!
Then I put the envelopes together in the configuration that creates the album.
Here are a couple of views of the album after I covered it with paper. I used DCWV's Timeless Time Stack. I LOVE IT! The poloroid images made me buy it!
Another view...
I wanted to challenge myself to not buying anything for this album, just using what I have. And, because of the nature of this album, I wanted to keep the embellishments to papers from the pack. So, I utilized the paper in cutouts and through the use of punches. I only added some string that I inked for some of the tags, and some hole reinforcements that I had leftover from another project.
I cut out another image of the "Fotographia" piece of paper and adhered it to the front cover over the same image, creating a pocket. I put this paper slip in to show the pocket.
Then I put things in the pocket, and layered images over the bottom of it to cover the "seam". I titled it 2012, because I am going to use it to showcase 1-3 pictures a month through the whole year. A sort of "highlight" photo album.
The tags in the front cover. This paper stack has two pages of the poloroids and postcards!
Front cover open...The tag behind the left poloroid comes out for journaling.
...then the right flap opened, showing the pockets of the envelopes.
Then that flap pocket opened. There is a TON of space for photos.
Here are the tags in the first set of pockets.
So then you turn the page after remembering which flap closes first (HAHA) and you get this. This is the second set of flap pockets.
The tags in the flap pocket...Then opening the left side to reveal flap pocket number 3!
These are the tags in this flap pocket.
Then you open the flap pocket to the right, and you get this lovely "Dream" page.
This is the flap pocket on the right opened to reveal the "Butterfly" page. I embellished these butterflies with punches from some of the typewriter key paper.
This is the middle section. I added a flap with two of the postcard pieces to create another "page".
The other side...
...and the back of the album.
I hope you enjoyed this! Pleasse check out her video and give this idea a try! My album using the three envelopes holds a lot of stuff, and measures 6" across by 8 1/4" tall! Lots of room! There are 20 photo mats and 13 double sided tags.
Stay crafty!
Monday, January 23, 2012
Daily Junque Journal
You all remember this...
...it is getting full!
I have been putting all kinds of stuff in it. It is fun, and addictive.
I found the lemon picture in a magazine...I wrote, "When life gives you lemon... ADD VODKA!
One night I got my vintage folder with a ton of stuff I collected a long time ago, and did a collage page. I really didn't think about it, just glued stuff down.
This is a "to do" list I did for a week. I decided it needed to be in here.
The "art" is just a paper I had, and liked it, so it is here now. I cut the "memories" title from a magazine, along with the exclamation mark, and smashed in the packaging from the candles I put on Jake's cake.
I have two adorable Dachshund babies, so this page is for them. The picture isn't mine, I found it on the net.
More magazine clippings...
Here are ideas from the net, from magazines...Here for future reference.
That's just some of the stuff I have been doing. I also have been putting all sorts of clippings and such for projects I want to do, decorations and furnishings I love, quotes that are funny, etc. I love to just look through it every once in a while. It has turned into a daily junque/smash/inspiration/art journal. Whatever I like goes in.
Stay crafty, my friends!
Friday, January 20, 2012
Update on the December Daily Junque Journal
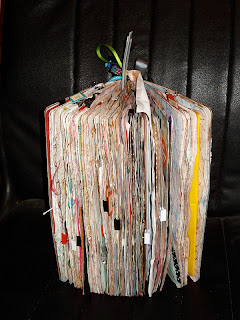
This book got HUGE! I did finish it this year! HOORAY! Last year I didn't finish my December book, but this year, it is FINISHED!! I cheated a little, and I added all of the pictures through our kids visit with us than was done on the 6th of January, but that was our Christmas present, so it is in the book!
I need to add something so that I can close it, I can't believe how full it is.
I decided that it was a combo December Daily and Junque Journal, so there is random stuff in here, and it may not be in order. Oh well. I found that I like this format way better...I felt less pressured to do something every day.
Our daughter came home from Iraq, and she sent us the paper from her home town where she was featured. We also got this wonderful plaque and an American flag flown in a mission over Iraq.
This is Christmas day, having our taco salad supper after my husband, son and I all worked that day!
Some cards and such.
Our grandson, Cooper.
Cooper loved the Zoo Lights and the train ride!
More of the adventures at the zoo!
OK, that is it. I just wanted to let you all know that I did finish it! YEAH!
Stay Crafty, My Friends!
Subscribe to:
Posts (Atom)


