WELCOME!!

We are so glad you are here! We love making and sharing our projects, and we are excited to have you visiting our site. Please leave us a comment and let us know what you think!

Jackie and Michelle

Followers

Monday, July 30, 2012

Tiered Organizers

I have been drooling over the ones I have seen all over the internet and on Pinterest...so I decided I needed to make one of my own.
 I found these mini metal platters at the thrift store for $3, and the candlesticks were from Craft Warehouse.  I spent a total of $8 on the whole thing.  I used E6000 glue, and Taa Daa!  I LOVE IT!  If you look close at the bottom right of this picture, a layout I did is under the glass of my desktop...my husband and grandson.  Ahhhh....CUTE!
This one is in progress.  I found these plastic outdoor plates at Safeway, and I had one more candlestick...What's a girl to do?

Stay Crafty, My Friends!

Friday, July 27, 2012

Butterfly Specimen Box

 I got this kit from SEI at the last scrapbooking convention I went to. It came in one of their club kits, and I knew when I saw it that my mom had to have it.  So, I made it for Mother's Day! I know the post is a little late, but Mom got it on time!!!
I think it turned out really cute.  It measures about 8 1/2 x 8 1/2".  I added a little bling, and lining to the inside.

I bought a second blank shadow box.  I just have to figure out what to do with it for decorating my room!!

Stay Crafty, My Friends!

Monday, July 23, 2012

More of my Photo File

We took a trip to the Saturday Market.  I added some pictures that I took with my regular camera, but cut the pics into the instant camera shapes.  That counts, right?
 I used some scrap papers to create the frames.  I found these cute little camera wood embellishments by studio calico and colored them with Sharpies.  Behind these two photos is a tag...
 I put journaling on the back of this.  The top tag pic is me and my oldest son, Neil.  The bottom left pic is my daughter-in-law, Sarah, and the right pic is my mom with Neil and Sarah.
This is the back of that page.  I have to go back and get more of these little cameras!

Stay Crafty, My Friends!

Saturday, July 21, 2012

Mini Notebook

I found this tutorial on Jennibellie's blog, and made this for myself.  I don't know what I am going to put in it yet, but I had some scraps, I had some time, and I think it turned out super cute!
I made it from a recycled bar soap box, so it is small, but the spine is wide, so there is definitely room to expand in it.  I used some of my homemade washi tape and come bookbinding tape for the spine.  The closure is a 7 Gypsies elastic closure.
My pages are sewn in with red embroidery floss. I have some bigger boxes...guess what that means?

Go check her tutorial out, its awesome!

Stay crafty, my friends!

Monday, July 16, 2012

Magnetic Message Board for my room

I was trying to figure out how I could hang a metal/magnetic board in my room.  Then the idea hit me like a ton of bricks!
Here is the finished product.  It's not very fancy, but the magnets are cute!  Here is how I did it.
 I have discovered those Command Hooks that are adhesive and come off cleanly.  THEY WORK!  I love them, and am using them for a bunch of different uses.  For this project I put the hook on the inside of my cabinet door, but I put it on upside down!
 I punched holes in my metal sheet.  You can get these for $3 at craft stores.  They are very cool!  Then I set eyelets in the holes so that it wouldn't cut my ribbon.  The edges of the metal are SHARP!
 I measured my ribbon, and threaded it through, tying a good square knot.
 On the corners of the back, I adhered squares of felt so that the movement of the door with the metal hanging on it wouldn't scratch my cabinet door.  Later on, I went to the craft store, and they had the felt squares, already made for this kind of purpose.  Oh, well, mine were not pretty but at least they were free.
Then I looped it over the door and onto the upside-down hook!  Taa Daa!  New over-the-door magnetic message center!  Now, you could ask, why didn't I just put the hook on the front of the cabinet door.  My answer...I didn't want to have the hook showing!  That's the plain and simple truth.  Weird, yes, but true none-the-less!

Stay Crafty, My Friends!

Wednesday, July 11, 2012

Coupon Organizer Tutorial

I needed one of these coupon organizers, so I thought I would break out some scraps and make one!  It is just another accordion type book, but just in case you aren't familiar with how to make one, here it goes.
 I gathered my Bazzill envelopes, some chipboard, and my scraps from this paper pack.
 I sealed the envelopes, then cut a sliver off of the end.
 I put a strip of score tape down the middle, and stacked them.
I adhered 12 of them together.  They are big, measuring 7 1/4" x 5".
 I cut the chipboard back and front at 7 1/2" by 5 1/2".
 I covered the outside pieces of the chipboard, then got an eyelet and the elastic closure.  I love these, and I am almost out of them...MUST REORDER!
 I punched the hole, set the eyelet, and put the closure through the back piece of the chipboard.
 I covered the inside of the chipboard next, covering the closure ends.
 I adhered the envelopes inside the covers using the same method as adhering the envelopes to each other.
 Open...A nice big coupon book!
Since I didn't put a bottom on this book, it can open pretty wide!  This definitely wouldn't work for an extreme couponer...but it works for me!

Stay Crafty, My Friends!

Monday, July 9, 2012

The Diagonal Pocket Page Tutorial

Hi, all!  On my last post, I showed you the mini album I made for the Just a Few Friends Stars and Stripes Blog Hop.  I promised you a tutorial on how I came up with the pages, and here it is.  It is super simple, and very versatile.  I hope it makes sense to you all, if you have any questions, please let me know.

 The pages are 4 1/4" square, and each page created 4 pockets.
 I started with a 12x12" paper and folded it into a triangle.
 I found the middle of the triangle, at the fold, and folded the corners into that point.
 Then I cut the top of the triangle off.  This is the base of all of the pages I made for this mini  It creates 4 pockets when all folded up.  I folded it down the middle, burnishing well.
 You can fold the diagonal pocket to the outside of the base page, or to the inside.
 I am using an orange paper to show how I added pieces to create many different pages.  On this one, with the diagonal pocket to the outside of the page, I adhered it to the back side of the diagonal, creating this pocket...
 ...and creating this page to open.
 Here is another view of this.
 You can add the extra piece of card stock to the other side of the diagonal pocket as well.
 You can add the card stock, then fold them to the inside of the page...
 ...which gives you this.
 You can add flaps to the inside pockets to create flaps.
 I tried this by just keeping the triangular pieces that I cut off attached, and folding them down, but it was way too bulky for the page.
This just shows a flap on the outside of the page (the diagonal pockets folded to the inside of the page.

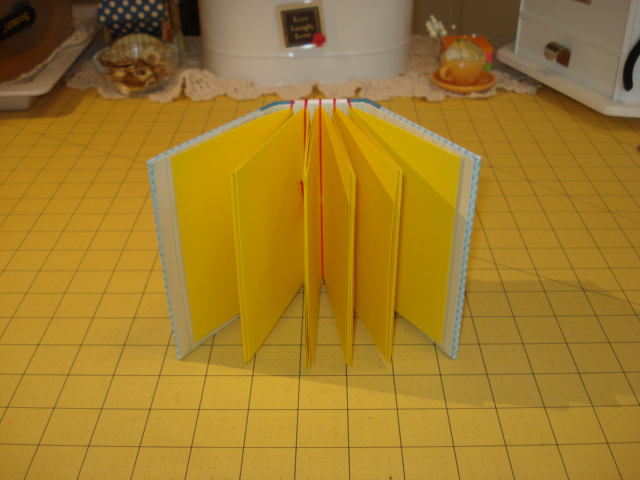
There are many more combinations you could come up with, these are just a few.  To bind my book I did this...

I used 5 pages total, and used the pamphlet stitch to bind them to a spine piece of chipboard covered with patterned paper.  I had 1/2" of space between each page, and in front of and in back of the first and last pages.  So, I had a 3" spine.  It made for a fat little book, but the space was necessary if you want to use bulky embellishments.

I hope this all made sense!
Stay Crafty, My Friends!!!

Tuesday, July 3, 2012

Happy Stars and Stripes Blog Hop!!

Welcome, EVERYONE!  This is my first blog hop as an official member, one of the newest Cubs, of the JUST A FEW FRIENDS PRIDE!!!  WOOOO HOOOOOO!!!
I am joining Elsa and all of the other awesomely talented folks from Just A Few Friends with this 4th of July Spectacular!  I hope that you all have enjoyed pouncing all through this blog hop.  You should have reached me after seeing what RJ came up with, but incase you are out of order,  you should have started with Elsa, and have come to me from RJ's site, here.  

For this hop, the theme was stars and stripes.  I was feeling super patriotic, and came up with three projects, I couldn't stop.  You will see...I went a little crazy!

 For a mini warm up project, I made a bunting for my fireplace.  I punched the red and blue "doilies" with a Fiskars and Martha Stewart punch, and used paper doilies as well.  I also used up a bunch of star brads that I have been hoarding for some time now.

 This is Herbert, my 3 foot tall gnome that sits in my front yard and guards the house.  He loves to dress up for the holidays, so  created this hat out of paper for him!  I used my Cricut to cut the stars for his hat!  He is STYLIN!!!
 This is the MAIN ATTRACTION!!!!!  I made this mini album for the hop, and I love, LOVE, LOVE how it turned out.  I created a cute little page fold, and I will do a tutorial on how I made it in a post in the near future.  The album pages are 4 1/4" x 4 1/2", the covers are a little bit bigger, and the spine is 3" wide!  I used a metal star plant poke for the cover, putting some streamers on it to resemble fireworks.  The title of the book is "Having a Blast".
 The spine is made of ribbons and lace and the flower ribbon that I was hoarding.   I added blue roses and the pinwheel that I attached with a Tim Holtz photo pin, and then I created little fireworks with leftover scraps and some twine!
 The closure is a simple ribbon and a hitch post.  I had everything in my stash except for the metal star!

 There are stars and stripes all over the place!  I made 5 "pages", and each page holds at least 4 tags.


 Some of the mats I punched fancy, some I just rounded corners.

 The two large tags in each page I thought of like Polaroids, so I left the bottoms to write on.  The tags are double sided.
I created the little pinwheels for the tag pulls.

 The pages are sewn in with a pamphlet stitch.
 The pages are spaced 1/2" apart to allow for the embellishments and pictures.
 More of my little fireworks.
 I had to add a butterfly!


 Almost there, I packed a lot into this little book!


Last page!  I really loved how this turned out, and I hope you did too.  It was a blast to make (yes, PUN INTENDED!)  Now, pounce on over to my fellow cub Sherence's blog and see what she has prepared for you to feast your eyes on!  Thanks for prowling on over here to my blog!  I am full of PRIDE!!!  (Can you hear the roars from us all??!!)

Stay Crafty, My Friends!


If you got lost, or found this by happenstance, here is the lineup for this hop (or pounce!) so start with Elsa, and see what we all have for you!