Tuesday, January 28, 2014

Portfolio Fun!

So, the other day I was surfing YouTube, and I ran into this video by Tim Holtz, about his new Collection Folios.    I was totally loving this idea!  But, since we can't get our hands on this until March or so, what's a crafty girl to do?

Yep, make one herself!  I raided my stash and I came up with this cool DIY version, and I want to share it with you!

WARNING!!!  Picture heavy post.  A list of supplies will be at the end of the post.  But check this out, sooooo cool!!!

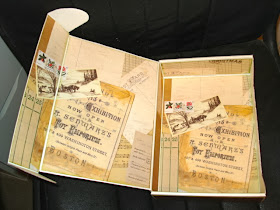
 I had a portfolio by 7 Gypsies sitting in my stash, and this paper pack by Bo Bunny, "Etcetera", and I knew this would become a very cool collection portfolio!
 I added all kinds of stuff!
 On the right, I added a kraft paper pocket, and adhered it to make another pocket.
All of these goodies are there...The tag on the left is a booklet.  The map sticker is on a cardstock booklet.  I created the cascading file, and then there is the envelope.
 This is the back...I covered the flap with papers...
...and filled it with these papers and postcards.
 Also in this pocket is this file folder that I created with the papers...
 ...inside is another pocket and more journaling tags.
 This is my DIY cascading tiered spine thingy.  Check out the video, this is a COOOOL idea!  I tried to make my own, I am waiting to get a hold of Tim's version!
 I attached cards and papers from the paper collection.  I also made my own "Polaroid" picture mats.
 The cards and such are layered, but also turn as pages...it is such a neat idea...I love it!
 I love the interactive nature of this book, and I love the texture that all of the layers give.
 I'm loving this so much I want to make another.
 The last page is actually attached to the back of the book to make another pocket.
 In this pocket I put more journaling and picture spots, and I printed off this free vintage map on parchment paper to make it look authentic.
 In the envelope is another file type booklet...
 ...with more journaling spots.
 And there's another file folder.I
I created a booklet with the leftover papers.

There is a TON of space in this book!!!  I hope you liked it!!!  I LOVE IT!!!

Stay Crafty My Friends!!

LIST OF PRODUCTS:

Map Printable through a link from a post here, Idyllwild Designs
Papers:  Bo Bunny, and also the line came with the rub-ons, stickers, and some of the journaling cards.
7 Gypsies:  Portfolio and elastic closures
Vintage Street Market:  Tinted Tape
Dazzle It!  Hemp cord
Tags:  Ranger
We R Memory Keepers Envelope punch board
Tim Holtz:  Distress Ink, Stencil, Hole Reinforcers, Map Sticker
Prima:  Vintage Tag
Canvas Corp:   Postcards
Recollections:  Envelope
Paper Accents:  Kraft Bag and Kraft paper
Magic Scrap:  2 fold fastener

Handmade:  Tinted masking tape, large envelope with string closure, waterfall book, file folders

Unknown:  journaling cards.

Wednesday, January 22, 2014

Welcome January!

Good morning!  Today I wanted to show you my new year long project!
I made this typewriter using a tutorial by Kathy at Paper Phenomenon last year.  I love it!  I love that you can use it to decorate too!  I made this October sign in 2012 with my post on this Vintage Typewriter.  Then, sadly, I didn't make any more signs.  This last Christmas, I just put a cute piece of paper from a Teresa Collins line in it.  I decided that it needed something more, for every month.  So, the yearly project has begun!
 I bought this paper line by Graphic 45 "Pages in Time" and decided to use it to create monthly cards for my typewriter.  I embellished this one with some bling, some snowflakes, and a ribbon on the tag.

My goal is to make a card for every month.  I may not always use the Graphic 45 papers, but I will have a stack of cards for my typewriter by the end of the year.  I may do birthday themed cards in the months of my birthday and my hubby's birthday.

Stay Crafty, My Friends!

Wednesday, January 15, 2014

December Daily, Finished for 2013!!!

I thought that today I would show you all the last half of my December Daily album for 2013, and then show you the altered box for the Christmas cards we received.  I left some of the pages out, because I didn't get permission from the folks in them to put their pictures on my blog. This is a long post with a lot of pictures.  The box project is at the end of the post.
 Me and my hubbin, out for dinner.
 Like I said before, I like to put new recipes tried into these albums.
 When I didn't have pictures, I put a list (On the 15th).


 On the left is an envelope that I used to put a pamphlet in.  On the right, my hubbin's picture is a flap...
 ...it opens for journaling.
 This pocket page is full of tags about what the 21st held for us.

 Christmas Eve with Jackie and her awesome family!
 Getting there was crazy foggy!
 Christmas day!!  Sorry, these are the pages I omitted because of the family, but I had several pages for Christmas day!

 I continue through the end of December...so here are my pages about getting my planner ready for 2014.
 On this page I made a waterfall type page.  The tag behind comes out so you can read the other journaling.  The page on the right opens to house the recipes I tried for New Years.

And taking the decorations down.  My boys look so sad!

So now, here is the box I made for my Christmas cards.
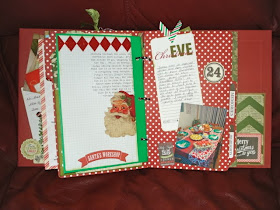
 I just covered my box with papers left over from my December Daily.
 I covered the inside also.
 I bundled my cards with ribbons, and it's done!
This is what the box looked like when I started.  I get these from work.  I have used them in a couple of projects, and have also cut them up to make covers for some of my albums.  I love it when I can get my hands on them as they are super heavy duty!

That's it for Christmas, 2013.  I hope you enjoyed the album.  I can't wait to do one for this year!  I have already collected some new stuff!

Stay Crafty, My Friends!

Saturday, January 11, 2014

Arc Planner Pages for the rest of 2013

Hi everybody!  Welcome back to the blog!  I am going to show you the pages I did for the last few weeks of my 2013 Arc Planner.  Later, I will bring you a post on how I did some little changes for the upcoming new year.  But, for today, I just want to show you these pages and how I decorated them!

 I still love my ARC planner.  I have been able to keep so many things in order, plan for future projects, and just have fun with it.  I love decorating the weeks according to the seasons and how I feel that particular week.
 I also still just love how easy it is to take pages in and out, and rearranging them is a DREAM.
 This week was busy, and the mini half page came in handy.
 December started, and my Christmas themed pages started as well.
 This page with the blues, greens, and the polar bears was my favorite during this time.  I totally should have done the whole month this way!
 But these pages are cute too!  I had too much fun with them.
I also wanted to show you my 2013 "Projects to Finish" page that I had in my planner all year long.  I decided that my main resolution for 2013 was to finish those projects I have started, and I did a very good job at it, I think.  Of course, I also got distracted by other new projects, but this helped keep me in focus to finish what this "Queen of Unfinished Projects" has started.  Those projects that didn't get done, are moved onto my 2014 list.  I really felt a sense of accomplishment looking at all of the checked off projects.  Yay me!

So that's my pages for now.  I will show you how I changed some of my book in the next post.  I also will have posts for the "Fauxdori" notebooks I made (THESE ARE COOL!) and for a stepped notebook I created.  I have other things in my little bag of tricks, I can't wait to let them out so you can see them!

Stay crafty, and organized, my friends!