Monday, January 28, 2019

"Today, Tomorrow, and Always"

Good morning!

Valentine's Day is creeping up on us, and I have a cute project to share with you.


 This is the "On the Go Purse" album by Laura from Laura's Crafty Zone.  You can find her YouTube video tutorial here.  It is a super cute and super quick mini album that measures 6x6" and has multiple flaps and pockets.


I made the album to enter in Challenge #2 for February through the Facebook group called Scrapbookers of County Craft Creations. The challenge was to use the colors black, red, pink and white in any project of our choice.

 Country Craft Creations is a great place to get scrapbooking supplies, and the women who do tutorials are amazing.  You should check it all out!


 The paper line I used is by Authentique, called "Lovely".  I found it in my stash, and it is dated 2012!  I used a couple pieces from the die cuts that were included, but I had almost the entire paper pad and die cut assortment available!  Woo Hoo!


Since it is a small album, the photo mats are measured to hold 3x4" pictures.  This post is picture heavy, so I'll leave you to it.


Isn't it yummy?


I hope you enjoyed my album.  Wish me luck on the challenge!

Have a crafty day!!!
đŸ’–Michelle

Monday, January 21, 2019

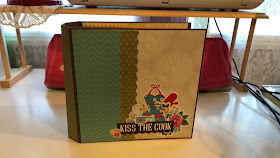
"Kiss the Cook" Recipe/Album


Good morning!  I hope everyone had a wonderful weekend.  I know I did!  Although I have been sick with my 2nd cold of the year (I know, right???) I have been able to spend a little time working on this project.  This album is AMAZING!!!  It is not my creation, but from a tutorial from Tamra Kilgore-Merrill's Country Kitchen Album on YouTube.  You can find her channel here.  It is so cool, and the spine is THE BEST!


Check this out...It is flexible and expandable and rounded and BEAUTIFUL!

This is a picture heavy post, so I will just show you some beautiful pages and then give you a list of the supplies I used.  I love, love LOVE how this album turned out, and I can't wait to do it again!  It used a lot of paper, but is so worth it.  Head on over to her YouTube and check out her tutorials, she is  an amazing crafter!!

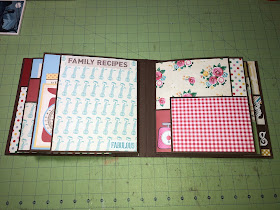
There are lots of flaps and flips and pockets in this album.  These pictures show just one page assembly.


I love her use of the papers, using "color blocking" in the pages to use all of the paper you can!  I had a very small 4x4" bag of scraps left over from the collections I used.


This can hold pictures and recipes.  I forget how many recipe cards are included, but there is a bunch.


Every page is different...Love that!


She showed how to use the "cut aparts" in a paper collection to create pockets for pages.  I never thought of keeping some of them together to use as a pocket.  Clever!

The next two pictures show a page assembly.  I love how you can put pictures here and then...


The flaps open up to hide more recipe cards.


Isn't this album yummy?  The next pictures show a fold out that she created.  These will be awesome for small pictures to be added.  I also love the back inside cover, a lovely pocket.


That's it for today.    Here are the supplies I used for this album.

Design:  Country Kitchen Album.  Tamra of Country Craft Creations.  See the YouTube tutorials.  Her page is here.

Papers:  Paper Accents, Echo Park ("Happiness is Homemade"), Paper Loft ("Home Cookin'")
Stickers:  Echo Park
Scoretape/Scotch Tacky Glue
Chipboard

Don't forget to have a crafty day!
đŸ’–Michelle

Monday, January 14, 2019

Organizing my Recipes!

GOOD MORNING!!!


I have an organizing post for you today.  In addition to crafting, I love to cook and to try new recipes. I have been collecting recipes since I was a kid.  I used to go through my mom's magazines, and in the food product ads they would tell you that you could send a "self addressed stamped envelope" to the company and they would send you recipes!  I did that constantly! (Remember, this was 
WAY WAY WAY BEFORE the internet!)  I collected all kinds of stuff.  I was also pretty fortunate that my dad worked at the post office so he could mail them off for me and get the stamps I needed!

The above picture is one half of our office space in our house, and this side is dedicated to my recipe collection.  I have graduated from snail mail to collecting books, internet printouts, and for a while I did a lot of swaps.  

This is what is inside those cupboards and file drawers...


I have a huge collection of recipes.  And, I really do try to do new recipes all of the time.  One year I kept a tally, and I tried over 300 new things that year!  

Everything from casseroles to seasoning mixes.  Our diet changes along with our health situation, and eating healthier is a priority right now.  So, once again, I am collecting a lot of new recipes and I need a system so that I can find them again.  This was one of my 2019 goals.  I did it!

I am combining my love of planning with my love of collecting recipes. 


I keep a Bullet Journal (Bujo) for a variety of lists in my craft room.  I decided that the bujo technique may just be the answer to how to find my recipes that I have tried and loved.  

It's simple, I divided the page into the recipe name and where it is located.  I just went through all of my stuff and wrote everything down.  I left several pages blank in each category so that I could add more recipes as I try them.  It was a long process, but it is well worth it.  Now I know where that darn recipe is located and it makes meal planning so much easier.  


Speaking of meal planning... I made a book with my Happy Planner meal planning sheets and this is what I use to figure out the grocery lists, and the weeks meals.  I do a little meal prepping on my days off so that my work days are easier to deal with.  I list it all out and if I need to find recipes then I can go to the index, pull the recipe and be totally ready to go.  I have some sticky notes with my meal planner, and I usually use stickers to make it look pretty, but I didn't this week for some silly reason.  

That's what I have for you today, a little organizing tip that is also fun to do..especially fun when it is done and you reap the rewards of your hard work!

Thanks for stopping by.

Don't forget to love, laugh and craft!

đŸ’–Michelle

Monday, January 7, 2019

Planning the New Year!

Good Morning!  I thought that today I would share my planner set up with you. I am a Happy Planner.  I love that it is functional AND creative.  I feel like I am crafting when I work in it, and I work with it every day.

Recently the "Transformer Planner" idea has taken hold, and I decided to try it.  I LOVE IT!  I have, in the past, tried to keep up on several notebooks, and now, it is all in one.  It's very chunky as you can see, but it is awesome, and everything is in one place.  I have 4 planners/sections to it, and I can do it because I only keep 3 months in each one at a time.  If you are unfamiliar with this concept, check out YouTube.  It is full of videos on what it is and how to do it.

Here is my main planner.  This is the Trendsetter that came out last year.  I found two more on clearance at Hobby Lobby, and bought them.  I redated this one to make it good for this year.


The daily to-do sheet is amazing!  I don't have a lot of things to schedule, so I use this primarily for my household stuff like cleaning, extra tasks, work schedules, etc.  I did find, however, that I needed a little extra space sometimes.  I needed something...so I decided to DIY and make some sheets from old planner pages that I didn't use.


I just cut down a sheet and simply inserted it into my book.  This side is for the left page of my planner, and when you turn it, it becomes a note page for the right page of my planner.  I put stickers on the days that have some sort of special thing, such as birthdays, appointments, and the like.  Any notes I need to make, like notes for appointments, phone calls, etc, will go here.  I just started using this concept.  So far I like it!


I'm showing you this spread because I wanted to show you how I redated it.  I made a table in my Pages program, measuring it to fit the planner page.  Then simply cut it out, adhered it, and used number stickers to redate the calendar.  I found the mini calendars for 2019 by Carpe Diem and used them as well.  It came out amazing and now I can use my favorite style of planner for this year as well.  YAY!


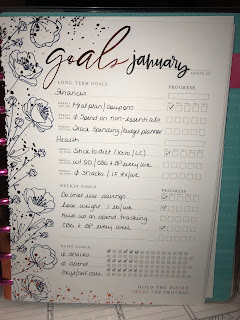
The next section of my planner is this one.  It came with the latest Be Happy Box that Mambi promoted.  It came with great goals pages, so I decided this would help me keep focused.


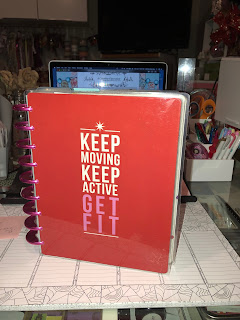
  My next section is my fitness planner that I recycled from 2 years ago.  I never liked the pages that came with it originally, so I bought the new fitness pages and am using them for recording my food intake, my weight, blood pressure, etc.  It also has a nice daily section to record some thoughts, progress, etc at the bottom.


Last, but certainly not least, is my MISS MAKER!!!  I am using her to get my crafting fun back in order.  I am planning blog posts, working on projects for myself and for others that have been commissioned.  It has great space to keep everything in place, and it's PRETTY!  She matched the bright colors of my Trendsetter, and I love it.  Of course, after I took the picture below, I filled her out with this weeks adventures in creating, she looks pretty plain here, but believe me, she is full of great fun now.


Thanks for stopping by, and I hope you enjoyed the post.  What does your planner look like?

Stay Crafty!
đŸ’– Michelle

Tuesday, January 1, 2019

Happy New Year!!!


HAPPY NEW YEAR!!!

It's 2019!!!  Can you believe it?  I can't...Where did 2018 go?  It flew by and I feel like I blinked and I missed it.  A lot has happened in the last year, and I have been absent from the blog. I've been absent from a lot...looking at others blogs, YouTube tutorials, etc.   I am truly sorry about it, and I want to make it up to you.  It's a new year, and it's time for a new start.  If y'all stick with me and follow along, I promise we will have some fun!

I have been gone from the blog but not from crafting.  I have done some cool things.  I did manage to do a Craft Fair, my first ever, and it was so much fun!  I have made some new mini albums.  I have been doing a lot of crocheting (since I was recovering from surgery), and I am still totally into my Happy Planner.  I can't wait to share things with you.  Personally, we have had the joy of adding another grandson to the family, and my hubby's band has been super busy with Gigs (for which I have been the costume designer...more to come on that!).

So, here's to 2019, may it be the best year yet, and may we all LOVE, LAUGH and CRAFT!

đŸ’–
Michelle