Sunday, May 26, 2013

Mother's Day Cards, better late than never! And...Announcements!!!

Before I get started with this blog post, I have a couple of announcements that I want to share with you all.  

First, Father's Day will be celebrated with the creative geniuses of "Just a Few Friends" On June 8th.  Please make sure you stop by and see what we all have done for the Daddy's in our lives!

And Second, on June 15th there will be another special blog hop.  I can't divulge all of the details, but to say that I am now also part of a group called the "Sassy 5" and we are going to be celebrating a brand new and AWESOME release of something you won't want to miss.  We are working with Elsa, of Just a Few Designs, and she has a super special, awesome and wonderful surprise for us all!

And now, for the blog post!

 Here are the Mother's Day cards I came up with this year.  Yes, between me and my hubby, we have 4 mom's!  We love them all so very much!   I bought a card kit from my local scrapbook store,
A Joy Forever.  Follow the link and you will get her directions for the cards on the blog that they just started!  Joy created the designs, made the kits, and I LOVED IT THE MOMENT I SAW IT!  I did some tweaking to the cards for the Mother's Day cards, buying some dimensional stickers that matched the paper line.
 The paper line is Knee Highs and Bow Ties by Basic Grey and it is soooooo cute!  I also found out, because of the goodies in this kit, that the "candy dots" by My Mind's Eye are a MUST HAVE!  I went out and bought 4 packages of several different colors!

Have a wonderful and safe Memorial Day, and remember...Stay Crafty, My Friends!

Sunday, May 19, 2013

Craft Supply Inventory.

OK, so I made an inventory notebook for my craft supplies.  

That's not weird is it?  

I mean, I just got a little tired of not remembering what I had and didn't have.  Buying doubles is fine for some stuff, but not for others, you know what I mean?  

I have been working on this for a couple of months.  I think I have everything in here now.  (Oh, yeah, except for all of my paper stacks and collections).  I think it is awesome.

I just have to remember to use it when making supply needs lists and to take it with me when purchasing certain things.  

Here it is...TAA DAA!

 I made the pages on classic sized papers, because a full size three ring notebook would have been too big to handle in the store.  I wanted to use my ARC disc binding system, but they don't make rings big enough for all of this stuff.  (I have a lot of stuff, but I have been crafting since before I can remember learning how to do it!!!)
 The side tabs are the main categories.  The top sticky notes are the temporary way I am dividing the main categories.  I still have to tweak things.
 The following are just examples of what's in my book.  Not only are some pages an inventory, but also a nice sample of what the product looks like.
 I found a bunch of printables on the Ranger site.  Go check it out!  The link will take you to the page where there are a ton of color sheets and label sheets to print out and use to help organize your stuff.
 A list of my Cricut Cartridges.  I double spaced it so that I have room to add more.
 Pictures of my dies...all divided into categories of company.
 I had some folders that I could not find the names of.  So, I put a sample in the book, I can use it when I shop.
 I also knit and crochet.  I need the information for that also!
 Punches...
 ...Scissors...
 ...and Stamps, OH MY!
 And, you have to have a washi tape collection inventory.
I made the dividers using the tutorial I found by Paper Phenomenon.  It uses the EK Success envelope maker to create the tabs.  I just cut the card stock into pieces that were 8 1/2" x 6", did the punching and cutting, and I had custom dividers for my book.  The video tutorial is here, she shows how to make half sized file folders using this technique.   I also played with the paper size she uses in the video to create her file folders.  If you use a paper that is 8 1/2" by 12" to start with, and score the fold at the 5 3/4" mark from the "bottom" of the file folder, you will get a folder that perfectly holds 8 1/2" x 5 1/2" papers.  If this is confusing, let me know, I'll show you!

What do you think?  (Not about how much stuff I have stashed in every nook and cranny of my craft room!  What do you think about my book?  HAHAHAHA!)

Stay crafty, and ORGANIZED, my friends!

Wednesday, May 15, 2013

Planner Pages For Your Viewing Pleasure

I LOVE LOVE LOVE MY ARC BY STAPLES PLANNER!!!
 I just wanted to show you a couple of pages for the last couple of weeks.  I was raiding my sticky note stash for the page above, along with some Creative Imaginations stickers.  I am continuing my "Stuff. Things." titles for my page of to do's.  I like it.  
 This page sported some stickers by Simple Stories.  
Like a goof that I can be, I threw away the paper for these border stickers...I have no idea who made them.  I did like the quote I added to the right page.  Sometimes I use that blank box for quotes, sometimes for my weekly check boxes.  Oh, if you were wondering...The E is for exercise, the J is for journaling, and the V is for vitamins.  I want to do the journaling and vitamins daily, the exercise at least three days a week.
 This page is the current week.  I tried stamping on this one.  I made a MESS of it!!!  One would think that simple stamping would be easy, I CAN'T DO IT WELL!!!  ARGH!!!  I made a mess of the middle of the page, so I covered it with a page from a notebook I have on my desk.  I think it worked well to cover it up, and give me lines to write on!
 These pages show my page of sticky quotes that I like, and then my master task list for the month.

I hope you enjoyed looking at this.  I just love this book and I use it every day.  I love to decorate it.  I usually spend some time on Saturdays figuring out what the "theme" will be for the next week.  I don't really have one for this week.  Maybe next week will be better!

Stay Crafty, My Friends!!!

Saturday, May 11, 2013

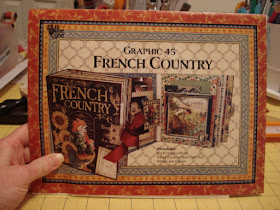
Graphic 45 French Country Album

 Hi, All!  I wanted to share this with you.  I was at the Creating Keepsakes convention back in March and at the Pine Cone Press booth they had this kit.  I. HAD. TO. HAVE. IT!  I love Graphic 45, and this kit was beautiful.  It made a pretty large book, with lots of space to add stuff.  I, of course, had to add more stuff and embellish it with more things.
 Heres the cover, I added bling by ZVA Creative, and the sunflower embellishment is by K and Company.
 The spine is 3" wide.
 The pages are 8" tall, 6" wide, and spaced 1/2" apart.
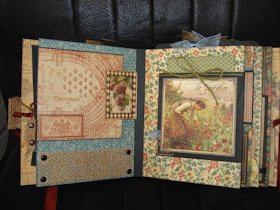
 I went to craft warehouse and grabbed some of the embellishments that come with this line of paper.  I did the kit exactly as they said, except I used black card stock instead of the cream they sent.  Then I embellished with more things.  The flower is by Bo Bunny, the leaves are 7 Gypsies.
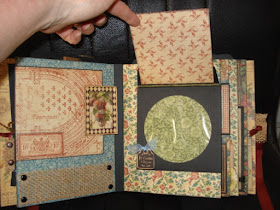
 The little envelope opens and two tiny tags are in it.
 The page on the right is built with a cd envelope.  It makes for a lot of room for pictures and such.
 All of the little picture embellishments are adhered so that pictures can slip behind them.
 The cd envelope window.
 More Bo Bunny flower embellishment ideas on that pocket.

 I adhered this flap so that a tag (on the left, black with the face on it) could be tucked behind it.  I also did the right page a little different, creating a bother pocket.  The Bon Appetit card is a tag, everything else created the pocket.

 On this flap on the left side, I also adhered it different so that a tag could be placed behind it.  I used the file folder method that Kathy Orta showed in this video, the idea came from her friend Diane.  Go check it out, if you have an EK Success envelope maker, you need to see what else you can do with it.

 This sunflower is also from K and Company.
 I added some stuff to the back cover.  I created a pocket on the back cover using an envelope/tag and die cut from the paper line.
I also created extra pockets in the pages.  The album is constructed with black card stock pages.  After making these bases and putting them in the book, you cover them with the papers.  Before I covered them, I added large envelopes to the card stock pages.  I sealed them, cut off the end, adhered them to the card stock, then covered them, thus making a top pocket for these large tags. There are 5 base pages, so I made 5 pockets for large tags.

After I finished with this album my brain went haywire with ideas...I am currently working on another mini album of my creation, and will be bringing it to you all very soon.  That one will also have another set of tutorials that I will do on video to show you how to create one for yourselves!!  I'm super excited about it, so stay tuned!

Stay crafty, my friends!

Saturday, May 4, 2013

A Box for Mommy

Welcome to the Just a Few Friends Mother's Day Blog Hop!!!  
We are soooooooo glad that you prowled on over to see our purrfectly created projects!  We have all been tearing up our dens in the creation of our box themed goodies, and we hope that you like them!  If you have not started from the beginning, please start with Elsa's Den.  If you have been  pouncing along the blog hop, you should have come to my den from RJ's Den.  I have a list of all of our participants at the end of the post.  Now, on to the fun I have created for your viewing pleasure.

I have a video on YouTube also, please go and check it out!

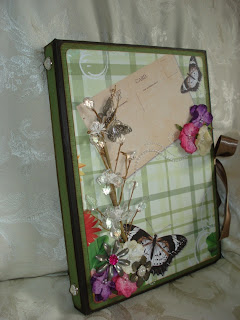
 This project was made using a Tim Holtz Configurations Book that I bought at the last Creating Keepsakes convention I went to. I bought this paper collection at Tuesday Morning, and it is called the "Social Butterfly Stack".  I am really not sure who put this collection out, but it is beautiful!
 I used Petaloo flowers.  The metal flowers and the metal butterfly were from a bulk bin at the craft store.  My BFF, Jackie, gave me the spray in  a grab bag of flowers and ribbons.  The brads on the spine and in the metal flowers are by The Girls Paperie.
 I painted the box and the inside boxes with brown paint.  Then I adhered the papers in the back of the boxes.  I remmed one section to make a space to house a mini album.  I used the "Never Ending" book style that I have done several times in the past, and used a simple ribbon "belly band" for the closure.

I added a few embellishments in the boxes, but didn't want to over fill them because I thought the paper was so pretty, I didn't want to cover it up.  I added a glitter filled bottle, a flower, a key and wooden butterfly, a metal bird and quote, and some lace that looked to me like a doily on a shelf.
 A top view of the mini album and its pages.
 This is the first cover page opened...
 ...Then the right page opened again.  I used some leftover card stock to create a pocket for tags.
 The "back" page opens to reveal a belly band type holder that I created to hold a trifold mini pull out.
 Each side has 4x6 mats to hold more pictures.
 When you open the page with the mini pullout, you get this layout.  I added a flap that I punched with a Martha Stewart Edge punch.  The pink paper behind it shows off the pattern.

This is the "middle section of the mini album.  I made a slit type pocket to house two more tags.  

I sure hope you liked my project.  It was so much fun to put together.  Now please pounce on over to Sherain's Den and see what she has come up with, I know you are going to like it!