Hello and Merry Christmas! I have a wonderful tutorial for you today. It is actually the first in 4 videos that I will have in this series. I am presenting my December design team project for Country Craft Creations! I am using Simple Stories, "Simple Vintage Ancestry" paper collection and it is AMAZING! I am totally in love with this project and I can not wait to share it with you! It is a huge album and it will require quite a bit of supplies, but it is soooooo worth it. The idea for this album is for an album that you can document a couple family genealogy and then pass it down to your children for a heritage keepsake. Please visit Country Craft Creations for your supplies!!!
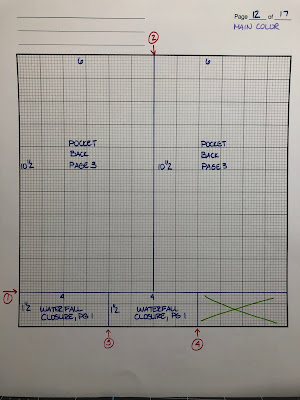
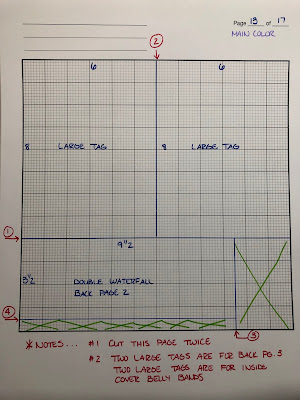
This video is the first in a series. I have pictures in the beginning and end of the finished piece. During this video we will do a walkthrough of the prototype of the album we are going to make together! I rarely do this type of tutorial, but we are going to go through everything step by step. We will also go over the supplies I received in the design team package and the supplies I purchased to add to it. I will also make the cover of the album. The cover is a wrap around cover that I think you will like. The other videos showing the page construction and how to make the family chart will come soon, within a couple of days. I am working hard on the editing. Below is a supply list. I will also have a cutting guide. The cutting guide is useful to show you how to cut your card stock so that you can make the most out of it with little waste.
Thanks for stopping by and for your support. Have a wonderful Holiday Season!!
SUPPLIES USED:
Chipboard, 2 at 12x12
Score Tape Sheets, 4
Large Magnets x 6
Patterned paper, Simple Stories, “Simple Vintage Ancestry”, 24 sheets of 12x12” (this includes the cut apart sheets for adding to the pockets in the album), 7 sheets of 6x8”, and 7 sheets of the 12x12 solid color papers that coordinate with this paper line
Cardstock: Artisan, 12x12, 21 sheets of Black and 5 sheets of Brown
Seam binding, about 6 yards
Scoretape, 1/4”; and Art Glitter Glue
Distress ink for the papers if desired
Miscellaneous die cuts, stickers, flowers, etc. for decoration of the album.
CUTTING LIST: (Scoring and patterned paper cuts will be given during the videos)
Chipboard:
1 at 8 x 10
1 at 7 7/8 x 10
2 at 2 3/4 x 10
1 at 1 3/8 x 10
All cardstock below is to be cut in the main color, I used Black. The brown cardstock was used for mats and for the genealogy booklet we will make.
Cardstock to cover the chipboard:
2 at 5 3/4 x 10
2 at 10 x 12
1 at 4 3/8 x 12
1 at 9 7/8 x 5 3/4
1 at 9 7/8 x 2
PAGES: Note that we are making two sets of pages, one group for each side of the album. Also, the pages will be scored at 3/8” for the tab that binds it to the album.
Page 1: 2 at 6 7/8 x 8 1/2
Page 2: 2 at 7 3/8 x 9
Page 3: 2 at 7 7/8 x 9 1/2
Page 1 Front:
Stacked Waterfall
2 at 10 x 6 1/4
2 at 9 x 6 1/4
Water fall closure, 2 at 4 x 1 1/2
Page 1 Back:
Gatefold
4 at 8 1/2 x 3 3/4
2 at 8 1/2 x 3 1/4
Page 2 Front:
4 at 8 1/2 x 6 (Main Flaps)
2 at 6 1/4 x 4 1/4 (Flip up A)
2 at 6 3/4 x 4 1/4 (Flip up B)
4 at 4 3/4 x 6 1/4 (Top Flap add on pieces)
4 at 6 x 2 1/2 (Bottom flap pocket pieces)
Page 2 Back:
2 at 3 1/2 x 8 (Pocket)
Double Waterfall:
4 at 9 1/2 x 3 1/2
Page 3 Front:
4 at 9 1/2 x 5 3/4
Page 3 Back:
2 at 10 1/2 x 6 1/2
Inside Back Cover Belly Bands: Cut these and score at 1/2” on each end. In the video I didn’t cut the inside back band at 8 3/4 and had to adjust. These measurements are correct.
1 at 2 x 8 7/8 (Inside Front)
1 at 8 3/4 (Inside Back)


No comments:
Post a Comment