WELCOME!!

We are so glad you are here! We love making and sharing our projects, and we are excited to have you visiting our site. Please leave us a comment and let us know what you think!

Jackie and Michelle

Followers

Wednesday, November 9, 2011

Another Junk Journal Swap

Today Jackie and I are leaving for a mini vacation to the CK Convention in Washington.  But, before we go, I wanted to show you all this little project.

I made this for Daisy at Mini Album Scraps.
She wanted a general purpose book with her favorite colors, black, purple, pink and robin's egg blue.  She also loves the shabby chic type style, so this is what I came up with.  I used Pink Paisley papers and ephemera, Prima flowers,  and Recollections bling.
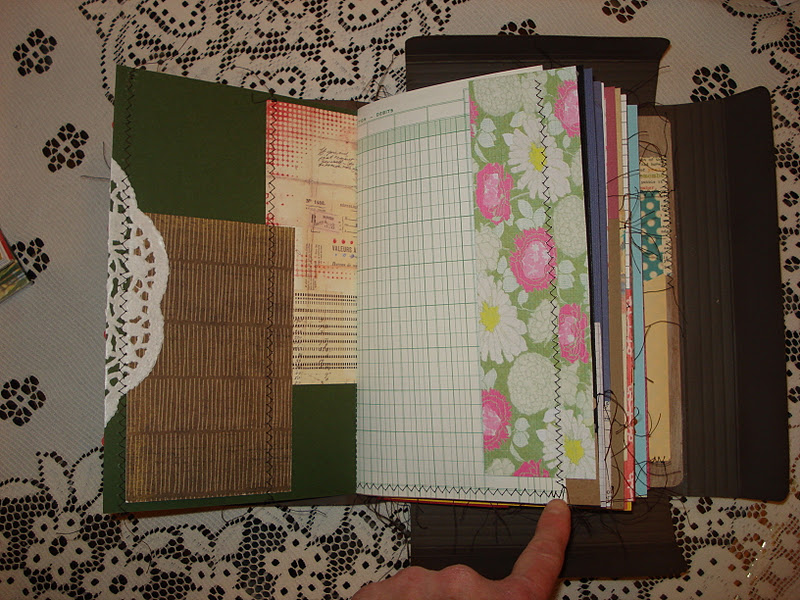
 Here is the view of the whole book.  I made 4 sections, and all sections have the same type of papers.  The dividers, pocket pages, and envelopes I made all have different papers, but the "pages" are all the same in every section.
 Divider number 1.
 Pocket page made out of a 12x12 paper.
 Plain heavy weight copy paper and flash cards with some ledger paper.
 I used 4 paper bags, and made pockets out of the bottoms, putting some journaling tags in every one.
 Map page and a list page.
 A brochure envelope, I added paper to the flap to pretty it up and put an index card in it.
 Home budgeting page and a lined page.
 A blank white card and a large tag with ribbon.
 A black card and more white paper.
 I made huge envelopes to tuck things in.  I don't know which line of paper it is!
I had bought some stuff to use for the book cover , and am sending what I didn't use  for Daisy to embellish as she wishes.

I sure hope she likes it!!!
Stay Crafty My Friends!

Monday, November 7, 2011

Stash Buster Junk Journal

I made this and totally used up a ton of paper scraps that I had in a box by my craft table.  The box went from overflowing to manageable.  I need to make another.  I just picked papers and started sewing and gluing.
 The cover is made from an old 7 Gypsies folder that I had and never knew what to do with.  I painted it and then covered it with panels of scraps.  The binding is a pamphlet stitch using just some bakers twine.
 The inside cover and first page.  Lots of scraps, some doilies made it in here too.
 Papers left over from my junk journals that I have been making.

 This left side is a left over file folder from my last "Mini Notebooks" entry.


 I put library cards in it too...and some stickers.


This is the back cover.

Stay Crafty My Friends.

Friday, November 4, 2011

Mini Notebooks

I decided to clean up my craft room today and ran across an OLD tin full of K and Company mini file folders. I used a few when I first bought them, and had a ton left, sitting on the shelf, not doing a thing.  I decided to use them to make some tiny notebooks.
 I took groups of them and sewed them down the spine with my sewing machine.  I tied the thread above and below, and cut off the extra.

 I had these 7 Gypsies labels and used them for the title labels for the mini books.
 I cut up papers from my junk journal stash and glued them into the book.
 There you have it.  All done.  Some have 10 pages, some have more.
 They can be held together with mini binder clips.  I also have some mini paper clips from Tim Holtz that I am going to use.
Three down, four more to go.  

I think these will make cute purse notebooks, or even mini smash books.  They have all kinds of possibilities.  

Stay crafty my friends!

Wednesday, November 2, 2011

Journal Page Tutorial

I was shopping at my local grocery store and realized that I had forgotten my reusable grocery bags.  I asked for paper bags, since the plastic ones are so bad for the environment and the paper ones have a bazillion uses.  Then, I got a recycling idea...
 I cut the bags up into manageable sizes, these are 5"x7". Since they all had the store logo on the outside.
I arranged them so that the wording would be on the "inside", and then applied a little double sided tape from my ATG to the middle of the papers, making a kind of sandwich out of two of the pieces.  I left the borders of about 1" without tape.  I just wanted enough in the centers to hold them together.

 Then I took my sewing machine and sewed the edges at about 1/8" with a straight stitch.  You could totally use any fun stitch and color of thread you wanted.  This is why I didn't want the double sided tape too close to the edges, so the needle wouldn't get all gummed up.
 This is my stack of papers.  I used 4 bags, and got enough to make 16 pages.
 I tied the thread together on each side and cut the strings off.
Taaaa daaa!  I have 16 journal pages, 5"x7" in size, double thickness so they are durable.  Now my head is swimming with ideas on what to use them for.  Should they go into another junk journal?  What about a cool birthday book?  I could make it into a recipe book or a photo album.  I have to think on this one.   I could distress them, paint them, draw on them, whatever I wanted.

What would you make with these?  Please let me know what you think!

I have used paper bags in the past for another cool project...check out this tutorial with a PDF for brown paper bag recipe cards...its awesome!

Stay crafty!

Monday, October 31, 2011

A Food Tutorial!

First, before I do anything...

HAPPY HALLOWEEN!!!!!

OK, this is completely different, but here it goes...This is not a Trick, it is a Treat!

My husband and I are on a low carb diet, so that means no bread.  Which, when making casseroles, means no bread crumbs to grace the top...until now.


I love these Mission Carb Balance Tortillas. They are only 6 net carbs per tortilla, and are delicious.  We use them for wraps, enchiladas, anything you can do with a tortilla.  I have made tortilla chips and shells for taco salads also.

I decided to try an experiment.  It worked beautifully!

I took one tortilla, cut it up, and dried it.  I just left it to sit out overnight, but you could do it in the oven also.


I broke up the pieces, and ground them in my food processor.


One tortilla made about 1/2 c of crumbs. Regular bread crumbs are about 20 carbs per 1/3 c, these are 6 carbs per 1/2 cup.  It doesn't sound like much, but those nasty little carbs add up.


I added the crumbs to some butter, and some Italian Seasoning.


I made Baked Sour Cream Chicken and topped them with my crumb mixture.  It was awesome!!!!  The crumbs provided the crunch that we love on a casserole!  (PS:  How do you like my Halloween kitchen in the background?)

Stay hungry, my friends!

And, for the kiddies...Have a SAFE AND FUN HALLOWEEN!!!

Friday, October 28, 2011

Recipe Mini Album by the Button Farm

When Jackie and I went to the CK Convention last year, we took this class by The Button Farm.  You should really check them out, they have magnificent album kits, and they have a monthly kit club.  I am waiting impatiently for that to start!
The album was an acrylic album, which I had never worked with before.  I learned a lot of tricks in dealing with these little beauties.  The paper is by Basic Grey.  I actually had more recipe cards than pages, so I created a few more out of cardstock when I got home.
Because I tend to write big, I made each recipe card a pocket, then added a double sided tag behind it so that I could  have plenty of room to write.  Now the problem is, what recipes to put in here!!

Stay hungry, my friends!

Wednesday, October 26, 2011

A Halloween Pumpkin

When I was on Paper Craft Planet where they were having a 3D Challenge, I saw a link to Archivers, where they have a tutorial for a pumpkin, and this is my attempt:


I think it turned out very cute!  I have it out for Halloween, but I can also use it throughout fall and Thanksgiving!!!  I used plain Bazzill cardstock, and inked the edges.  Others have used double sided papers.  It was fun and easy to make.  I am thinking about all sorts of other possibilities.

Stay Crafty My Friends!

Monday, October 24, 2011

An Old Halloween Project

Back in 2005 my husband and I had a Halloween Party, and I made a book for keeping the recipes I wanted to use, party planning papers and such.  This is that book.  I found it today, whilst I was getting ready for our Halloween this year, and I thought you all would like to see it.
 This is a paper bag book, made out of full sized grocery bags, folded in half and the edges trimmed.  It is big enough to hold 8 1/2" x 11" papers!
 This was pre-Cricut days...so I created the recipe tombstones on my computer.  I hand cut all of the letters with stencils to make the titles for my pages.  I even created the tags, which I will show in a later picture.
 I don't know the line of papers I used, that was 6 years ago, sorry!
 I made up the "spooky" recipes by myself.
 The binding was a simple ribbon binding.
 Here are the tags I made.
This is just an example of what I have in my pockets.  It held magazine clippings, printouts from the net, and I even have pumpkin carving templates in here!  It was cool to find it buried under my cookbooks.  It was a mini time capsule.

Stay Scary, My Friends!