WELCOME!!

We are so glad you are here! We love making and sharing our projects, and we are excited to have you visiting our site. Please leave us a comment and let us know what you think!

Jackie and Michelle

Followers

Saturday, December 21, 2019

The tutorial for my "Home Again" Explosion Album is LIVE!!

Please join me over on YouTube for the tutorial on how to make this awesome little album! 

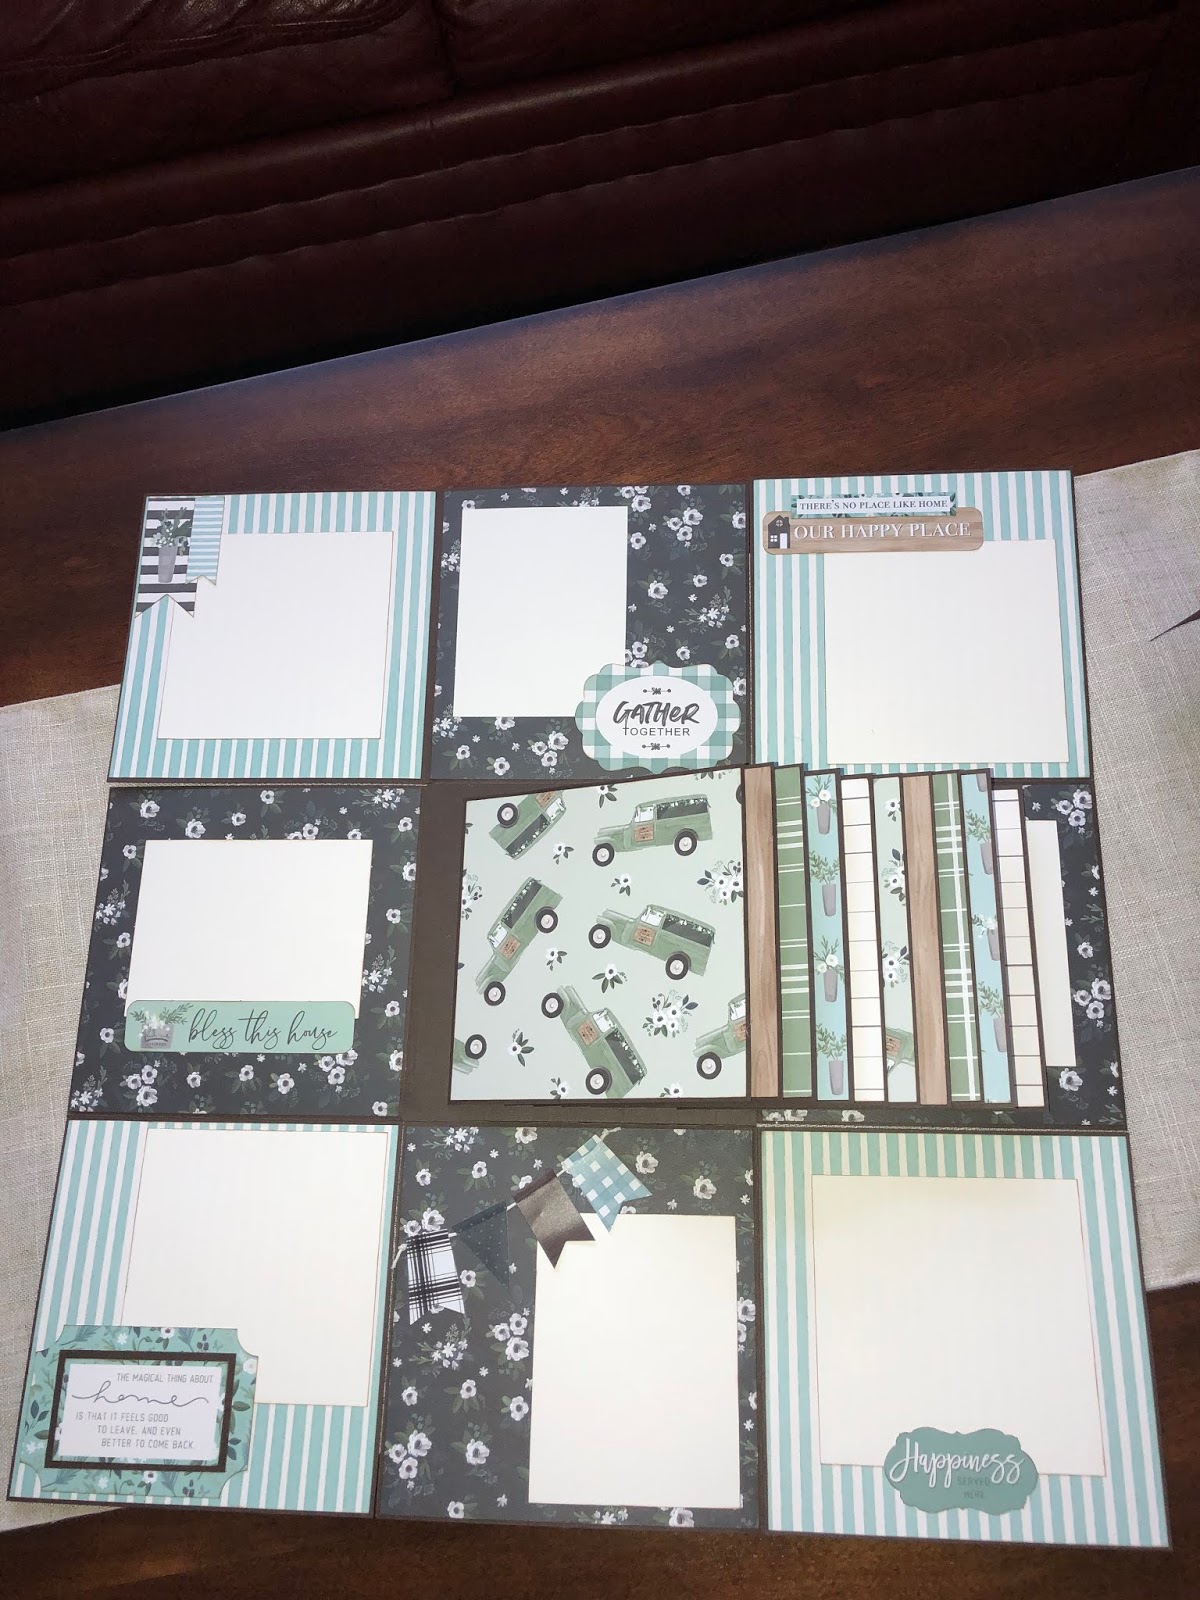
This is the second design team project I made for Country Craft Creations and I am using the "Home Again" paper line from Carta Bella.   I also used brown and ivory Artisan Cardstock.   Please visit Country Craft Creations for the supplies by clicking this link.

There is a little disclaimer I need to add...the video music is weird for a few seconds on the video, but then it is OK.  I'm not sure what happened, and I will try to fix it.  Please forgive me, I am not sure what to do or why it is that way.  UGH, technology!!!


Below is the cutting guide and the cutting list. 

I did not include the cutting guide for the "yard" base tray.  It is an optional part of this project.  If you do want to make it, you will need one piece of cardstock at 9 x 9", and strips of cardstock at 1 1/2" wide and a fence cutting die  (I used the Tim Holtz die), or a fence cutting file on a Cricut or Silhouette program.  

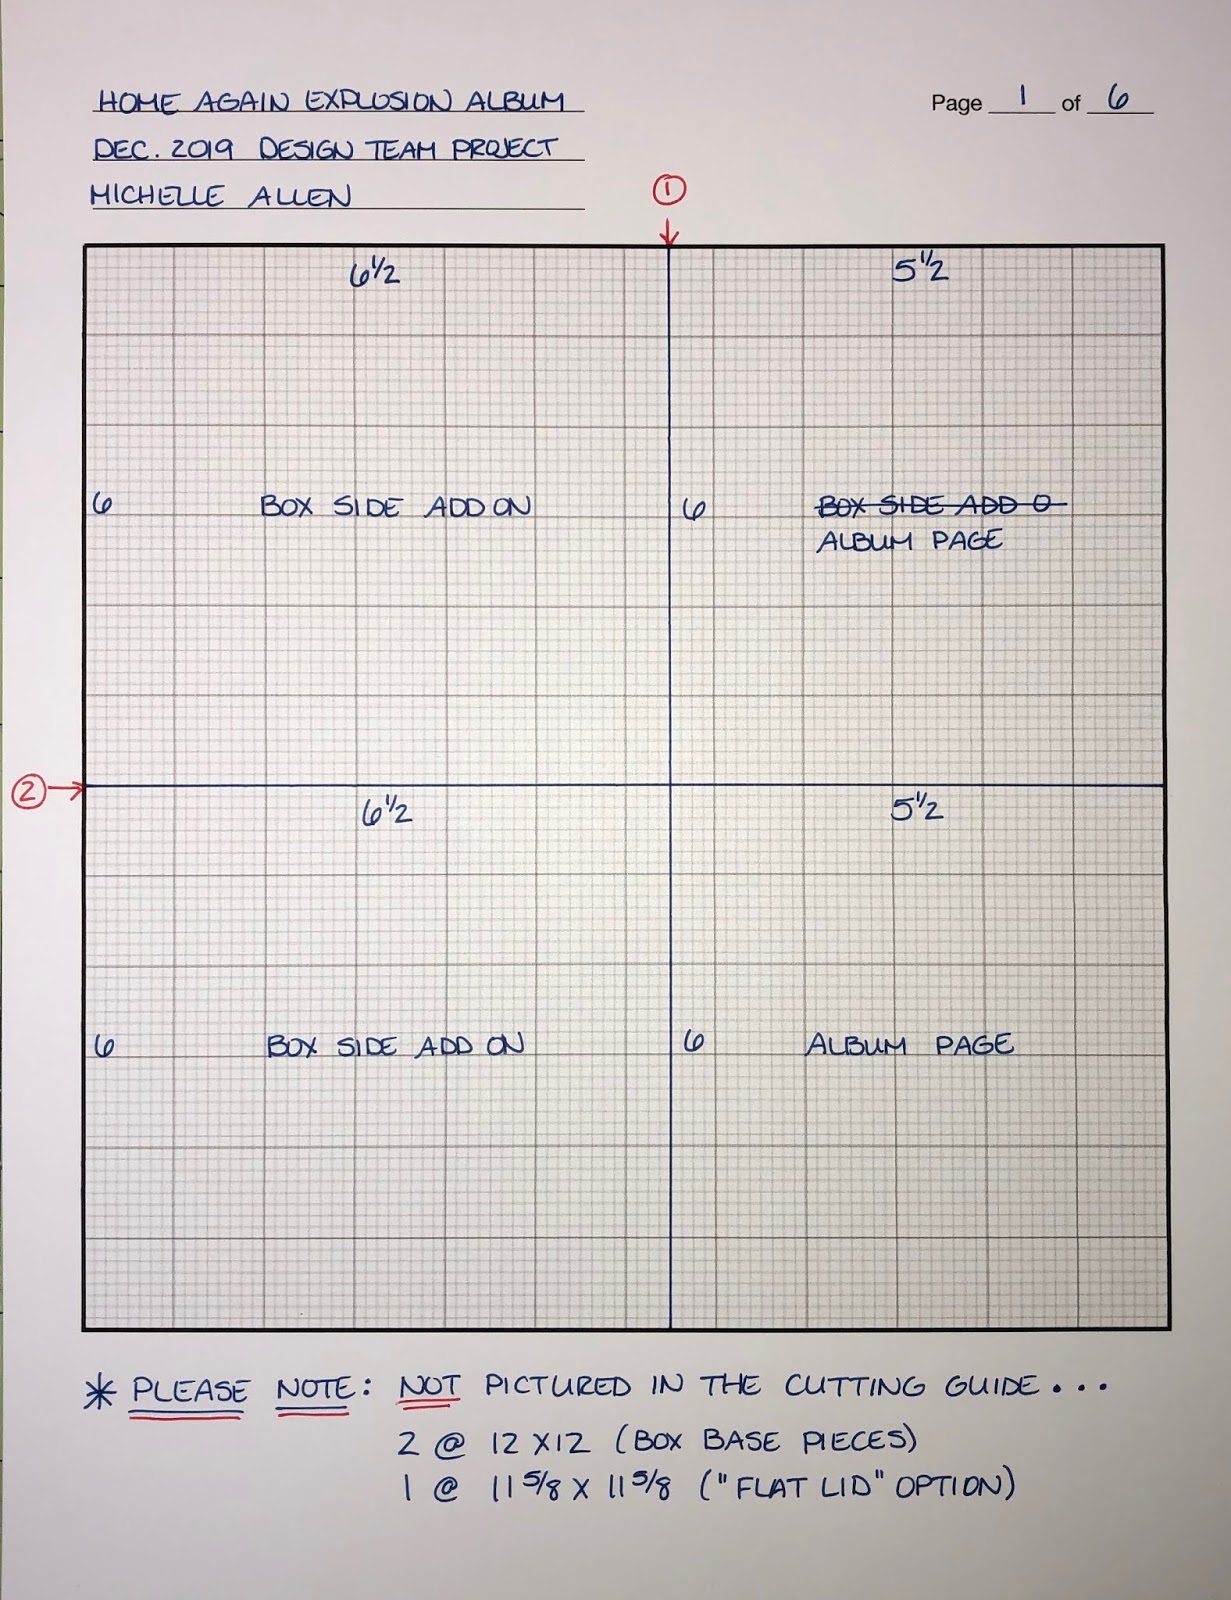
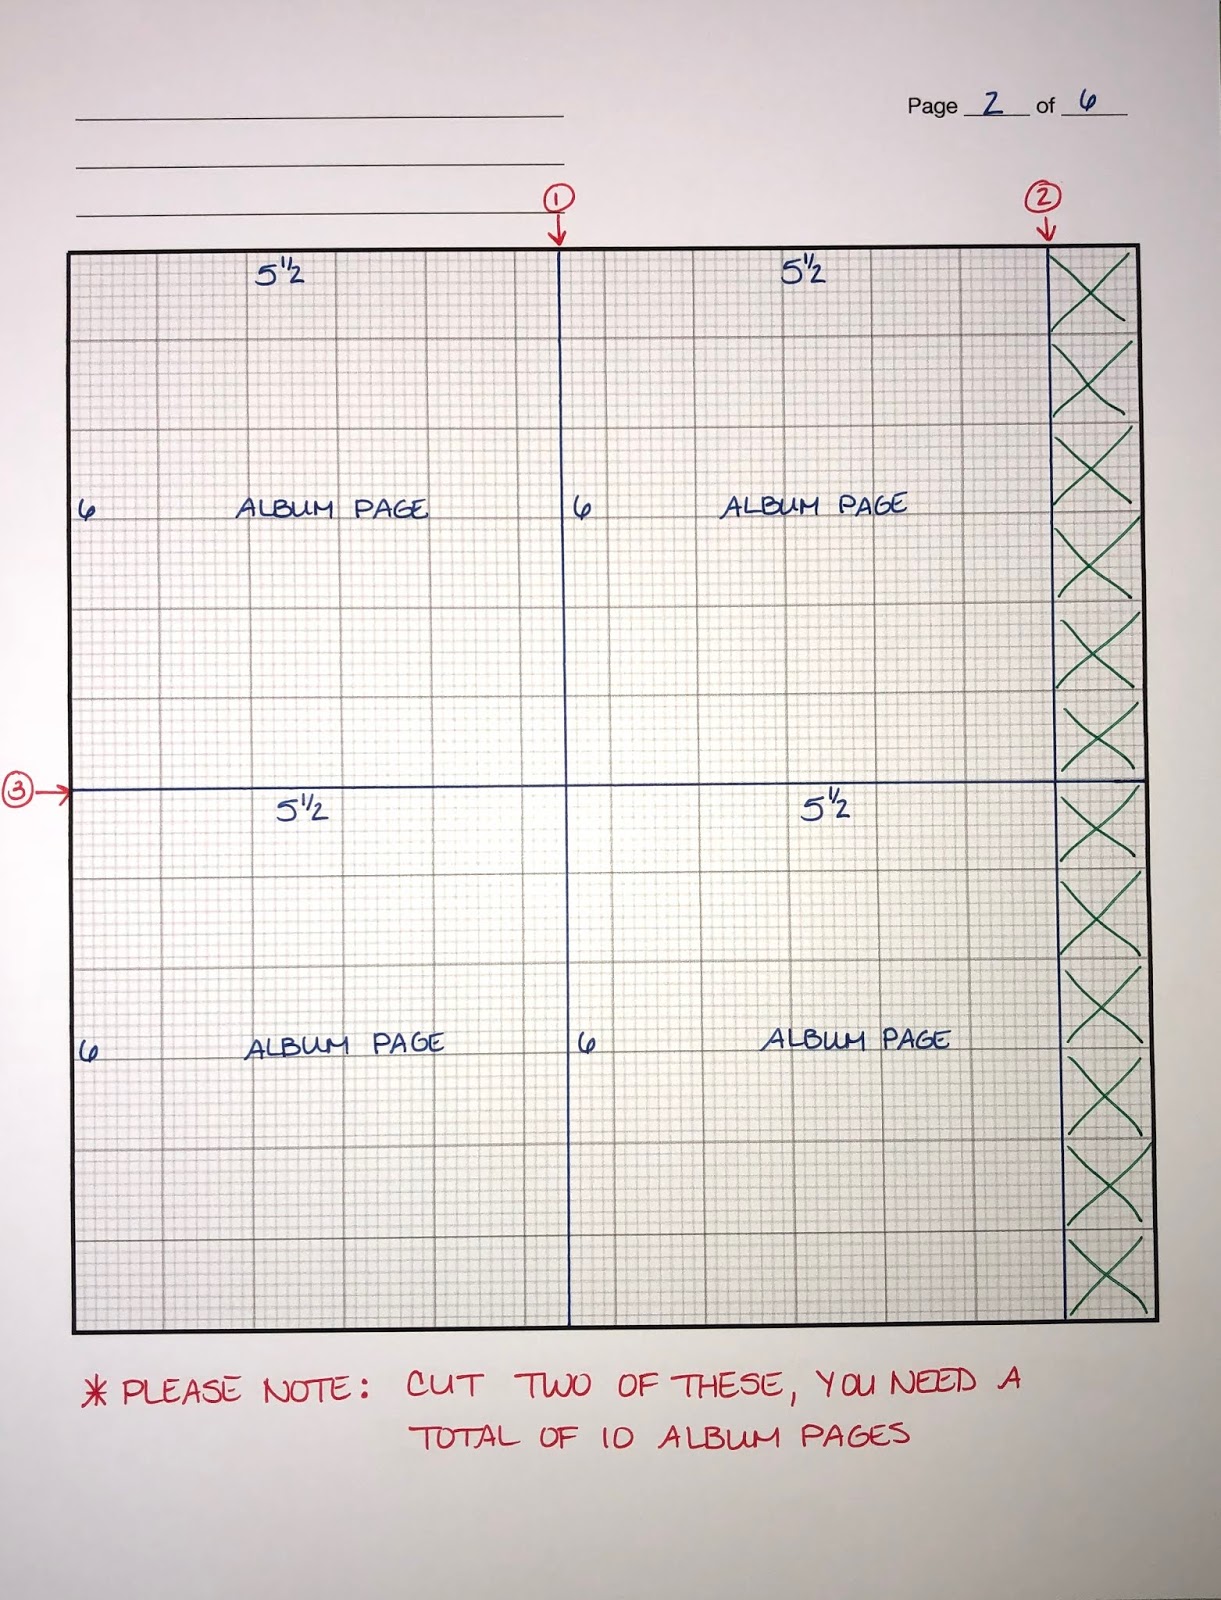
Here is the cutting list:  

PLEASE NOTE:  There are two lid options.  You do not need to cut out both the Flat and Roof Lid Pieces.  Only cut the one lid you choose to do the project with.  

Cutting list: Box Base: 2 at 12 x 12 Box Side Add On Pieces: 2 at 6 1/2 x 6 Album Pages: 10 at 5 1/2 x 6 "Flat Lid" Option: 1 at 11 5/8 x 11 5/8 "Roof Lid" Option: 1 at 7 1/8 x 12 "Roof Lid" Option Front and Back: 2 at 6 1/8 x 4 1/2 Mats for Inside of Box: 4 at 4 1/4 x 4 1/4 4 at 4 1/4 x 3 1/4

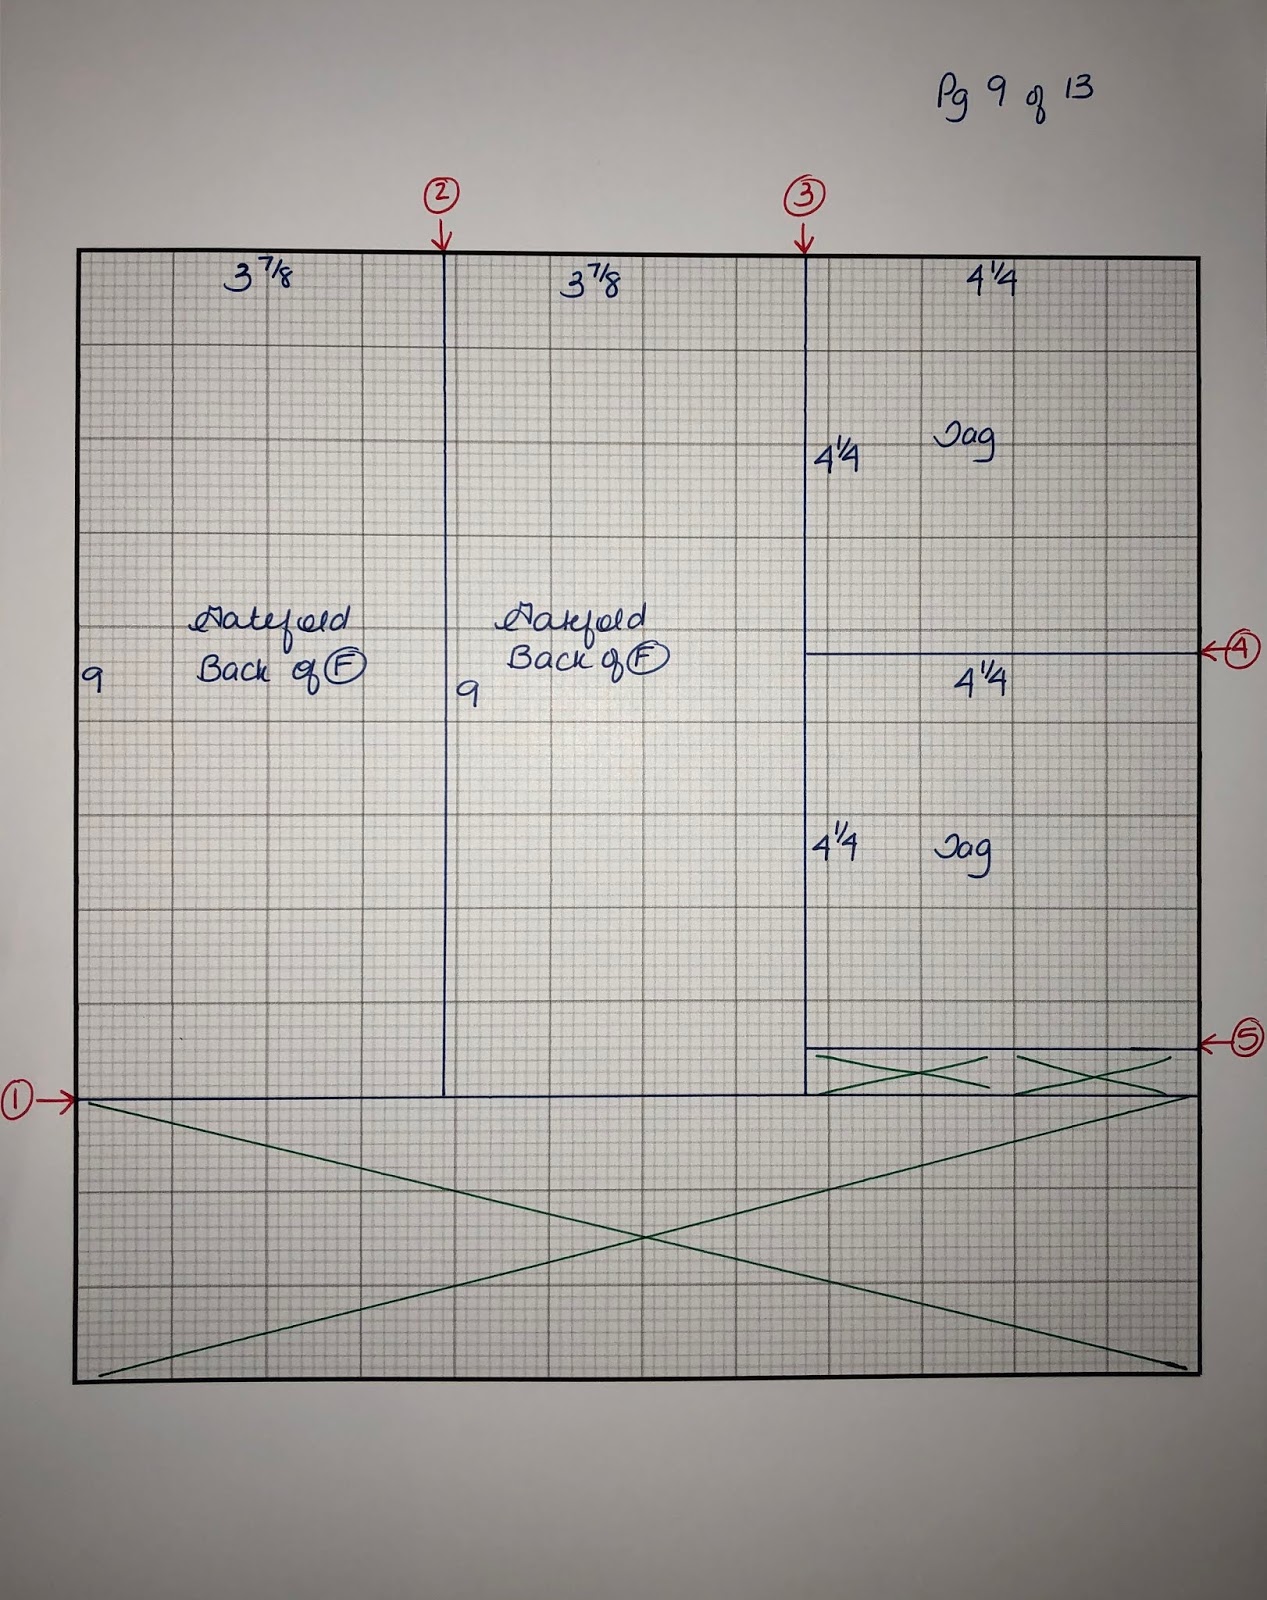
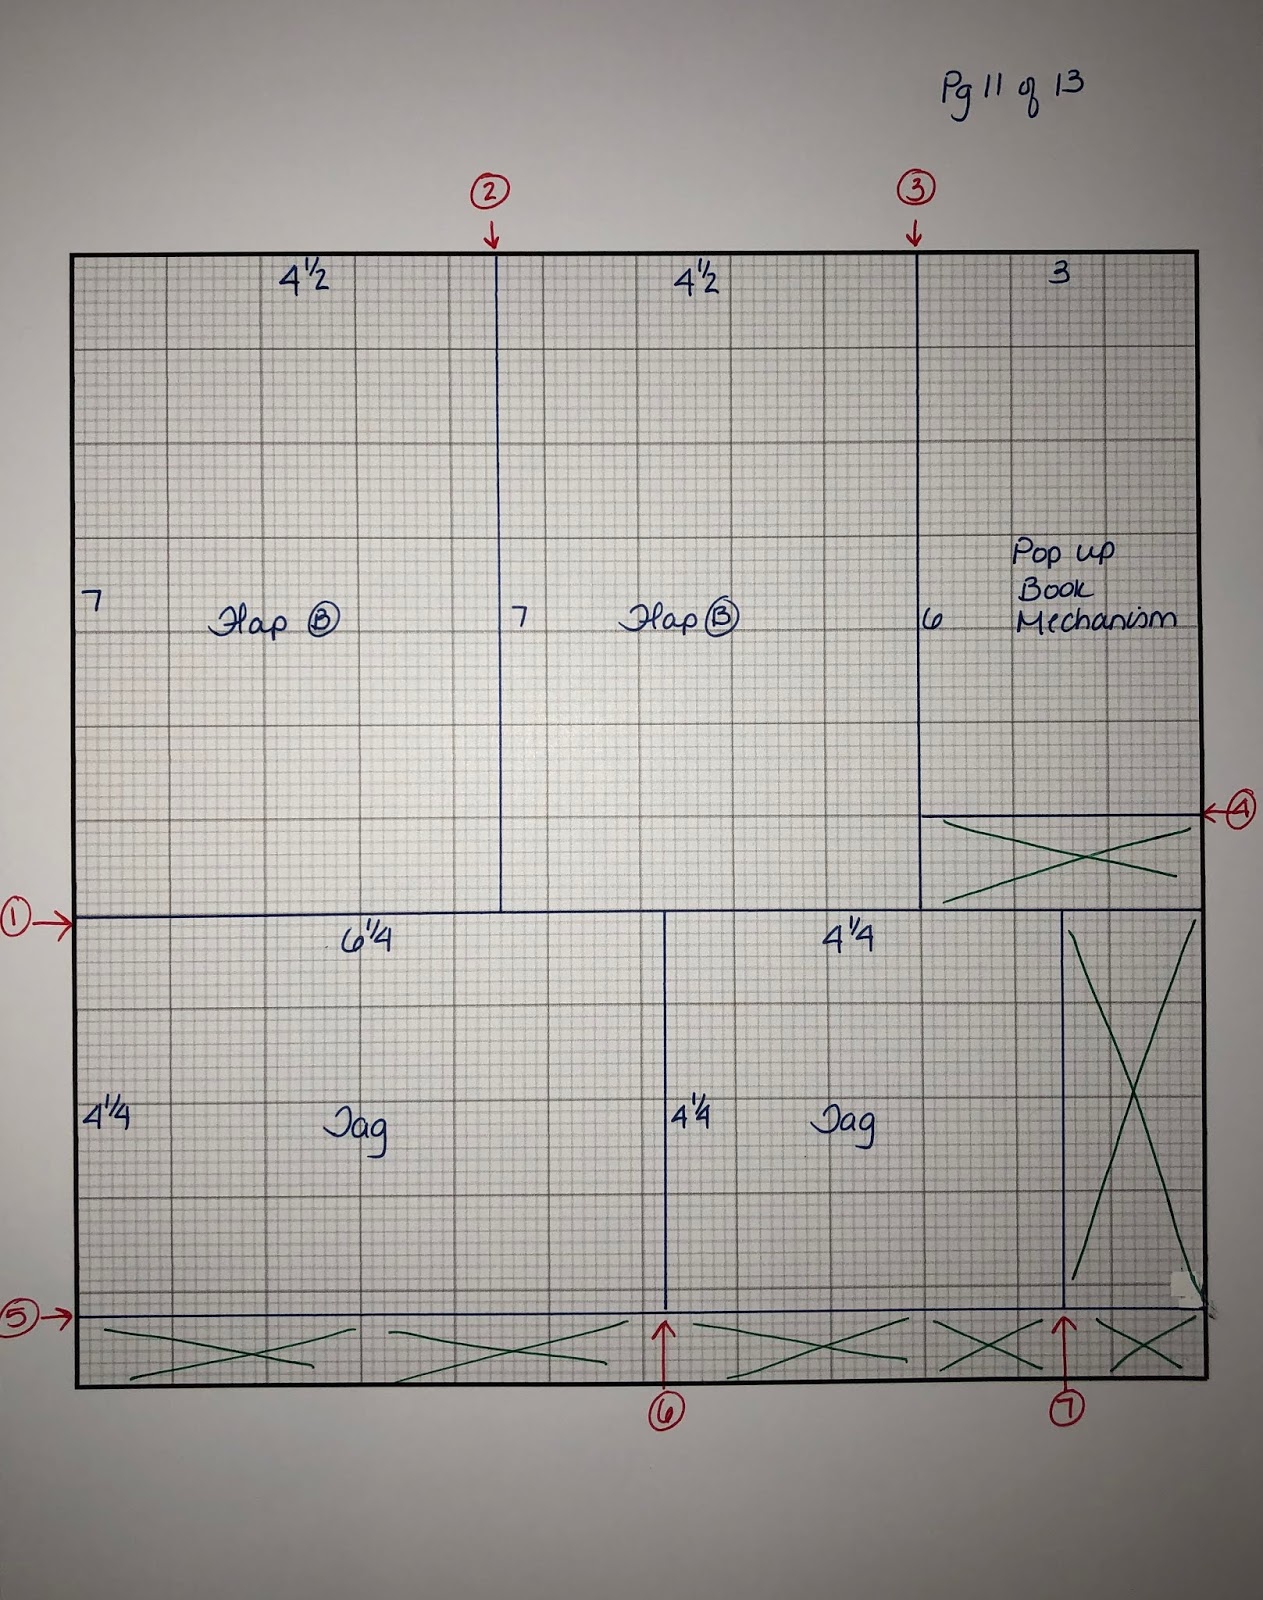
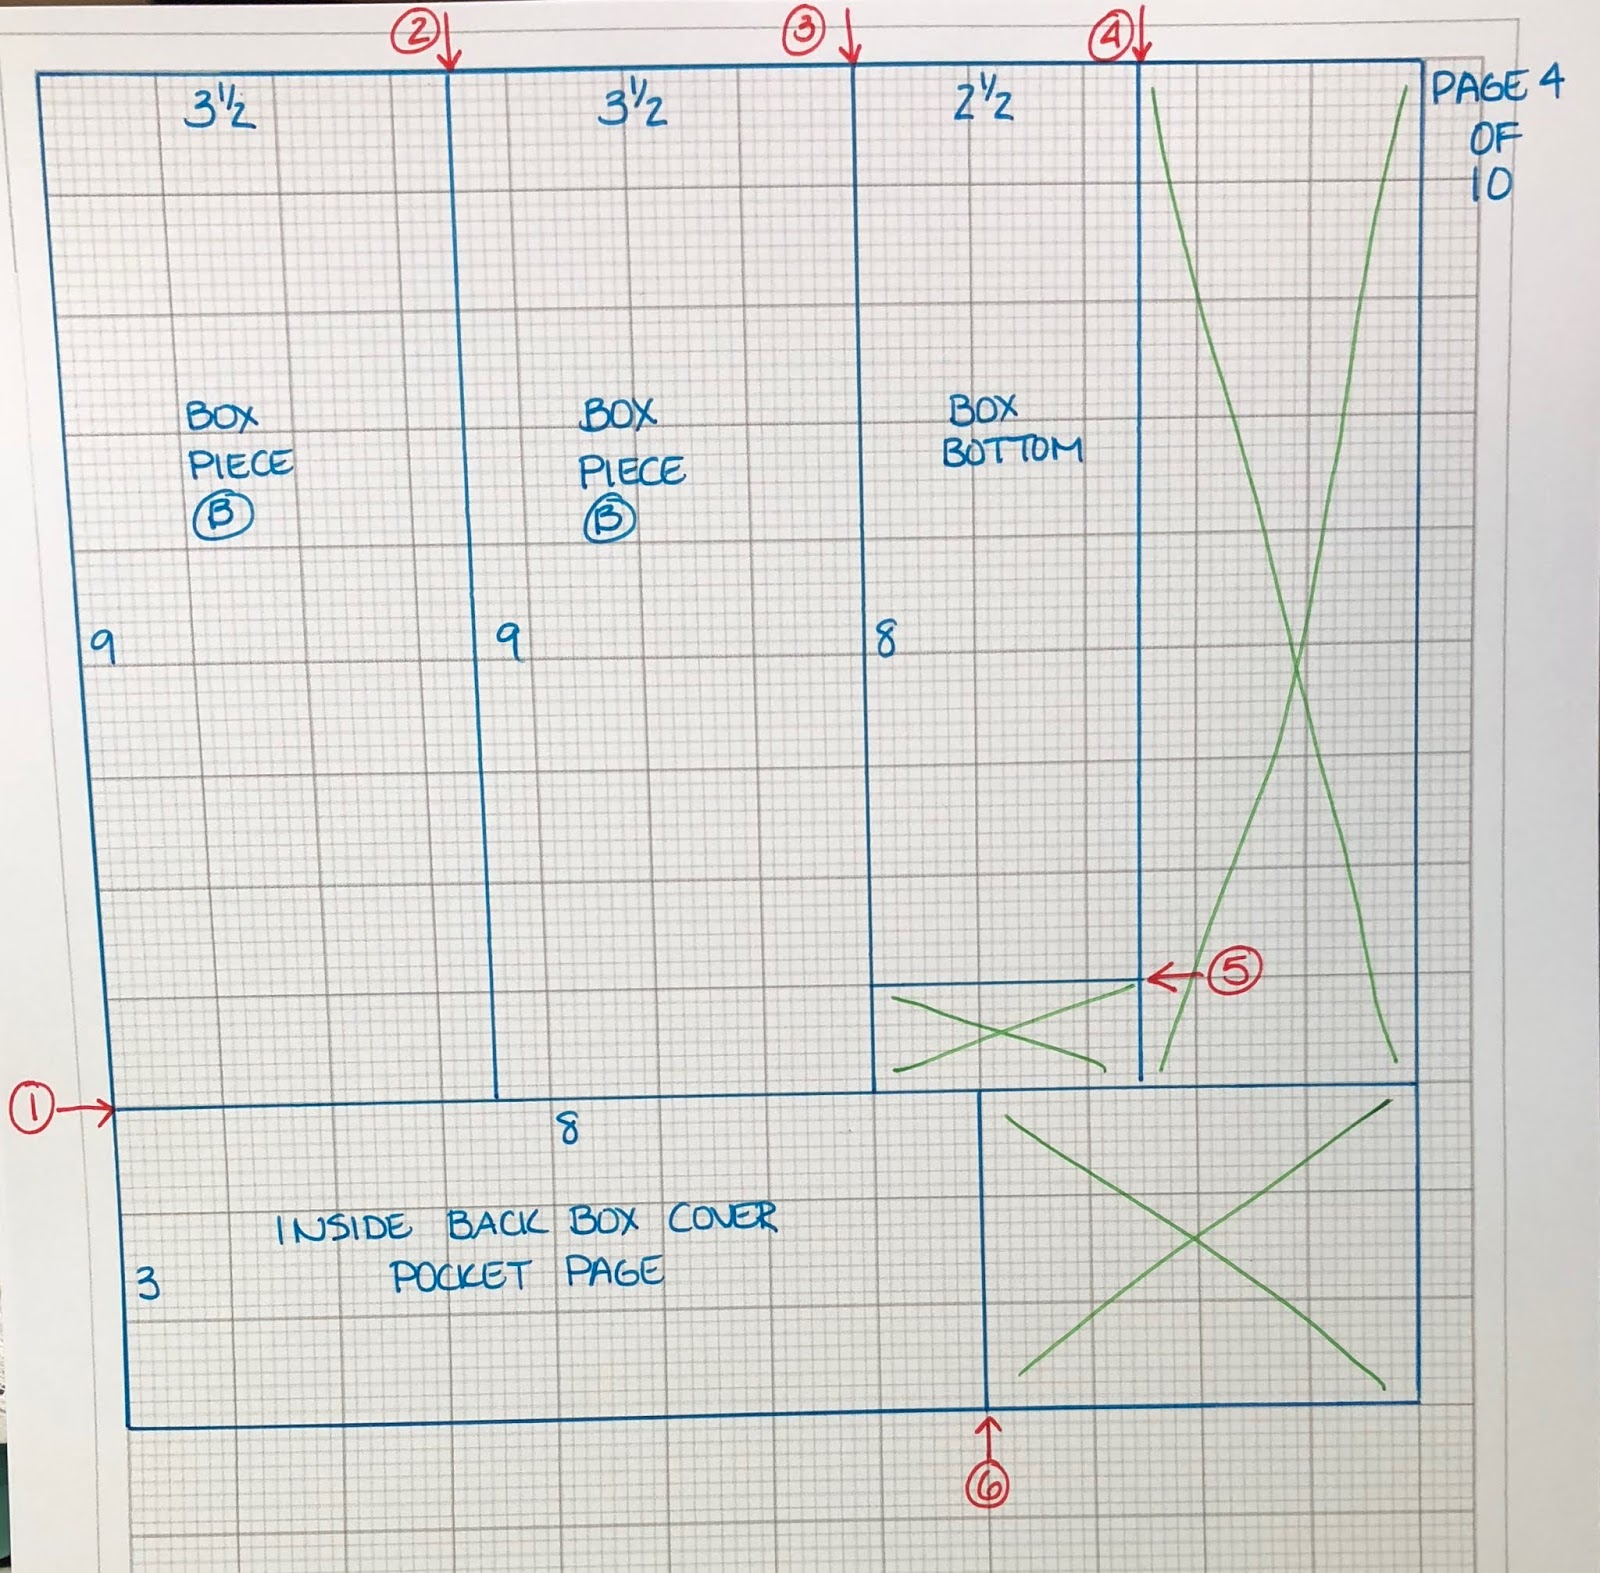
Here are the pictures of the cutting guide.  

PLEASE NOTE: There are two lid options. Please read the notes on the pictures to make sure you are cutting out the proper pieces for the lid option you choose.


Wednesday, December 18, 2019

"Home Again" Explosion Box Album

I have the walk through available on YouTube for this fun and easy album
 I am using the "Home Again" collection from Carta Bella that was given to me as part of my design team package for Country Craft Creations.  It turned out SOOOOOO CUTE!!
 I show you how to make the box/album, and two different lid options, the roof or a flat lid.  I will also show you how to make the "yard" tray.
Go on over to Country Craft Creations to get the fabulous papers, and the Artisan Cardstock.  The tutorial will be up soon!

Stay Crafty, My Friends!
Michelle

Saturday, December 14, 2019

"Home Again" Folio Tutorial is LIVE!

 Good morning!  The "Home Again" Folio Tutorial, which is my design team project for         Country Craft Creations, is LIVE!  Please visit my YouTube Channel for the tutorial.  I know you will like it!  
Below you will find the cutting guide (visual) for the cardstock used in making the base of this project. I also have a cutting list if you prefer that method.   I used brown Artisan cardstock that I purchased from Country Craft Creations, and it is a dream to work with.  I know you will love it!  

And if you are on Facebook, check out the Country Craft Creations page.  It is an amazing community of crafters, tutorials galore from all of the designers, and they are all free!

Thank you for looking and I hope you have a crafty day!
Michelle

CUTTING LIST: FOLIO BASE PIECES: Labeled A, B, C, D, E, and F. The video explains exactly what this means. A and D: 2 at 9 x 8" B and C: 2 at 9 x 8 1/2" E and F: 2 at 9 x 7 3/4" ADD ON'S TO THE BASE PIECES (Labeled per piece it goes on) A: Belly Band: 1 at 1 1/2 x 7 3/4" B: Side Flaps: 2 at 6 1/2 x 5" Top and Bottom Flaps: 2 at 4 1/2 x 7" Pop Up Book Mechanism: 1 at 3 x 6" Pop Up Book Card (Large): 1 at 10 x 7" Pop Up Book Card (small inside): 1 at 4 1/4 x 6 1/2" C: Pop and Twist Pop Up Card (inside): 1 at 4 1/2 x 12" Pop and Twist Card (outside): 1 at 7 1/2 x 5" 1 at 7 x 5" Pop and Twist Mechanism: 1 at 4 1/2 x 11" D: Belly Band: 1 at 1 1/2 x 7 3/4" E: Horizontal Pocket: 1 at 4 x 7 3/4" Gatefold Pieces: 2 at 5 x 6 3/4" Slider Closure Pieces: 2 at 3 1/4 x 4 1/4" Slider Closure Mechanism: 2 at 2 5/8 x 3 1/4 F: Vertical Pocket: 1 at 3 1/2 x 10" Gatefold Pieces: 2 at 9 x 3 7/8" Gatefold Closure: 1 at 4 1/4 x 4 1/4" Tag for Closure: 1 at 3 x 6"

Below is the visual Cutting Guide:


Friday, December 13, 2019

"Home Again" Folio

 Good Evening!  I have a walk through video available for my latest design team project for 
 I created this awesome folio using the collection "Home Alone" by Carta Bella.  It is so pretty!!!  I also used Artisan Cardstock from Country Craft Creations.  Believe me, once you try this cardstock you will never want to use any other kind of paper.  
 The tutorial should be available in a couple of days.  Please stop by my YouTube channel and check it out.  I really think you are going to like it!  The walk through is here!
 Thank you so much for stopping by.  
Stay crafty, my friends,
Michelle

Friday, November 29, 2019

Christmas Tree Box and Album Tutorial

My tutorial is live on YouTube!  YAY!
 In the video I will show you how to make the box and the album.  I will be using Echo Park's "Twas the Night Before Christmas, Volume 2" for the tutorial.
 It is an easy project to do and one that I think you will love.  Please come and check it out!
Here is the link to the video.

Below is the cutting guide so that you can maximize the use of the cardstock.  I also show you a really cool way to get four 4 1/2 x 6 1/2 mats out of one sheet of cardstock!


Thanks for stopping by, and I hope you have fun with this project.

Stay crafty, my friends!

Wednesday, November 20, 2019

Christmas Tree Box and Mini Album

 Good evening!!!  I have made this album using papers I bought when I was at the latest Creating Keepsakes Convention a couple of weeks ago.  I used Authentique's "Alpine" paper line, and I think it turned out wonderful!
 I wanted to make a Christmas Tree shaped box.  The box could be done separately and used as a gift box, but the album inside is just awesome to place into it for a gift.
I have a video share that covers the whole project.  I hope to have a tutorial done very soon.

Thanks for visiting, and don't forget to stay crafty!!!

Michelle

Saturday, November 16, 2019

Christmas Album in a Box Tutorial

 Hello!  I created this album in a box and I have done a tutorial for it on YouTube.  I wanted to share a few pictures and give the link to the video.  Below you will find the cutting guide pictures for the card stock and the cutting list.
 This album is fun...The box folds open, almost "explosion" style to reveal an inner box that holds the album in place.  The inside covers also have a pocket and a waterfall feature.
 This would be a fun album to do for lots of different themes, birthdays, babies, etc.

I used Graphic 45's "Christmas Magic" collection.  I had used some of it for my "Perpetual Accordion Album" project I did for Country Craft Creations Christmas in July design team project.  If you are interested in visiting that tutorial you can find it here.    I had purchased all of the paper, including the Artisan Cardstock at Country Craft Creations.  Visit the store and see what wonderful supplies she has in stock for you!
So the link to the tutorial video on YouTube can be found here.

You will be using 10 sheets of cardstock, and one magnet. I used about 2/3rds of a pack of patterned papers. Cutting List: Box Piece A: 2 at 9 x 10 Box Piece B: 2 at 3 1/2 x 9 Box Bottom: 1 at 8 x 2 1/2 Inner Box: 1 at 7 1/2 x 12 Lid Piece A: 1 at 10 5/8 x 11 1/4 Lid Piece B: 1 at 4 1/2 6 5/8 Inner Back Box Cover Pocket 1 at 3 x 8 Inner Front Box Cover Waterfall: Pages: 6 at 4 3/4 x 6 1/4 Closure: 1 at 4 1/4 x 6 3/4 Mini Album Cover: 1 at 7 1/2 x 12 Mini Album Pages: 3 at 7 1/4 x 5 5/8 Mini Album Page 3 pockets: 2 at 3 x 6 1/4 Mini Album Page 4 Photo Mat: 1 at 4 1/4 x 6 1/4 Mini Album Page 4 Booklet: 1 at 4 1/2 x 4 1 at 4 1/2 x 3 1/2 Mini Album Page 5: Pocket Flap A, 1 at 4 x 7 1/2 Pocket Flap B, 1 at 4 x 6 1/2

Below you will find the cutting guides to show you how to cut your card stock.


Thanks for stopping by, and thanks your support.

Stay crafty, my friends!
Michelle