Hello, and welcome to my channel. Today's tutorial was inspired by some mini's I have done with the inspiration of Tiffany of Let's Get Scrappy. Today I have a new size and an idea for a folio inside the mini. I used scraps from my #paperstashsmash papers, and also scraps from Echo Parks Little Lumber Jack for the other. These are too cute and feature MINI POLAROIDS!!! I can't stand all of the cuteness in one place! :) Her original tutorial is here, https://youtu.be/ddJWnyaaAaY?si=UGvWkvlATrBRD9sw I made some using her tutorial for my Christmas Craft Fair, and that share video is here, https://youtu.be/uvU8pmO_5tg All of the measurements are in the video, so get a pen and paper. It's really easy and fun and makes adorable gifts. Stay crafty and I will see you soon! #craftfair #minialbumtutorial #weddingalbum ❤️2025 #paperstashsmash playlist ❤️2026 #paperstashsmash playlist 🌺My social sites: Instagram Facebook Pinterest Blog This video was made with iMovie for iPhone and music used was provided by the iMovie app. Canva used for thumbnail, dividers and end screen creation.

Showing posts with label scrapbook scrapbook tutorial. Show all posts
Showing posts with label scrapbook scrapbook tutorial. Show all posts
Monday, January 12, 2026
Micro Mini Album FREE TUTORIAL, using Echo Park's Wedding Bliss and Little Lumber Jack! #paperstashsmash
Hello, and welcome to my channel. Today's tutorial was inspired by some mini's I have done with the inspiration of Tiffany of Let's Get Scrappy. Today I have a new size and an idea for a folio inside the mini. I used scraps from my #paperstashsmash papers, and also scraps from Echo Parks Little Lumber Jack for the other. These are too cute and feature MINI POLAROIDS!!! I can't stand all of the cuteness in one place! :) Her original tutorial is here, https://youtu.be/ddJWnyaaAaY?si=UGvWkvlATrBRD9sw I made some using her tutorial for my Christmas Craft Fair, and that share video is here, https://youtu.be/uvU8pmO_5tg All of the measurements are in the video, so get a pen and paper. It's really easy and fun and makes adorable gifts. Stay crafty and I will see you soon! #craftfair #minialbumtutorial #weddingalbum ❤️2025 #paperstashsmash playlist ❤️2026 #paperstashsmash playlist 🌺My social sites: Instagram Facebook Pinterest Blog This video was made with iMovie for iPhone and music used was provided by the iMovie app. Canva used for thumbnail, dividers and end screen creation.


Monday, June 6, 2022
Rustic Sunflower Mini Album Tutorial, a Design Team Project for Country Craft Creations
Hi and welcome back to my channel. Today I have a tutorial for you on my album made as a design team project for Country Craft Creations. I'm using the Heartfelt Creations paper collection called "Rustic Sunflower" and I think I have made a cute project. I was endeavoring to use the 6x6 cutapart pages for this album, and the other odd sized cutaparts in this collection. I made the album first to show you, and then we will be using "Heart Of Courage" from Country Craft Creations for the tutorial.
This album is unique, as I am using a different idea for a binding system. Although it is not the same, seeing this album by Bobbie (another Country Craft Creations designer) gave me an idea. I'll explain during the video. Also, I did a little something different in the cover, inspired by Nicole (another Country Craft Creations designer). Here are their links to their channels/videos. Bobbie, the video that gave me an idea is here...I love these little gems! Nicole's channel is here, and she shared the idea for the cover. Below is the cutting guide. This album doesn't take much, and as I said, it was built around the 6x6 cutaparts in the paper collection. Thanks for watching and I'll see you again soon. COVER: Chipboard 2 - 7 x 7 1 - 2 5/8 x 7 Cardstock 2 - 9 x 9 1 - 6 x 9 1 - 6 x 6 7/8 BINDING PIECES: 2 - 5 x 1 7/8 1 - 3 x 1 7/8 PAGES: There are two other smaller pages as part of this album, and it will be discussed in the tutorial. These all depend on the size of the cutaparts used. 4 - 12 x 6 1/2 SUPPLIES USED: Chipboard, heavy weight, 2 - 12 x 12 Artisan Cardstock, main color (I used Natural), about 8 sheets of 12 x 12 Artisan Cardstock in contrasting color (I used Brown for the Heartfelt book and Burgundy for the Hearts of Courage Book), about 5 sheets of 12 x 12 Heartfelt Creations "Rustic Sunflower" "Heart of Courage" by Country Craft Creations, it is out of stock right now but other great papers are available here, all exclusive to Country Craft Creations Seambinding, in Ivory, Deep Navy and Goldenrod Art Glitter Glue, Scor Tape and Foam Tape Prima Frames Flowers by Graphic 45 and 49 and Market STASH SUPPLIES: Lady bugs Brad, jump ring, chain and charms
Friday, June 4, 2021
Retro Men Configuration Page Mini Album Tutorial
The tutorial finally decided to upload! Yipee! I hope you like it!
This is my first project using "Retro Men", the exclusive paper collection from Country Craft Creation, and I love it!!! I hope you do too! If you would like to get some of this paper for your own, head on over to the store. Country Craft Creations is an amazing store, and community, and you will not be disappointed.
There is a full cut list in the video description.
Have fun!
Michelle
Wednesday, December 23, 2020
Simple Vintage Ancestry Album, Tutorial #1, is available!!!

Hello and Merry Christmas! I have a wonderful tutorial for you today. It is actually the first in 4 videos that I will have in this series. I am presenting my December design team project for Country Craft Creations! I am using Simple Stories, "Simple Vintage Ancestry" paper collection and it is AMAZING! I am totally in love with this project and I can not wait to share it with you! It is a huge album and it will require quite a bit of supplies, but it is soooooo worth it. The idea for this album is for an album that you can document a couple family genealogy and then pass it down to your children for a heritage keepsake. Please visit Country Craft Creations for your supplies!!!

This video is the first in a series. I have pictures in the beginning and end of the finished piece. During this video we will do a walkthrough of the prototype of the album we are going to make together! I rarely do this type of tutorial, but we are going to go through everything step by step. We will also go over the supplies I received in the design team package and the supplies I purchased to add to it. I will also make the cover of the album. The cover is a wrap around cover that I think you will like. The other videos showing the page construction and how to make the family chart will come soon, within a couple of days. I am working hard on the editing. Below is a supply list. I will also have a cutting guide. The cutting guide is useful to show you how to cut your card stock so that you can make the most out of it with little waste.
Thanks for stopping by and for your support. Have a wonderful Holiday Season!!
SUPPLIES USED:
Chipboard, 2 at 12x12
Score Tape Sheets, 4
Large Magnets x 6
Patterned paper, Simple Stories, “Simple Vintage Ancestry”, 24 sheets of 12x12” (this includes the cut apart sheets for adding to the pockets in the album), 7 sheets of 6x8”, and 7 sheets of the 12x12 solid color papers that coordinate with this paper line
Cardstock: Artisan, 12x12, 21 sheets of Black and 5 sheets of Brown
Seam binding, about 6 yards
Scoretape, 1/4”; and Art Glitter Glue
Distress ink for the papers if desired
Miscellaneous die cuts, stickers, flowers, etc. for decoration of the album.
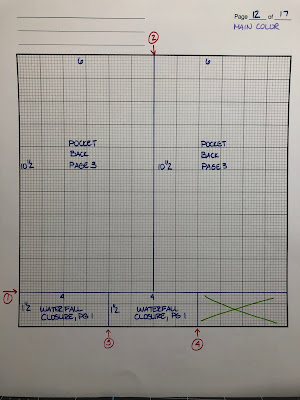
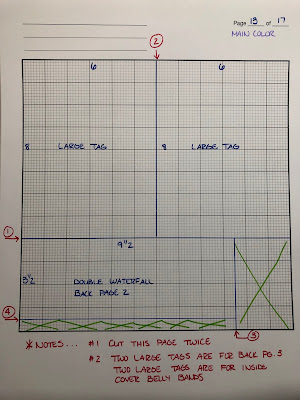
CUTTING LIST: (Scoring and patterned paper cuts will be given during the videos)
Chipboard:
1 at 8 x 10
1 at 7 7/8 x 10
2 at 2 3/4 x 10
1 at 1 3/8 x 10
All cardstock below is to be cut in the main color, I used Black. The brown cardstock was used for mats and for the genealogy booklet we will make.
Cardstock to cover the chipboard:
2 at 5 3/4 x 10
2 at 10 x 12
1 at 4 3/8 x 12
1 at 9 7/8 x 5 3/4
1 at 9 7/8 x 2
PAGES: Note that we are making two sets of pages, one group for each side of the album. Also, the pages will be scored at 3/8” for the tab that binds it to the album.
Page 1: 2 at 6 7/8 x 8 1/2
Page 2: 2 at 7 3/8 x 9
Page 3: 2 at 7 7/8 x 9 1/2
Page 1 Front:
Stacked Waterfall
2 at 10 x 6 1/4
2 at 9 x 6 1/4
Water fall closure, 2 at 4 x 1 1/2
Page 1 Back:
Gatefold
4 at 8 1/2 x 3 3/4
2 at 8 1/2 x 3 1/4
Page 2 Front:
4 at 8 1/2 x 6 (Main Flaps)
2 at 6 1/4 x 4 1/4 (Flip up A)
2 at 6 3/4 x 4 1/4 (Flip up B)
4 at 4 3/4 x 6 1/4 (Top Flap add on pieces)
4 at 6 x 2 1/2 (Bottom flap pocket pieces)
Page 2 Back:
2 at 3 1/2 x 8 (Pocket)
Double Waterfall:
4 at 9 1/2 x 3 1/2
Page 3 Front:
4 at 9 1/2 x 5 3/4
Page 3 Back:
2 at 10 1/2 x 6 1/2
Inside Back Cover Belly Bands: Cut these and score at 1/2” on each end. In the video I didn’t cut the inside back band at 8 3/4 and had to adjust. These measurements are correct.
1 at 2 x 8 7/8 (Inside Front)
1 at 8 3/4 (Inside Back)




Wednesday, September 16, 2020
Masquerade Mini Album Tutorial

Good day to you all!!!
I have the tutorial available for my latest mini album. This is a design team project that I did for Country Craft Creations. I am using Authentique's "Masquerade" paper collection and I think you are going to love it! I had some fun coming up with a couple of new ideas, and I have incorporated one of my other waterfall assemblies from a previous project in it. There are a ton of places for photos!
The video is a little on the long side, but it is worth the time...you will love this album. I love, love, LOVE Halloween, and this paper was a JOY to work with. You can find the video tutorial here.
Along with the "Masquerade" paper collection and Authentique's Spectrum (black, that I used for the large pocket tags) from Country Craft Creations, I also used Artisan cardstock in black and brown, chipboard, Scoretape sheets, Art Glitter Glue, and Seam Binding. The flowers, bling, and the frame on the cover were from my stash...from Recollections and Tim Holtz. The cover frame will hold a 4 x 6 photo.
Below are pictures of the cutting guide, and I also have a cutting list as well. You will need at least 7 sheets of patterned paper (that is what I used, more may be needed depending on how you cut it!), 14 sheets of black and 5 sheets of brown. I try to the absolute best of my abilities to keep a count of all that is used, but I am human, so I apologize if there is an error. If you notice something or have questions, please let me know!
I hope you enjoy the tutorial and make the album. It will be a fun one to look through in the years to come.
Happy Halloween!!!
Please note: There are cutting guides for BLACK and BROWN cardstock. Photos 1-10 are Black, then after there are photos 1-3 for Brown.


Masquerade Mini Album Tutorial Cutting Guide
Michelle Allen
Country Craft Creations Design Team Project
#3 for August/September, 2020
Chipboard
2 at 8 1/2 x 7
1 at 8 1/2 x 2
Cardstock to cover chipboard (black)
2 at 9 x 10 1/2
1 at 5 1/2 x 10 1/2
1 at 5 1/2 8 3/8 (inner spine cover)
Pages (black cardstock)
4 at 8 x 7
4 at 5 x 8 (pockets)
Inner front cover
Black cardstock
2 at 6 x 12
Brown cardstock
1 at 4 x 6 (photo mat)
1 at 4 1/2 x 6 1/2 (element base)
1 at 3 x 6 (tag)
Front page 1
Black cardstock
1 at 4 3/4 x 6 3/4 (large pocket photo mat)
1 at 4 x 12 (accordion)
Back page 1
Black cardstock
1 at 4 x 9 (pocketed belly band)
2 at 4 x 6 (mats)
2 at 3 x 4 (mats)
Brown cardstock
1 at 6 3/8 x 7 7/8 (mat for page)
Front page 2
Black cardstock
1 at 4 3/4 x 6 3/4 (tag)
2 at 3 x 4 (mats)
1 at 3 1/4 x 6 1/2 (tag)
Back page 2
Black cardstock
2 at 3 3/4 x 8 (gatefold pages)
4 at 3 x 8 (mats)
Brown cardstock
2 at 3 1/8 x 7 7/8 (back of gatefold)
1 at 6 3/8 x 7 7/8 (page mat)
Front page 3
Black cardstock
1 at 4 3/4 x 6 3/4 (large tag)
1 at 4 x 12 (photo mat)
Brown cardstock
1 at 4 1/2 x 6 1/2 (element base)
Back page 3
Black cardstock
1 at 4 x 9 (pocketed belly band)
2 at 4 x 6 (mats)
2 at 3 x 4 (mats)
Brown cardstock
1 at 6 3/8 x 7 7/8 (mat for page)
Front page 4
Black cardstock
1 at 4 3/4 x 6 3/4 (tag)
2 at 3 x 4 (mats)
1 at 3 1/4 x 6 1/2 (tag)
Brown cardstock
1 at 3 1/8 x 6 3/8 (mat for tag)
Back page 4
Black cardstock
2 at 4 1/2 x 6 1/2 (gatefold pages)
2 at 4 x 12 (photo mats)
Brown cardstock
1 at 6 3/8 x 7 7/8 (page mat)
2 at 3 7/8 x 6 3/8 (mats for back of gatefold pages)
Inside back cover
Black cardstock
2 at 6 x 9 1/2
2 at 6 x 8 1/2
Saturday, September 7, 2019
Prototype Share Day!
As you all know, I have been given the opportunity to be on the design team for
Country Craft Creations. I love that company and I am having so much fun designing for them.
When I make an album and am creating a tutorial, I make a prototype album first to work out kinks and make sure that the album design is good before I use the products that they give me to use.
I thought I would share today the prototype albums I made for my July Projects.
The first one was the prototype for my "Journey" album using Carta Bella's "Let's Adventure" collection. You can see the original blog post here.

I used papers from Hot Off The Press that I had in my stash for this prototype. I just love how it turned out.


The embellishments were from K & Co. Again, I was hoarding these ins my stash and it was time I used it!


The colors matched perfectly.

The second project that I did for July was the Passport Holder. This is a great project!

For this prototype I used papers by Tim Holtz that I was hoarding. I am glad I finally used it.


The picture above shows the pocket flap open to hold the passport.


Thanks for stopping by and checking this out. I will also do a post showing the prototypes I made for my August projects. I am currently designing the September projects along with getting ready with some Halloween Goodies!
Stay Crafty, My Friends!!!
Michelle
Subscribe to:
Posts (Atom)