WELCOME!!

We are so glad you are here! We love making and sharing our projects, and we are excited to have you visiting our site. Please leave us a comment and let us know what you think!

Jackie and Michelle

Followers

Wednesday, May 27, 2020

Hooray Easel Album Tutorial

HELLO!!!

Today I have the tutorial for my Hooray Easel Album! This is my 3rd design team project for Country Craft Creations using Authentique's adorable "Hooray" paper collection! I was also given Carta Bella's "Dots" papers, which matched PERFECTLY with the papers. This album was designed with the thought of documenting the first 10 birthdays in a child's life, but there are so many other things you can do with this album!! I give a list of ideas in the video.


Along with the papers mentioned above, I used 9 sheets of denim Artisan Cardstock, 3 Ivory Artisan Cardstock, and a lot of the patterned paper scraps. I estimate that if you were to use patterned paper for the entire project instead of utilizing scraps you would need about 6-7 sheets. You will also need book rings (at least 1 1/4"), eyelets (optional), seam binding for the closure, and Art Glitter Glue. You can get the papers, glue and seam binding at Country Craft Creations.


Below is a cutting list for the cardstock and the mats with the papers needed, if you do choose to do the pages as I did in the video.


Thanks for watching. Let me know if you have any questions. Stay safe and stay crafty!


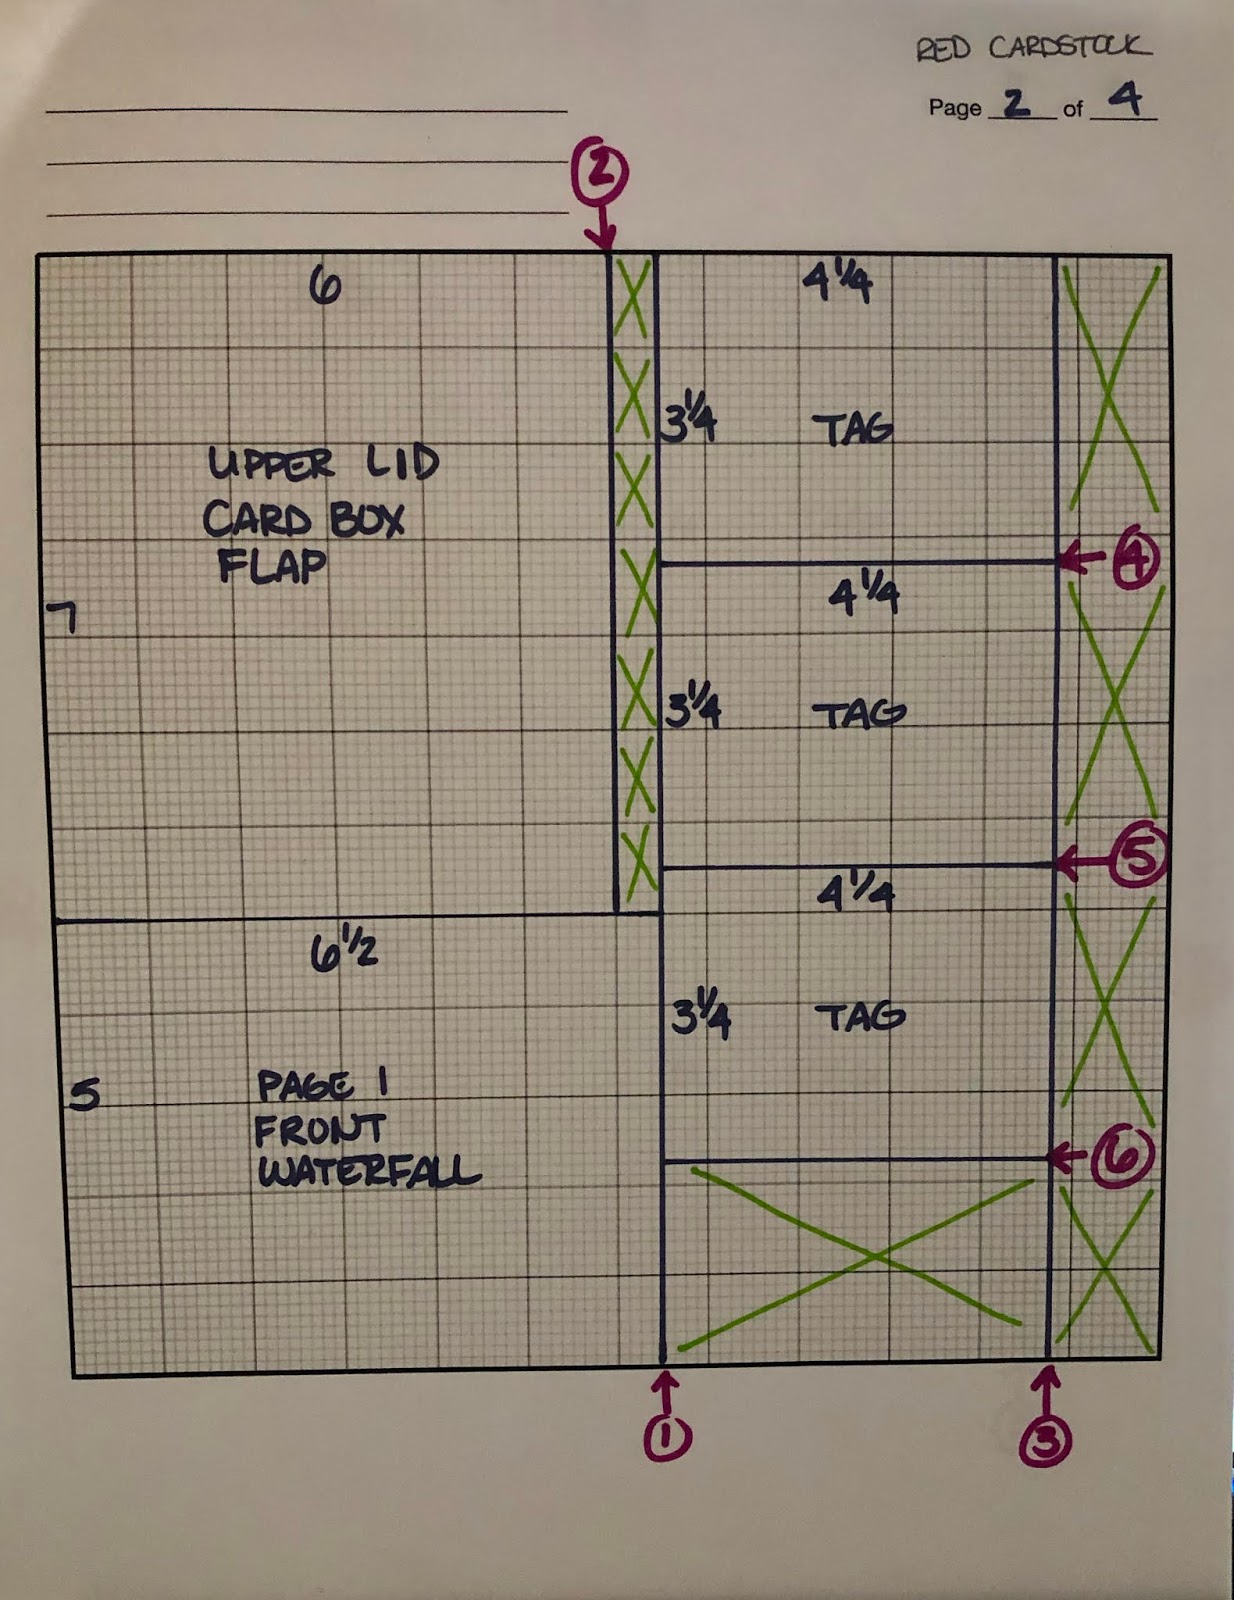
Chipboard: 2 at 7 1/2 x 5 1/2

Denim Cardstock:
To cover chipboard, 2 at 9 1/2 x 7 1/2 and 2 at 7 3/8 x 5 3/8
Easel Stand mechanism, 1 at 7 1/2 x 3 1/2, and 1 at 7 1/2 x 3
Pages, 5 at 8 x 11 1/2
Front Cover, 1 at 7 1/2 x 5 1/2

Below are specific cuts for the pages, making the mats and patchwork pieces of patterned papers as I did in the video. This is optional, and you can do the pages however you wish.

Photomats are cut from Ivory cardstock.
Pages 1 and 6
cardstock 2 at 4 1/4 x 6 1/4
patterned paper 2 at 1 x 4 1/4 and 2 at 1 x 7 3/8

Pages 2 and 7
cardstock, 2 at 3 5/8 x 5 5/8
patterned paper, 2 at 3 5/8 5 5/8
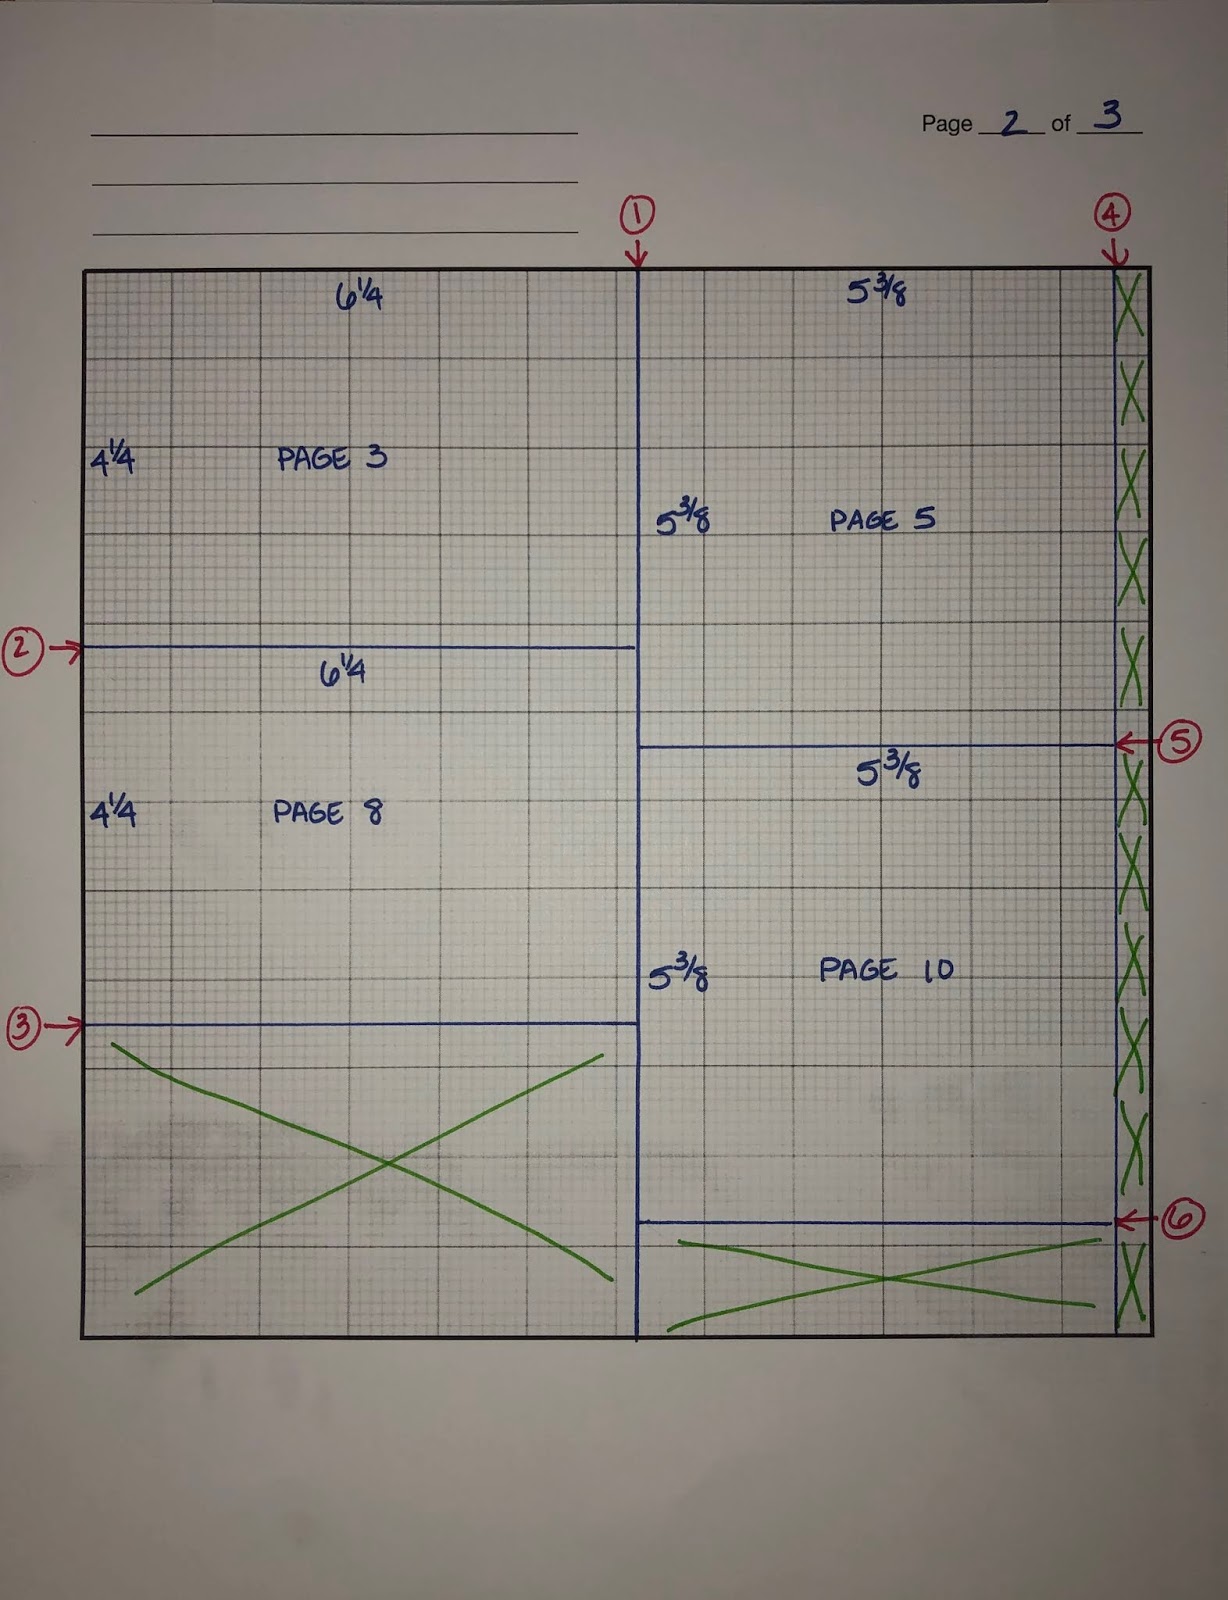
Pages 3 and 8
cardstock, 2 at 4 1/4 x 6 1/4
patterned paper, 2 at 5 3/8 x 7 3/8

Pages 4 and 9
cardstock, 4 at 3 1/4 x 4 1/4
patterned paper, 2 at 1 x 3 1/4 and 2 at 5/8 x 5 3/8

Pages 5 and 10
cardstock, 2 at 5 3/8 x 5 3/8
patterned paper, 2 at 1 3/4 x 5 3/8


Saturday, May 23, 2020

Hooray Gift Box Album Tutorial


Hello, Everyone!  Today I bring to you my Country Craft Creations design team project tutorial for my Gift Box Album using Authentiques “Hooray” paper collection!  I hope you enjoy this project!  I had a great time making this album (the tutorial gave me fits, but I persevered!) and I think you will too.  It really doesn’t take a ton of paper to make and will make a great gift.  Please visit Country Craft Creations for your supplies.  I used Authentique’s “Hooray” collection, Carta Bella “Dots” papers, seam binding, magnets and Art Glitter Glue from the store.  


Below you will find the cutting list and a cutting guide, which will help you cut the cardstock so that you maximize it’s use.  You will need 6 pieces of red cardstock, 4 of Ivory, about 8 pieces of 12 x 12 patterned paper, 4 large magnets, and seam binding.  


Thanks for stopping by, and have a wonderfully crafty day!

Red Artisan Cardstock:

Box Lid:

1 - 12 x 12, lid
1 - 6 x 7, card box flap
1 - 4 1/2 x 9, box pocket

Box Bottom:

1 - 2 3/4 x 7 1/2, pocket
1 - 11 7/8 x 11 7 /8

Page 1:  

1 - 6 1/2 x 7, page
2 - 6 1/2 x 5, waterfalls
1 - 5 1/2 x 4 1/2, closure for waterfall pages

Page 2:

1 - 2 3/4 x  7 1/2, pocket
1 - 6 1/2 x 7, page
2 - 6 1/2 x 5, gatefold pages

Page 3:

1 - 1 1/2 x 7 1/2, belly band
2 - 1 1/2 x 4 1/2, belly band closures
1 - 6 1/2 x 7, page

Tags (from left over cardstock pieces)

3 - 3 1/4 x 4 1/4
2 - 4 x 6

Ivory Cardstock:

1 - 6 7/8 x 6 7/8, box lid
2 - 5 3/8 x 6 7/8, card box flap

Page 1:

2 - 4 3/8 x 6 3/8, back of waterfall pages
1 - 4 7/8 x 4 3/8, back of closure
1 - 6 3/8, 6 3/8, back of page

Page 2:

2 - 6 3/8 x 4 3/8, back of gatefold pages

Page 3:

1 - 6 7/8 x 6 7/8, back of page

If you follow my cutting guides you will have strips of leftover Ivory cardstock to make tags.  You will have 3 - 5 1/8 x 12, and 1 5 3/4 x 12.   


Tuesday, May 12, 2020

A New Tutorial...Banner Album with a Box!!

 Good morning!  I hope you all are having a great day!  Today, it's TIME TO PARTY!!

I got my design team package from COUNTRY CRAFT CREATIONS and it is WONDERFUL!
 I received Authentique's "Hooray" paper collection and it is wonderful! It is beautiful, the colors are amazing, it has the vintage vibe, AND it can be used for kids and adults!

I chose to go with the adult themed project for my first one, and I have created this 

It is a decorative banner to hang for a party for folks "over a certain age"...
It is an album, in TWO WAYS!  First, there are photo mats on the back of the banner, AND there are booklets IN THE BANNER!!!
It also folds up into a nice box for storage on your bookshelf when the party is over, but you can take it out the following year and decorate with it again!!!
Please check out my tutorial on YouTube and see how EASY this is to put together!!  Below I have a list of the supplies you will need.  

Also please go to COUNTRY CRAFT CREATIONS to get your supplies!  You can find the Artisan Cardstock that I used, the patterned paper by Authentique ("Hooray") , the seam binding and the Art Glitter Glue!  

Gather up your supplies and let's have some fun!  

Thanks for stopping by.  BE SAFE AND STAY CRAFTY!!

Michelle

Cardstock: Color #1: Black, 3 sheets, Cut 6 at 6 x 12 Black, 1 sheet, cut 1 at 6 x 12 and 2 at 4 x 5 Color #2: Red, photo booklets, cut 6 at 4 1/2 x 9 Out of the 3" wide scraps you will cut photo mats, 6 that are 3 x 4 Color #3: White, 3 sheets, cut 12 at 4 1/4 x 4 1/4. Out of the 3" wide scraps you will cut photo mats, 6 that are 3 x 4 Patterned papers: 3 sheets for banners, each cut into 4 pieces that measure 5 3/4 tall by 5 1/2 wide, you will need 12 pieces all together. 1/2 sheet of 3 x 4 cut aparts. Each cut apart will need to be trimmed to 2 7/8 x 3 7/8 2 sheets for the box, one for the inside, one for the outside: 2 of each patterned paper at 5 7/8 x 3 7/8 (4 total, front and back) 2 of each patterned paper at 2 7/8 x 3 7/8 (4 total, sides) 1 of each patterned paper at 2 7/8 x 5 7/8 (2 total, bottom)


Sunday, May 3, 2020

Happy National Scrapbooking Day!

OK, so this is a day late, but it's still the weekend and I still hope you are having all kinds of crafty fun.

The design team, along with our fearless leader of Country Craft Creations, Tamra Kilgore-Merrill have done several YouTube tutorials for this event.  I thought that I would give you a list of the links so you can check them out for yourselves.  Some are super quick and easy projects and a couple are full out albums.  I have personally made 6 of the 8 projects and I have had a great time.

My project is the Card and Envelope Album.  You see below.  It is a super fun project using cards and envelopes as the base of pages, and they are all in different configurations to create a lot of interaction.

My tutorial is here.   This is my Card and Envelope Album.


Here is the list of the other projects by a group of very talented designers that design for 
Country Craft Creations.  Visit Country Craft Creations for your scrapbooking needs.  The selection is amazing, the customer service is the best I have ever seen, and all tutorials by the designers are free for you to do at all times.  

Tamra Kilgore-Merrill's Best Year Ever Album

Sandy Trefger's Photo Flip Folio

Bobbie Weaver's Tulia and Norbert Album

Christina Aubin's Easy Folded Page Mini Album

Jackie Randolph's 7 x 8 Folio

Jenn Palmer's Simple Photo Wallet

Lori Parker Thomas's Photoplay Camp Happy Bear Album

Thanks and have a wonderful and crafty day!
Michelle