WELCOME!!

We are so glad you are here! We love making and sharing our projects, and we are excited to have you visiting our site. Please leave us a comment and let us know what you think!

Jackie and Michelle

Followers

Wednesday, May 19, 2010

Recycled CD Album

I made this for my Showcase #7 submission on Audrey's blog, Cute and Some.
And this is what I did...
I took two old CD's and lightly sanded them to make the paper adhere better.
I applied the glue stick to each side, placed paper and trimmed the edges.  I covered both the front and back.
I went to my trusty Cricut and had it cut out 8 circles, a little smaller than CD's, at 4 1/2".  Since this wasn't double sided paper, I cut 8, adhered them back to back to make 4 pages.  This is the leftover papers from my purse project, from October Afternoon.  I inked all the edges of the covers ad the pages.
I punched holes with my Crop-a-Dile, set eyelets, and used a book ring to bind.  Then I tied ribbon to the ring to decorate.  The  flowers on the front are from K&Company.  The  images are from Heartwarming Vintage, buttons are Making Memories.
Closeup.  The lady is saying "Always with a smile."  Yep, that's me in the kitchen!  HA!
I think I am going to put some kitchen notes in it and hang it on my fridge.  Thanks for looking!

Tuesday, May 18, 2010

Thank you cards from scraps!


Talk about recycling!  I had left over strips of lovely papers from my recycled envelope book, and I CAN'T THROW ANYTHING AWAY!  (How many of us are like that?!)  But, what to do with them?  I came up with these cards to send to my surgeon and his office and surgical center staff to thank them for the wonderful care I received recently.  The left and right flowers are made from scraps of ribbon, and the center flower was cut from my Cricut.  It is also leftover from the envelope project!  I embossed the words "Thank You" with my Cuttlebug, and matted them on cardstock.  Simple and elegant, and I used up those precious leftovers!

Monday, May 17, 2010

Its Your Day


Patterned paper:  Prima & K&co. Solid card stock: American Crafts.  Number brads: Around the Block.  Punch:.McGill.  Letter stamps: Amuse.  Adhesive: Beacon 3in1.  Misc: Embroidery floss.

Sunday, May 16, 2010

Best Wishes

Creative way to use those circle punches!  Here we punched out multiple sizes of circles & used deckle scissors to make the perimeter a little more interesting!  In the center is textured Grunge board punched in the shape of buttons.   Best Wishes!

Friday, May 14, 2010

Double Page 12x12 layout

Rock, Paper, Scissors!


Layout created using vintage Basic Grey=Infuse & Technique Tuesday Diecut Tiles.

Thursday, May 13, 2010

Final Installment in the Recycled Envelope Book Tutorial!

*See May 11th posting for part 1 of series
Now you should have all of your pages covered and inked, the binding done, and the tags made and inked.  This is a view of my pages.  You will see that I was running out of paper, so some of the tags are "pieced" together (see the one on the right of the picture).  I think it gave it a cool look.  And, I didn't waste any paper!
Just another view of the tags.
Various ribbons in greens were tied to the binding...see how pretty it looks when you use the O-wires!  The "C" and "K" are chipboard from K-Ology.  The butterfly is a punch that I have, from Paper Shapers.  I cut out three for each butterfly, layered two (adhering only the "body" of the butterfly), lifting the top butterflies wings to give dimension, and the third punch I cut off the wings, using the body in a contrasting color.  I added rhinestones to the body. The flower, leaves, and flourish are cut from my Cricut.  I used the cartridges Gypsy Wanderings, Sentimentals, Storybook, and Tie the Knot for my embellishments and tags.  I used a lot of Smootch Spritz in silver also for added sparkle!
Another page, I have another flourish punch I used behind the blue flower, and stamen stems from Michael's.  I had flowers from Making Memories that matched the paper line on the right page, with buttons as well.  The peacock feather and leaves, and the blue flower were cut from the Cricut cartridges.
I had bling, sorry, I didn't have the package!, more flourishes from the Cricut.  The lower right corner are felt flowers with rhinestone centers.
The flowers were from another punch, from Fiskars.  Another butterfly.  I enhanced the wings with a glitter pen.
Some more flowers and feathers and bling!
Pretty, huh?  I tried to leave a little space for some small pictures.  I didn't decorate the tags at all, because of bulk.  Bigger pictures and journaling will go on the tags.
The back of the book.  It had to be decorated too!

I sure hope that you liked the book and the tutorial.  PLEASE...if you use my tutorial to make one for yourself, won't you please let me know.  I would love to see the results of your fantastic creativity!!

Stay crafty, my friends,
Michelle

Wednesday, May 12, 2010

Recycled Envelope Mini Book, Part Deux


So now, you should have all of your pages made.  The picture just gives another shot of the orientation of your book.

Ink the edges of your envelope.  The papers will cover the entire envelope, but it helps to "hide" the edges of envelope.
Ok, now choose your papers and cover.  I used a glue stick, use whatever adhesive works for you.  Go to just the edge of the pocket on the top, and on the right side...
Turn it over, and cut off the remaining paper.
Cut a strip of paper for the "tag" part of your project.  I cut it a little wider than required, and slipped it inside of the pocket a bit.
Once the other side is also covered in the same manner, ink all of the edges again.
Do this for all of your envelopes.  Oh, by the way, the papers were from Making Memories.
The next step is to bind your project.  Do it however you want.  I used my bind it all because it is one of the coolest toys in my craft room and I LOVE IT!  You can tie all kinds of pretty things the spine of your book when you are done.  It is a lovely thing!
I then measured the pockets and cut tags accordingly.  You need one of these for every page you made.  These tags went into the middle pocket...
These tags, cut from my Cricut (I love this toy also!!), are for the pockets on the front and back of the envelope pages, so you need two for every page you made.  I love these papers, blue and green are my favorite colors.

Ink the edges of your tags.

Tomorrow...Part three...embellishing!

Tuesday, May 11, 2010

Recycled Envelope Tag Book, My New Version! Part 1


This is the book we are going to be making.  I am dividing this into three tutorials, over the next three days.  I was inspired by the tag/pocket books out there using envelopes to create the side pockets.  I have come up with a new way to make these, creating three pockets for every envelope you use.  Jackie and I are going to the Creative Keepsakes convention this coming November, and we needed an album to fill with pictures of our adventure, and this little gem is what I came up with.  So, let's get started. 


First you need a big envelope...the brochure kind.  I get these from my insurance company.  They measure about 9 1/2" x 6".  You could also go to the office store and by them this size, but I wanted to be green and recycle what I had.  I took care when opening the mail, so that I could reseal the envelopes. 

So, seal your envelopes and fold them in the middle.  The two pictures above show how to fold them.  This is how your page will lie, so that you have the orientation correct.  The fold is the bottom of the page, the sealed side is the right, the left side of the now folded envelope with be the binding edge.


 Now, measure 1" in on the corners of the envelope as shown.  Cut these corners off.  Then, slice of just a sliver of the top edge.


I showed this step with the envelope open, but you don't have to do it this way.  Just fold down the flaps as shown, and adhere them to the "page" of your envelope.  Then turn your envelope over, apply adhesive to the tag part only, and adhere.


This is what it should look like now.  The pockets are created.  One in the middle, and one will be on each side of your page.  I made six of these pages, and my envelopes were not all the same, but they were all big.  It created some more interest in the book, as the pages were a little different in size, but you can certainly use the same size envelopes for this project.

Tomorrow, part deux!

Monday, May 10, 2010

Post Mother's Day Posting!


This is an Artist Tray by 7 Gypsies that I decorated for my mom for Mother's Day.  The papers were mostly from Making Memories, from their Vintage Findings line.  I loved that line, and my local stores don't carry it anymore!  I also had some old papers from the Life's Journey line by K & Co., and some others that I am not sure what they were.  I made the flowers in the top and bottom of the tray using my Cricut/Gypsy.  I used 3D foam dots and chalk inks to give a lot of the elements some dimension.

The cast of characters in this lovely tray, from top to bottom, left to right...my son-in-law Jeremy, with my daughter, Beth; my grandson, Cooper; my future daughter-in-law Sarah, with my son, Neil; my son Jake; and my wonderful husband, DJ and myself.

Stay crafty, my friends!

Sunday, May 9, 2010


Happy Mother's Day!!!!

Here is #4 in our series.  I made this for my husband's mother, Lillian.  She lives in Iowa and a mini album is the perfect gift.  I used a Bazzill Accordion Album and DCWV papers, "Indian Summer."  There are pictures on the back of the accordion as well.  If you look at the bottom picture, that is my and the love of my life, Darrell!  The butterfly and the flower on the cover I made using my Gypsy/Cricut.  The flower tutorial can be found here:  http://www.youtube.com/watch?v=tCjUhuFKjOs

Thanks for looking!  I hope you all have the most wonderful Mother's Day!

Stay crafty, my friends!
Michelle

Saturday, May 8, 2010

Mothers Day Card 3

#3, This is the card project I started on National Scrapbook Day! Hope Mom likes it!

Friday, May 7, 2010

Mothers Day Cards 2

#2 in our series of Mother's Day Cards! A Vintage photo & the ever so great Tim Holtz stamps were used.
Make sure to check out our Creative Gallery link on the upper left of the page for other great postings!

Thursday, May 6, 2010

Mothers Day Cards 1


In honor of all Mama's we will be posting a series of Mother's Day cards over the next few day's. Hope you enjoy them!

Monday, May 3, 2010

Triple Fold Paper Bag Mini Album

Well, here it is, my first try at posting a tutorial on the blog! I created this type of paper bag book, and I hope that you like it. I love how it turned out! The binding idea came from Laura at http://followingthepapertrail.blogspot.com/. The flowers are made following the Tim Holtz tutorial, but I don't have the Sizzix die he uses, so I used my Cricut to cut out flowers using the Plantin SchoolBook Cartridge. The papers used are from Cloud 9, and the stickers are from 7 Gypsies.

These are the basic supplies needed:

4 paper bags, SIZE MAY VARY, so take MY measurements as an example!
Adhesive (ATG, glue stick, etc)
Paper cutter, scissors, hole punch OR Bind-It-All
Ruler, bone folder
Ink for edges of paper
Eyelets and binding rings OR O-wires for binding
Patterned papers of choice
Cardstock for binding
Embellishments of choice

My bags were 7”x 13 3/4”. Your bag size may vary, it doesn’t really matter what size they are. Fold your bag in thirds, with the bottom of the bag being on the top, which is really opposite from what you naturally want to do. Crease well with your bone folder.


Open the bag and trim the opening of the bag to give your some space between the opening and the fold. I trimmed off 1/2” so that when I folded the bag in thirds, there is about 1/2” of space between the open end of the bag and the fold, as shown in the third picture above. So the final size of my bags because 7” by 13 1/4”. Do this will all of your bags.

Take your cardstock and create four pieces 1” smaller than the width of your book, and 3” wide, score at the 1 1 /2” mark. This will be the binding edge of your book.
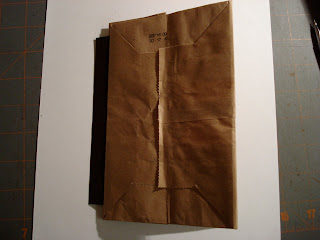

With your bag in front of you, lift up the left side, under the bottom of the bag will be a small fold. This is where the binding will be placed. Fold your cardstock so that it is double thickness, and adhere in this space to each side of your “page” in this fold area. I did it so that about 1/2” of cardstock was left sticking out of the “page”. Once adhered your page should look like the picture above. Do this for all your pages. Ink all edges if desired.

Now is the time to decide on the binding. Punch the appropriate holes into the cardstock binding pieces. Set the eyelets if desired. It is best to bind the project after you have completed placing all of your papers and embellishments.


For my book...each bag is one “page”. Each “page” has 6 sections. For my bags measurements, I needed:

4 pieces of patterned paper measuring 4 1/4” x 6 3/4”...and
2 pieces of patterned paper measuring 3 3/4” x 6 3/4”.

The smaller size papers were for the right section of the “page” where the bag opening is. MEASURE YOUR BAGS BEFORE CUTTING YOUR PAPER!!!!!


For my book...

The opening of the bag, which is the right sided section of the “page”, has a tag placed. You will need one tag for each of these, so I had four pieces of paper measuring 6 3/4” x 4”.
MEASURE YOUR RIGHT SECTION OF YOUR “PAGE” BEFORE CUTTING YOUR PAPER!!!!!


The inside of my “page, with the left section in the gray paper, the middle in the monochromatic rose paper and the right section with the multi-colored paper.

I punched a half circle in the opening of the bag to aid in the removal of the tag inside of the book.

I sewed a line of straight stitch on my sewing machine at this crease also, to prevent movement of the tag through to the inside of the bag “page”. This is optional.

Now, decorate, add pictures and bind, and you have a Triple Fold Paper Bag Mini Album! See our Creative Gallery for more pictures of the book!

Stay crafty, my friends!

Sunday, May 2, 2010

Scalloped Flowers

I made these a couple of days ago. I am learning to use the Gypsy! I love this thing. I was able to create these scallop flowers, with 6 layers, all on one sheet of double sided cardstock. I used Plantin Schoolbook, created 6 scallop flowers from 2 1/2" to 1 1/4". I crumpled them, inked edges, put a brad in the middle, recrumpled, and viola...4 scallop flowers! Since it was double sided paper, I was able to get 4 looks with one sheet of paper!

Stay crafty, my friends,
Michelle

Saturday, May 1, 2010

National Scrapbook Day


Today is National Scrapbook Day!!! What will your project be? I have decided to start on my Mother's Day Card project...