WELCOME!!

We are so glad you are here! We love making and sharing our projects, and we are excited to have you visiting our site. Please leave us a comment and let us know what you think!

Jackie and Michelle

Followers

Friday, August 10, 2012

"Surprise The Pride" Blog Hop

Hello, and Welcome to the August "Surprise The Pride" Blog Hop!  I am glad that you are able to pounce around our Dens and see what all of my Pride Sisters and Brother have in store for you! You should have reached me after seeing what RJ came up with, but incase you are out of order,  you should have started the whole hop with Kimi, and have come to me from Sherence's site, here.  

The theme of this month was "Surprise The Pride".  We all made whatever we wanted, no rules!
This is what I came up with for you, and for my PRIDE!

This was a fun project.  I had been thinking of another way to do a file folder album, with the Memory File idea in mind...and came up with this.  When I saw this paper (The French Country Stack)  by DCWV, I knew it was perfect for the project.
 I used a straight cut tab file folder for this project.  The flowers are mostly by Recollections.  The green ones I got in a grab bag, so I don't know where they came from.  The bling and tickets are also recollections.  The metal post is by Momenta.  I was trying to come up with a "signpost" type of look, did I do it?
 I also used three 6 1 /2" x 9 1/2" envelopes, and multiple greeting card envelopes (and the cards for the some of the tags).
 When you open the file, you get this page.  There is a huge tag in the large envelope on the left side.
 I created an accordion book for this side, closed with a ribbon.
 Inside each of these envelopes I put one of the cards, with punched paper edges.  A 4x6" photo will fit under the edges of this paper punched edge.
 These are two of the giant tags to fit in the larger envelopes.
 This is two of the larger envelopes attached to each other, then attached to the spine of the folder with a paper fastener.  Remember those?  I added paper pockets and more flowers.  The spray is by Recollections, but the added pink roses are by Shabby Chic.
 I busted out the Coluzzle and made mini file folders to put inside those pockets.
 This is the last page.  I created cascading pages with the envelopes, again using the cards for the tags.  I used paper hinges attached to the envelopes, then inserted through slits in the back page paper to attach this to the file folder...
 ...that way the paper looks whole, no interruptions in the papers design.
 I alternated the openings just because I thought it would be fun.
 Underneath the last envelope was more space, so I embellished a little there as well.
I sure hope you liked this project.  I think it turned out cute, and I used up some of my flower stash that I have been hoarding for quite some time!  Now pounce on over to Violet's site and see what she created for us!!!

Here is the line up for the blog hop, in case you need to start at the beginning or missed something!

Stay Crafty, My Friends!

Wednesday, August 8, 2012

Pull Out Page Mini Album Tutorial


 Here is how I made my "Come Fly With Me" Mini album.  I tried to make this tutorial simple.  I used post-it notes on the pieces, taking pics as I did it.  Then I tried to make descriptions that were clear under the photos.  I sure hope this tutorial makes sense.  Please let me know if you have any questions!
 I used greeting cards and envelopes I got at Michael's.  I think you could use any envelope and card (or card stock cut to fit) set you wanted, but I think the bigger the better so that you can fit nice pictures in it.
 Seal the envelope, and cut a sliver off of it on the left side.  Set aside.
 Take the card, add adhesive and fold it in half to make it double thickness...BUT don't adhere all the way on the right side, leave about 1" of room to attach the pull tab later.  Then, measure 1/2" in from the left, and cut a 1/2" strip off of the top and bottom as shown.
 With the open end of the envelope on the left, line up the card and envelope as shown, center the card piece to the sealed right end of the envelop, mark the envelope.
 Cut a very small slice off of the envelope between the marks.  Put the card into the slit to check to see of it is large enough.  Note that there will be an area above and below the marks that are not cut...this keeps the pullout from coming out.
 Remove the card from the slit just cut, and insert it into the envelope from the left side as shown...
 sliding it all of the way through the envelope, through the slit you just made.  Taa dad, the page is placed, and it will catch and not come through.
 To make the pull tab, I cut a 3" wide paper (shown in black for contrast) the height of the envelope.  I scored it in the middle, folded, and cut away a piece at the 1/2" mark, angling the tab a little so that it won't show on the pull out page.
 Insert the tab between the open area of the card.  Adhere.
 Pull out page inserted into the envelope...
Pull out page pulled out.

I hope this made sense!  To attach the pages you could do a bunch of different things, but how I did it was to use another envelope.  I sealed it, opened both ends. I scored it to create a 1/4" gusset, and adhered it to each page, thus creating the pockets on the outside of the pages.  Then I covered the pages with the patterned papers.

Stay Crafty, My Friends!

Monday, August 6, 2012

Come Fly With Me, Pull Out Page Mini Album

 I made this album, finishing it today.  I came up with a method of creating a pullout page that hides within the main page of the book, and doesn't come out completely.  I was inspired by an album I saw at the craft store by Echo Park that had sliding pages.  I used the Basic Grey papers, "What's Up".  What a cute cute line of papers!!!  It kind of reminds me of whimsical steampunk.  Or, maybe that's just me.
 Some of the embellishments are by Recollections.  I made the cover out of chipboard.
 I love the embellishments with this line of paper...the felt clouds are the bomb!
 I have made 5 of the pages.  There are 5 pull out pages, and 12 pockets.  I have 18 tags in all as well.  The entire set of pages are made of envelopes and the greeting cards that come with them.
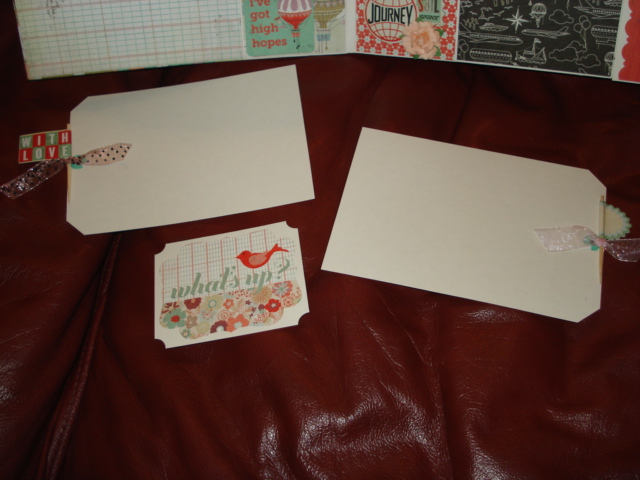
 Here is the inside front cover, and the first page.  I attached the pages to each other and to the cover with another envelope, creating the pockets.
 Here are an example of the tags in the pockets...made of the greeting cards.  I used stickers and die cuts to make several smaller tags for the book.
 And here is the pull out page...front...
 ,,,back.
 This is a little pic heavy, but here are the rest of the pages of the mini album.
 Oh, I love these little toothpick pennants that are a part of the paper line...I used them in every tag, tying them into the ribbons on the tags.
 Cute colors!


Here is a view of the pullouts all pulled out.  These are different than using the usual pullouts for albums.  These won't come out.  There is a way I came up with to make them stop.  I am going to post a tutorial for how I constructed the pages very soon.  If you make an album with this construction, please let me know...I would LOVE TO SEE IT!

Stay Crafty, My Friends!

Thursday, August 2, 2012

The Pride's Tag Swap

Hello all!!!  The Pride had a tag swap and I wanted to show you what I did!  I made this set of tags for Elsa.  I sure hope she likes it! The requirements were that it had to have 6 tags, the tags had to be what our partner would like, and the holder decorating was what we would like.  Well, Elsa loves girly things, ribbons and lace, pinks, roses and butterflies.  This is what I came up with for her.
 I chose papers by Carta Bella, called Beautiful Moments.  I added flowers and bling from Recollections, and the butterflies are by Momenta.
 This is the back of the folder.
 Here is the inside of the folder.  I altered the pockets a little from the original folder pattern.  It has two smaller pockets on the left and the right, each has a small manilla tag.  The middle pocket holds 4 large manilla tags.  The charms are also by Momenta.
 I made some additional tags for Elsa using the stickers that came with the paper kit. I put them on more manilla paper so that she could use them for journaling tags if she wanted.  I made a little pocket out of a die cut fence to house the ticket tags in.  I punched the butterfly and used pop dots to give the wings more dimension.
The tags were to be stamped with images so that they could be used as is, or cut apart and used in smaller pieces.  I added a couple of charms to the tags as well.  She can use them on projects with the tags or by themselves.

I hope that when she gets them she ROARS so loud that the neighbors complain!!!

Stay Crafty, My Friends!


PS:  She got them today, and she said she loved it!!!!  Yeah!

Wednesday, August 1, 2012

Record Album Notebook

I have always wanted to figure out how to do this, and I am so glad I did!  The video here on YouTube gave me the directions I needed.  I had some 45's that I got from my local stamp store before they went out of business.  They were doing collage art with them...but I had another plan.
 They turned out small, pocket sized, because 45's aren't very big. I love ABBA!
 I filled it with some found papers, and bound it with my Bind-It-All using a 1/2" ring.
Here is the back of the notebook.  This song was on the first tape cassette I ever had!  Ahhh, memories!

Stay Crafty, My Friends!