WELCOME!!

We are so glad you are here! We love making and sharing our projects, and we are excited to have you visiting our site. Please leave us a comment and let us know what you think!

Jackie and Michelle

Followers

Saturday, June 11, 2011

A Sweet Life Mini Album

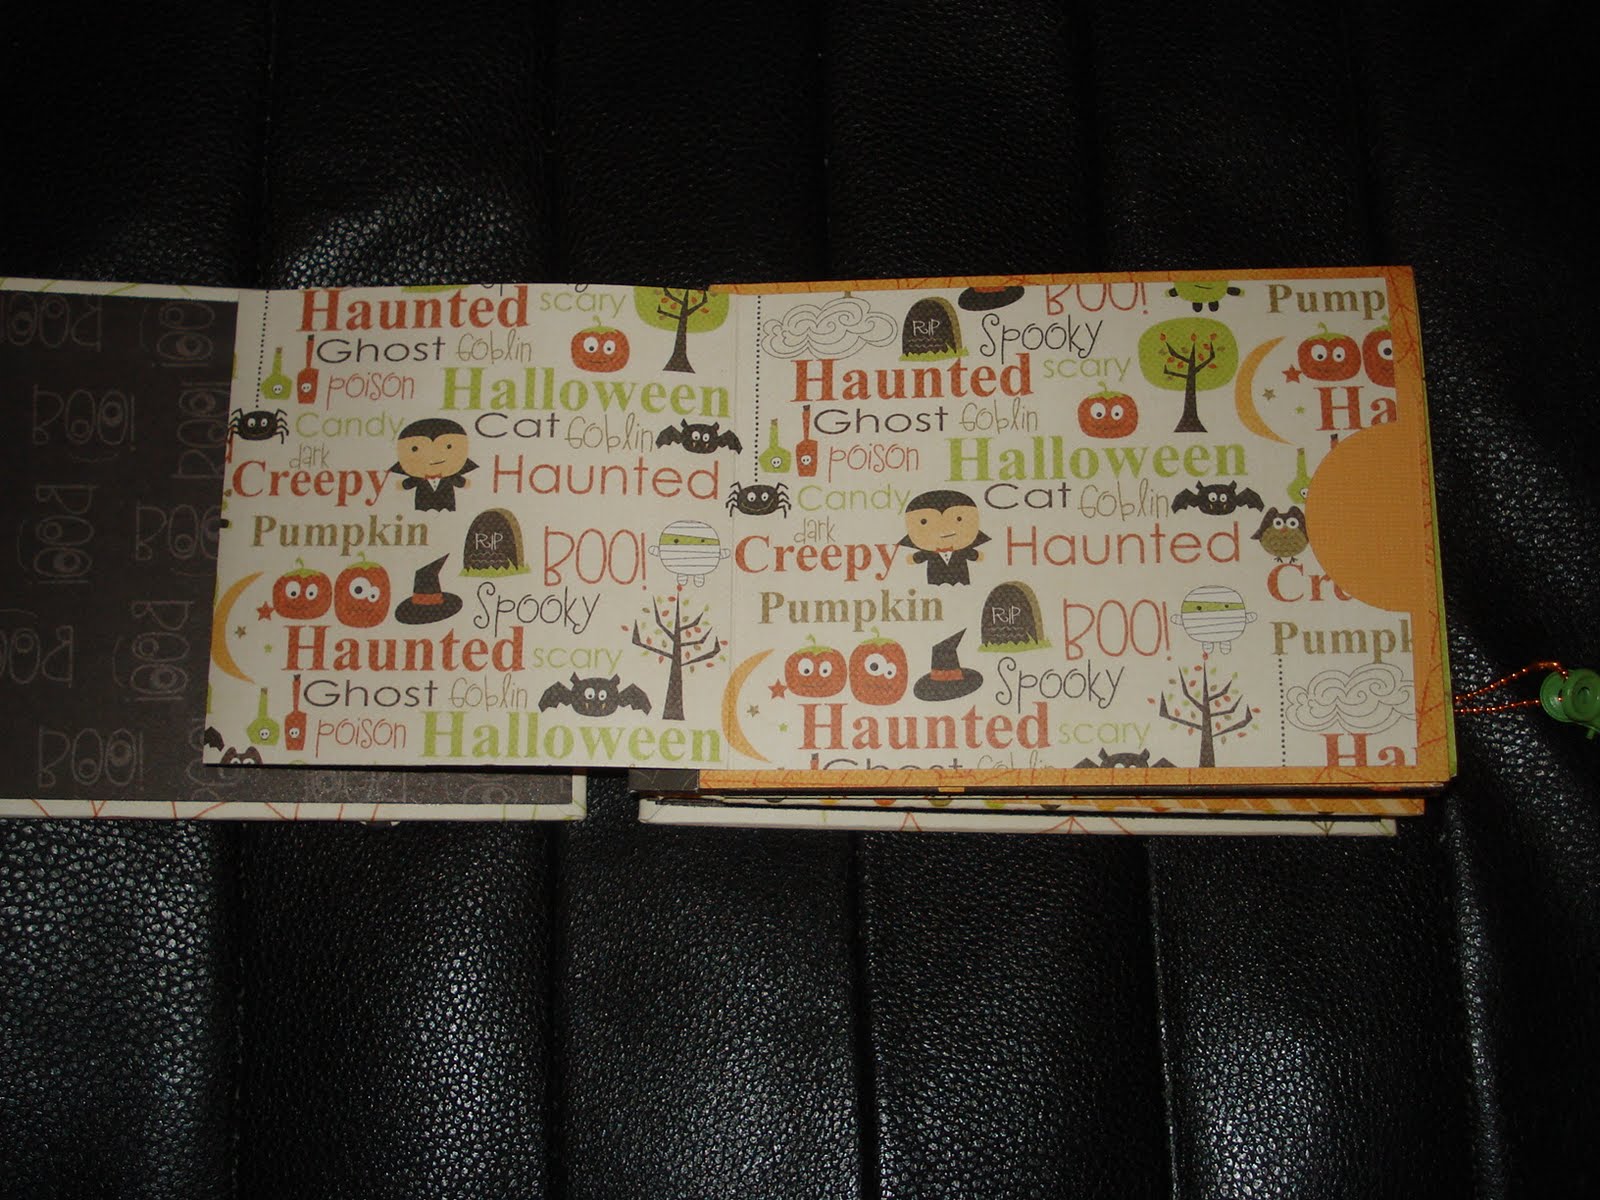
Here is my first project using my June Counterfeit Kit!  I made this mini album based off of a video that I saw here on You Tube.  She based it off of Elsa from Just a Few Designs.  Elsa has a video here you can check out.  I made Elsa's version in a Halloween theme right after she made it.  It is the coolest fold, she called it the "One Page Binding Mini Album"...


 Her mini is very cool and each page is made from one 12x12 paper that is cut and folded in such a way to create a cool base that you add things on to for more interaction.
 The following pictures show how many things one "page" has.
 Flap and pockets and tags, OH MY!
 This is the first page turned...and the next page...
And this shows the flaps opened again.  I am going to use each page for each year of my Grandson's Halloween pictures...I can put his first 6 years in here!

Now, for klipngirl's version that I made using my counterfeit kit...

 I used my Tim Holtz die to make the letters and edged them with a glitter pen.  How do you like the mirrored butterflies?
 OK...each page is adhered to a piece of black chipboard.  The base pages are made from black cardstock.  I used my papers from the kit to create all of the cool pockets and folds.  There are tags everywhere.
 This part flips up...
 Then the next part of the page flips up.  More pockets created.  More  tags for pictures and journaling.
 And it flips up again...
 I love this paper!
 So then you turn the page, and I put a picture mat on it, then for the next page, and another bunch of pockets and folds!
I made three pages. total.   I bound with simple binding rings.

So, What do you think?
Stay Crafty!!

Wednesday, June 8, 2011

A Wreath and a Kit, a "Two-Fer" Post!

 I made this over the weekend with the new K & Company Americana paper line.  I made a bazillion rossettes using my Tim Holtz die, and then used stickers from the paper line to create the centers.  I made the bottom award ribbon following directions I found on the Crate Paper blog.
Here is a closeup of the award ribbon.   All of the ribbons were in my stash.  I bought the wreath from Jo Ann's and used hot glue to attach.  I think this will look wonderful on my front door in July!

Now, for the June Counterfeit Kit...

Here is the original kit.  You can find it here on Burlap and Buttercups.  I love it for the beautiful pastel florals, I think it is very feminine.  I don't usually use a lot of floral-girlie stuff, this will be fun.
Here is my counterfeit kit.

 My papers are from October Afternoon, Creative Imaginations, Echo Park, and DCWV.
This shows the backs of some of my papers, more choices!
 I chose these cardstock colors, by Bazzill and Recollections.
Here are my goodies.  I punched some paper butterflies with a MS punch, I am going to use my alphabet die that I have had and never used...the ribbons and buttons are unused from my previous counterfeit kits.  I also thought that the Recollections flowers were the perfect colors for this kit.   I am also excited to use my Heidi Swapp mirror butterflies in this kit.

Now, what to make!
Stay Crafty!

Monday, June 6, 2011

Mini Travel Album

 This mini album is from another great monthly kit club called the Button-Farm that Michelle and I L-O-V-E!!!  I tweeked my kit a bit making it a travel album with alternate papers I added.  

A great Bare Naked chipboard and canvas album was provided with plenty of embellishments. 


 We altered envelopes to create additional pages!


 I really enjoy the creative ideas that are packed into these kits, looking forward to seeing the new creation every month!  

Friday, June 3, 2011

Fate and Dreams Mini Album

 I just finished this and wanted to show you all.  I LOVE THIS!  It turned out so cool, and my husband said that it is his favorite that I have made, so far!  I followed the directions given here by Kathy Orta of Paper Phenomenon.  She does the class over several videos, and it rocks!  Hers is a Valentine's themed album, this, not so much...but it is made with love.  (I can hear it now..."ahhhhhh").  I will have a list of the supplies I used at the end of the post, and I also have another example of the collage tags modeled after what I did here.
I called this "Fate and Dreams" because the Tim Holtz stamp I used on the ticket says, "Sometimes Fate and your Dreams Collide"...I like that.   I made the charm hanging on the ribbon with a variety of things.  I just layered up the cover with all kinds of things.  The seam binding was white, until I took the alcohol ink to it!
 The side view.  The closure is a door knob and a hair elastic.
 I made the flowers out of the new Tim Holtz glassine paper.  It is YUMMY!  There are a ton of tags throughout the book.  The big ones all measure 4 1/2" x 6 1/2".
 These are the first two tags.  The one on the left is an example of the collage tag.  I used the Stub Corner Chomper to make it ticket shaped.  The tag on the right has a full mat on the other side.
 Some of the pockets are vertical, some are horizontal....
 ...and then some are in the "pages" themselves.
 Two of the pages have the pocket assembly seen on the right.  They all have tags, and they all flip up to reveal more space for photos.  The smaller tags measure 3 1/2" x 5".
 More tags.
 Some of the collage tags are actually tag shaped.  I used ribbon, because you have to have some form of ribbon in a mini album, don't you?
 Yes, you also have to have a grungy butterfly or two, also!
 Showing the nest set of pockets that flip up.
 And more pages and pockets and tags...
 And more....
The last page.  I used two doilies in the book, sprayed with glimmer mist.

Supplies used:

Cardstock:  Recollections
Paper:  DCWV's Tattered Time, Tim Holtz Glassine Paper
Ink:  Distress Ink (Black Soot), Adirondack Alcohol Ink (Latte), Tattered Angels Glimmer Mist (Charcoal) and Homemade Glitter Mist using Making Memories dye and Perfect Pearls
Doilies:  Wilton
Dies:  Sizzix/Tim Holtz (Tattered Leaves, Tattered Florals, Elegant Flourishes, Gadget Gears)
Punches:  We R Memory Keepers Corner Chompers (Stub), EK Success punches
Embellishments:  Tim Holtz (clocks, seam binding, spinners, gears, metal flowers, fragment, film strip, door knob, jump rings, light bulb), Scunci (hair elastic), recycled guitar string (From my Husband), We R Memory Keepers eyelet, Safety pin (Making Memories), 7 Gypsies (tag hole reinforcements).
Unknown Embellishments:  Key-clock-star charm, gray ribbon, screw type brads, fishing luer swivel (Jackie gave me that)
Stamps:  Tim Holtz

PHEW!  I think that is everything.  Thanks for looking and remember to STAY CRAFTY!!!

Wednesday, June 1, 2011

Something different in a Paper Weight

Using the great paper line, Once upon a Springtime by Graphic45 I created a fun paper weight!  

 These clear acrylic paper weights are 3" in diameter and have a removable magnetic backing.  My 3" circle punch worked perfect for covering the back.  I then cut out the frog to place inside and attached the fairy. 
 Using Beacon's 3 in 1 glue I adhered the ribbon along the edge.  Moss from a nearby tree gave it some texture.
 I carefully covered the fairy with Diamond Glaze letting it dry for about 30 minutes, then very gently bent her causing the glaze to crack.  I think this will make a fun gift!

Friday, May 27, 2011

Counterfeit Kit Challenge Blog Hop!

WELCOME EVERYONE!  Thanks for hopping along to our  blog to check out what I created!  You should have arrived to this site after visiting Christy at My Scrapbook Evolution.  If you want to start at the beginning, go to the Counterfeit Kit Blog.

For this blog hop we were to go to our favorite company's blog and get some inspiration, then create something with it.  Well, I love, love, LOVE 7 Gypsies stuff!  The only problem is that my local stores don't carry much of it.  So, what's a girl to do?  Well, if you are doing the challenge for the blog hop you do this...

Here was my inspiration...


I loved the look of these tags from 7 Gypsies.  It is from their Camden Line, and you can find it here on their blog.


I took scraps that were leftover in my May Counterfeit Kit.  (I love leftovers!) I arranged them how I liked them and adhered the collage together.


I used  large manila tags (6 1/4" tall by 3 1/4" wide) and stamped journaling lines on them, then adhered them to the back of my collage.


I cut the tags out...


Made little labels...


Punched the top hole and made reinforcements to match the tags...


Taa Daa!!!  My own version of 97% complete tags using my May Counterfeit Kit!  I haven't decided on what to do with them...Maybe a mini recipe tag book, maybe I will use them on cards, maybe on layouts, maybe a mini album ... the possibilities are ENDLESS!

Ok, your next stop, last, but definitely NOT least...Bethany at Inspired Scrapper.

Stay Crafty My Friends!
Michelle

A Birthday Card for Mom

Just a reminder...tomorrow is the Counterfeit Kit Challenge May Blog Hop!!!  Be sure to check it out!  I am participating and I hope you like what I created!  See you then!


Today I am sharing a card that I created for my Mother-In-Law for her birthday.


Papers: Reflections
Rhinestones and Pearls: Kaiser Kraft and Reflections
Punches: Mini Butterflies, Lattice Border:  EK Success
Nestabilities:  Renaissance Hearts
Sizzix: big butterfly
Stamp:  Studio G

Stay Crafty, My Friends!!!
Michelle

Wednesday, May 25, 2011

A Recipe Tag Book for my BFF!

I made this  a little while ago, and wanted to share it with you.  I love recycling projects, and this was a fun little thing to do.  I also love recipes and cooking, so it was a perfect little thing to create.

I found a bunch of cocktail recipes that use the diet powdered drink mixes (which I love) and thought it would be a cute idea to use one of those drink mix containers to house a tag book for the recipes.  So I made one for my BFF, Jackie, then I made another for myself!

I did an internet search and found as many recipes for cocktails as I could.  I used a martini glass punch, which fit perfectly onto the tag.  I covered the  container and viola!!  The papers are from DCWV.

Cheers to my crafty friends!