WELCOME!!

We are so glad you are here! We love making and sharing our projects, and we are excited to have you visiting our site. Please leave us a comment and let us know what you think!

Jackie and Michelle

Followers

Saturday, October 20, 2012

A Halloween Slider Card Challenge

Hello and WELCOME!!  You have pounced upon our blog hop for October!!  My little Lion is all dressed up for Halloween and ready to show you some fun on my blog.  Our Pride has been busy, busy, busy creating our Halloween projects to share with you!  You should have reached me from RJ's blog.  If you pounced upon this blog hop by happenstance, the beginning is with Elsa on her blog here.  At the bottom of the post I have a full line up of my Den Brother and Sisters just in case you get lost along the way.  I'm Michelle, and I am glad that you are here!! 
Please welcome the new Cub in our Pride!  A huge Roar and Welcome to Yvette!!!  I am so glad you joined our Den!!!

For October, the challenge was to create a slider card.  So, using this tutorial from Split Coast Stampers, here is what I came up with.
 The paper line I chose was by Echo Park, Chillingsworth Manor.  I love the colors in it!  I added a spider by Jolee's and some Recollections bling.  The hand came from Michaels, and I added a "ring" that was actually a brad that I wrapped around the finger.
 This is the card, opened.  I cut the skeleton to make it tall enough to appear to come out both ends.  I added some stickers and viola!
And, as they say in commercials..."BUT WAIT, THERE'S MORE!"  I couldn't stop here.  I had to do more.  So, I used up the rest of the paper line to make a mini album to match the card!
 I decided to create this mini album for my pictures of this year's Halloween Festivities.  My little skeleton on the front, being looked at by the cat, holds the 2012 sign.  There is a spider by his head, and a spider on the spine as well.

 The album is made with 5 envelopes, 5 greeting cards, and I made 5 slider cards to go into it.
 Here is the inside front cover, and the first slider, on the envelope page.
 Here it is opened.
 When you turn the page, on the left, is the greeting card.  I created a pocket and placed a tag in it.  The slider is opened.
 The one side of the card is tucked into the envelope.  Here it is opened, showing a little "book" I made with the stickers in the paper kit.
 And here is the card pulled out of the envelope, the "book" opened.  Every envelope in this book has a card.  The part of the card that tucks into the envelopes is left blank for large pictures.
 I created another pocket for another tag.
 The embellishments are attached so that pictures can be tucked in behind them.
 I just love this paper line!


On the back inside cover I created another pocket for more tags.

So, now that's it.  You have seen what has been coming out of my den.  This lioness is tired!!!  I hope you continue your prowl on our hop, and go check out what my Den Sister, Sherence has in store for you!!!  Her blog is here.  Don't forget to say Trick or Treat!  Thanks for stopping by!  I would love to hear what you think, so please leave me a comment. If you have any questions, please ask!

As always, stay crafty, and SCARY, my friends!  BWAHAHAHAHA!!


Yvette http://daileyscrapper.blogspot.com/

Saturday, October 13, 2012

Steampunk meets Halloween Rolodex

I was surfing the web one day, and went to YouTube.  I found a video tutorial on this amazing project, and I wanted to share it with you.  The video is by Margaret, and it can be found here.  Her blog is here, you should check it out!
 This is my interpretation of her design.  I did it all as she did, with a few tweaks to the base and to the file inserts.  I used Recollections Steampunk Botanical paper line, and added a bunch of metal embellishments and a skeleton to it.  I apologize in advance, it is a bit pic heavy.
 I wanted to give the illusion that the skeleton was wearing a skirt, so I cut the flowers to go around the waist.
 The embellishments are from Tim Holtz mainly.  Some of these came from my stash and I have no idea where I got them.
 I embellished half of the pages, leaving room for adding things as I go along.


 There are eight pockets all together.  Each pocket has a tag.  There is also a front and back cover.


The bottom tag is covered on the front and back, leaving room for a big picture. The top tag, I added a pocket on one side.  I really love how this turned out, and I  plan on making more in different styles.  This is an awesome project.  Go check it out, I bet you will want to make one too!!

Stay crafty, my friends!

Wednesday, October 10, 2012

The Entagalope Mini Album

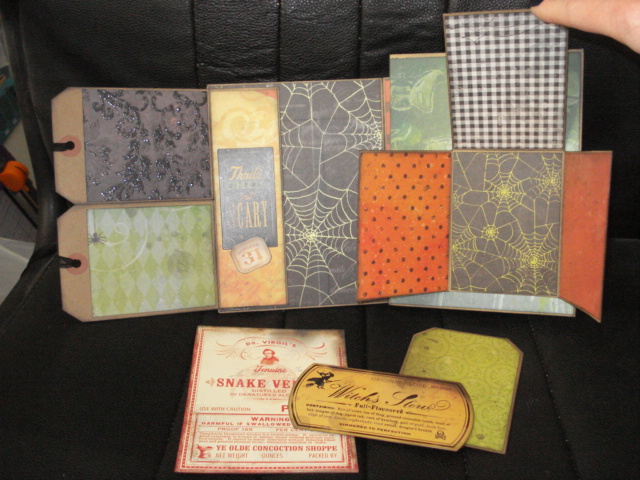
 As soon as I saw this tutorial I knew I had to make it.  I can not take the credit for this one...That belongs to Kit at Paperkitz.  Her video is awesome, and it is here.  I tweaked it a little, adding some more goodies, but the base of the book is hers.  Thanks, Kit, for the inspiration.  She used one envelope, one 12x12 piece of patterned paper, and 5 tags.  I used one envelope, one greeting card, 7 tags, one 12x12 card stock, and then patterned paper to cover it.  You can actually build and build to your hearts content!

Above is the front of the book, held together with a belly band closure.
 This is the back of the book.  I used K and Company's new Halloween line, I love it!
 It is made from tags and an envelope.  I added two more tags to mine and the greeting card that came with the envelope I used. She did another one, and I incorporated an idea of hers.  I also used one 12x12 piece of paper to create another added piece to this book.  This is the flap of the envelope, covered with paper.
 When you open it, the right side has a pocket created by one of the tags, and the left has a pocket created by the ends of the two sideways tags.
 This shows the tags pulled out.
 I turned the orange picket page, and took out the other two tags in that pocket.  It hold three in my book.  Then the left side has the small 2 1/2 x 2 1/2" flip out.
 Here it is, unrolled.  The tall tag is adhered.
 You turn this and the tall tag and the sideways tag created another pocket.  On the left, I added a folded page, creating another pocket.
 Tags pulled out, fold out opened.
 This is the back of the mini, on the right.  I added the greeting card, which is on the left  First the right...I made a folded 3x4" mini, and created another pocket.  On the left, I attached two tags, which do open separately, to the greeting card, and inserted the other end into the envelope.
 The tags opened, and the tags pulled out.  The two label tags are housed under the flap that says "Thrill, Chill and Be Scary.  This pocket is actually the ends of the two tags I added to the card.  It is easier to see in the next picture.
 This shows the inside of the belly band (on the top) and the greeting card, being pulled out of the envelope.  I left the pages of the card that go into the envelope open for large pictures.
 The card, turned over.
 The inside of the belly band has two pockets, and then...
 ...a folded page for more pictures.
Here is a top view of all of the parts and pieces.  I love how this turned out, and I will be making more of these, as they are super easy and fun to do.

Stay Scary, My Friends!

Saturday, October 6, 2012

Halloween Torches and a Kleenex Box

 I love Pinterest.  I spend way too much time there.  It is absolutely amazing what you find, and what ideas it sparks.  I saw a couple of things, and got some ideas...this is what my twisted brain came up with for Halloween!!!  You all know it is my favorite holiday, right?!

Anyway, I got the foam skulls at Michael's, along with the wooden candlesticks.  I painted the candlesticks black.  While they were drying I got a battery operated tea light, marked where I wanted them to go, and carved holes for them in the skull.  Then I got some red acrylic paint and drizzled and dripped it all over the skulls.  When the whole mess was dry, I hot glued the sticks into the base of the foam skulls.
TAA DAA!!!!!!!!!!!!!

I love them!!  I think on Halloween night, these little greeters are going to be on my porch!  BWAHAHAHAHA!!

Then I made this, sparked also by an idea I saw on Pinterest.

 I made this coffin out of foam core, painted and distressed, added embellishments...and you are wondering just what it is...I mean, does it have a function or is it just a pretty...
I needed a Kleenex box for my haunted bathroom!!!!  I family sized box fits neatly inside!  I used embellies from Momenta, Petaloo, Kaiser Kraft and Jolee's.  When I showed these to my husband, he just shook his head.  HAHA!  I can't wait for October 1st, the start of Halloween Season!

Here is a list of the links that spawned my creative play:

http://www.divinedinnerparty.com/halloween-yard-decoration.html
http://www.flickr.com/photos/phildesignart/5518444238/in/photostream
http://blog.capscreations.com/2010/10/skull-candlest

Stay Scary My Friends!

Wednesday, October 3, 2012

A Bootiful Booquet!

 I found the flowers at the dollar store, they have stalks with spiders on them along with the roses.  I picked up three of them.  I dug under my kitchen sink cupboard and found this vase.  I picked some paper and rolled it into the vase.  Hot glue and skeleton hands around the base of the vase (hey, I rhymed!) and VIOLA!  I have a bouquet!
 I am not the best photographer, and I don't have a great camera, but here is the view of the flowers so you can see.  On a couple of the stems I put mini skull heads.  I also put two skeletons-on-a-stick!
I used a sharpie to color a dowel, and hot glued it to his butt (I mean pelvis).    I love it!  I also like that I can change the paper on the inside of the vase to anything I want...so every Halloween I can have a different arrangement, if I want!

Stay Scary, My Friends!