WELCOME!!

We are so glad you are here! We love making and sharing our projects, and we are excited to have you visiting our site. Please leave us a comment and let us know what you think!

Jackie and Michelle

Followers

Wednesday, January 9, 2013

Old Envelopes into New

I found these gorgeous envelopes while I was surfing the net looking for recycling ideas.  When I saw them, I knew I had to try them out.  I have played with recycled business return envelopes before, but these were too cute to pass up.

Here is my version of these awesome little gems.

 What you do is to carefully tear apart the envelope, reverse it and put it back together so that you can reuse them for fun mail!
 I refastened the sides with various pieces of washi and washi-type tape from my stash, then to reseal the envelopes when it comes time, I used a strip of Score-tape...I'll just peel and stick when the time comes.
I raided my stash of black and white papers, and covered the flaps of the envelopes.  They all had the gummed edge, and it is on the outside of the envelope when you reverse it.  I thought this was a pretty way to cover that up!
Then, on the front of the envelopes I had to do something to cover up the windows in the envelopes were the business address usually ends up.  Cathy Holden of Just Something I Made has a link to a bunch of free printables she has created and these were perfect.  They are meant to be printed on label sticker paper, but I didn't want to close the envelope, so I just printed them on regular paper.  I added tape to the edges of the label, and taa daa!!  Now I have beautiful recycled envelopes to use for sending fun things in the mail!!!

This is easy to do and fun.  Save business return envelopes that have pretty security designs and see what you can create!!!

Stay Crafty, My Friends!!!

Saturday, January 5, 2013

5 Year Journal

New Years Resolutions...I always have them, seldom get around to doing them.  NOT THIS YEAR!!  I have a few resolutions that I already showed you in my new planner post here.  One of my projects that I wanted to start was a five year journal.  I already am working on one that is just a sentence about what you did for the day, this one is a daily question to ask.

Last year I saw this blog post, in the middle of the year, and decided to collect all of the journal prompts and start this year.   (This is not a link, but does show you what the questions look like).  Tammy Taylor wrote this awesome article about the project and there is a link to all of the PDF sheets of questions you can check out.
So, I made my journal and got busy!  I'm actually up to date on it, haven't missed a day yet!

 I found this journal on sale at Michaels.  I paid $1!!!  I bought it a while ago, knowing I would find a use for it.  The cover looks like leather and is actually quite nice!  The pages are also heavier than you would think for a $1 journal, and when I use my Uniball 207 Micro pen (MY FAVORITE) it glides like butter.
 I set it up so that there are two days per page, and I wrote each question on the side of the day.  It gave me ample room to have space to write 2-3 sentences.  Now, some of the questions are "thinkers" but some are "What does a gallon of gas cost?"  That will be fun to look through in five years, seeing the progression of the cost!
This is the four day spread.  Nice, huh?  I could also see this in a junk journal/smash book style, making the pages prettier.  Maybe I will make one like that for the next five years.

Go check out the project...its not too late to start, it's only the 5th!  HURRY!!!

Stay crafty, my friends!!!

Wednesday, January 2, 2013

The Last of the Christmas Cards!

Since I think that everyone has received them now, I think it's safe to post them.  I wanted these to be a surprise!

I made these cards for my den siblings at Just a Few Friends...I followed an example I found from A Path of Paper here through my Pinterest Christmas Board.  Have I told you how much I love Pinterest?
 I made a total of 12 of these, 3 each of the different papers from DCWV.  I used the Happy Hollydays stamp that I used in my other Christmas cards I made for this year.
Instead of making the snowman the card, I used my circle punches to create the snowman to put on the card.  I used a scalloped flower punch to make the nose, and a tree punch cut up to make the twig arms.  I used rhinestones for eyes and taa daa!!

Then, I needed to make cards for my nieces and my nephew.  I began making them fun cards a long time ago, and now it has become a must-do for every occasion.
 The paper collection is by Dear Lizzy.
I used a tutorial I saw here by Julie of Julie's Stamping spot. I did the "star" and the trunk a little different on mine.

Thanks for looking, and here's hoping you all had a wonderful Christmas, and all of my best wishes to you for a wonderful new year!!

Stay Crafty, My Friends!!


Tuesday, January 1, 2013

Just want to say...

HAPPY
NEW
YEAR!!!!!

We wish you all health and happiness in this new year.  

May 2013 be AWESOME!!!

Saturday, December 29, 2012

A New Planner

It's going to be a new year and I need a new planner!  I had been using the one on the right, made with Graphic 45 papers, for a while, I think 2 years...  I loved it, but it is small and I decided that I needed something a little bigger that I can keep all of my things together in, in ONE PLACE!  One of my goals is to be more organized, and I am hoping that this will help.  I custom designed it.  I made it classic size, and I think it will meet my needs.  I don't have a hugely busy life.  I work a lot.  I don't have kids in the house anymore, so school and after-school stuff is not an issue.  My planner is simple, and does what I need it to do.

I got the ARC binding system from Staples.  So far I love it!  I decided to use up some of my hoarded stash, and this is what I came up with.  I have included a bunch of links that inspired my creation so that you can see them also.

The cover, pockets and dividers were made from seriously heavy duty file folders I bought at New Seasons, by Cavallini and Co.

WARNING:  VERY PICTURE HEAVY, BUT I THINK YOU WILL LIKE IT!!!

 I cut the folders and created pockets on both of the covers.  The piece on the right folds out...
 ...Where I put a Post-It pocket on one side and created a pocket on on the other for my coupons.
 Turn the page, I added some other Post-It notes for use later.  And, they match!!
 Turn that page and I am going to use this section for my stuff, ideas, journaling, lists, home stuff, etc.
 I used some left over stickers to make this page.  Once I started listing all of the projects I need to FINISH, I was amazed!  I better get busy!
 I found this list of ways to stay creative on Pinterest, printed it and put it in the book for inspiration.  This section has graph paper that I folded.  I figure I can draw out my plans for projects on the graph paper and...
 ...it opens up to blank paper so that I can write notes, steps, etc.
 Another pocket...turn this page...
 ...and a section of papers for notes about work...my schedule, call schedule, etc.
 I got this idea from a brilliant person!  Beckie at Infarrantly Creative had created a system that I incorporated for my monthly/weekly planner section.  It looks like above when first opened.  When you flip open the left side...
 I have clipped inside a calendar I created from this site, here.  This flip out section also hides some project cards that I made using Rolodex cards I got for super cheap at Tuesday Morning, and a variety of craft tapes in my stash.
 I have my project cards, a year/day reference and my birthday/occasion sheet safely tucked away under this flap.
 I also made a tape page.  I took a piece of graph paper and sandwiched it inside a piece of folded waxed paper.  Then I put on some of my tapes, so that I can have some to use as I need it.
 The tapes come from a variety of sources, I think some are Washi, some are Cavallini and Co., some are Recollections and some are from Smash Book.
 So, the reason that I did the flip page this way is so that when I am looking at my weekly section (on the right) I can flip out the monthly section to see it while I plan.  I use the blank page on the back of the weekly pages (in the middle) to write to do lists, make notes, etc.
 If I don't need to see the monthly calendar, it just tucks away.  I used a piece of file folder to create the page marker.  On the other side of it, not shown, I put some sticky notes made from the same paper line as the file folders.  Here is one of my project cards.  If I have a big project that will span over a couple of weeks, I can just remove it and place it in the next week.  When done, I can just toss it.
 My week pages, you notice are different.  I have almost every weekend off and every Wednesday off. These are the days I can make appointments.  The other four days of the week are work, 10 hours a day with about 2 hours of commute.  I don't get much done during those days.  So...I made the weekly pages so that I had more room for my days off, and less for my working days.
 I also created a little mini page that folds, so I can try to do some menu planning and grocery shopping planning.  I need to get better at that, since I get home so late.  The left side is the back of the previous week page that I will use for notes.
 I found these free printable address pages at SampleWords.  They have tons of free printables.
 Phew, this is long!!  I put another Post-It pocket on this divider page for stamps and stickers.  I had some labels, again by Cavallini and Co., and I also put some slide stickers by Industrial Chic...you never know when you need to embellish something.
 The blog planner is based loosely off of a bunch that I have seen.  I am going to try to plan and stay more organized with my posts. This is the section where I will also keep track of my activities and assignments with the group, Just a Few Friends, headed by Elsa, of Just a Few Designs.
The back cover, is another pocket.  I also took another scrap of a folder and made a pen holder, the rectangle on the far right.

Woo Hoo!!  Done!!  I hope you enjoyed it.  I had a bunch of influences that inspired me when I was creating this book.  Please check out the links and check them out for yourself.

Stay crafty and organized, my friends!!

Tuesday, December 25, 2012

Happy Holidays!!!

We want to wish you all a
Very
Merry
Christmas!!!

Saturday, December 22, 2012

2012 December Daily

I bet you thought I wasn't doing one, did you?  Well, I am, and I am actually up to date on it!  Want to see it?  OK, here it is!
 Jackie and I actually got this book and made it last year at the CK convention.  But, since I already had a December Daily book for last year, I saved it for this year.  The paper line is by Simple Stories.  I'm sorry, I don't remember where the book is from.  It came with lined and blank papers, and was wire bound.  It has photo sleeves and pocket pages as well.

 Here's my first page.
 I decided to use my Fuji Instax camera for the pictures for a couple of reasons.  I love it, and it's instant pictures to add to the book!  Some things I did print out, like new recipes I tried, and a couple of pictures that I took with my phone, but MOST of them are the instant pictures.  They aren't always the best quality, but for this project it is PERFECT!

 I made this bread twice, it is sooooooo good.
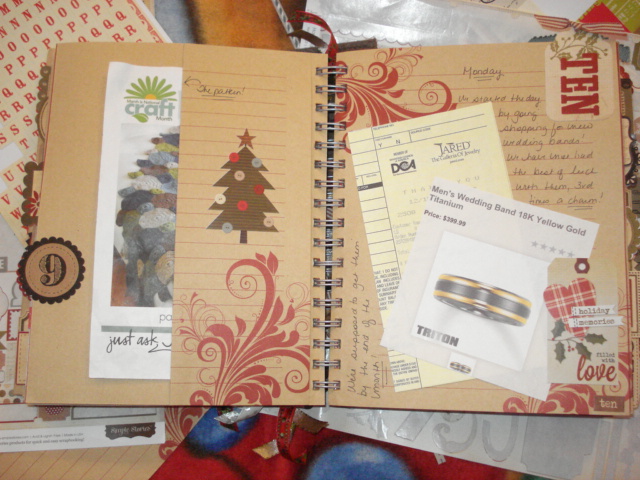
 I added my own pocket pages here and there by folding a page and adhering it down.  There is a copy of an afghan pattern I made for my Grandson in this one.  I also put the printout of the new wedding rings that Hubbin and I ordered.  It's a long story, but we decided for our 15th anniversary we were finally getting the replacement wedding rings we have needed for 10 years!  Merry Christmas and Happy Anniversary to me!
 Decorations outside our home.  Do you like the gnome, I mean elf in the top left?
 This is Roxie, the German Shepherd that we found.  We did find her Mom and her two boys the next day, they were do happy to get her back for Christmas.
 OK, I had to include this...how many times do we get to have all of the excitement (or hysteria) of the Mayan Calendar being misinterpreted?!
 But wait, there's more...
I won the bet, and my Hubbin owed me $1!  I included it in the book.

So, that's some of my book.  There is a lot of room, I am going to continue it through December, and include New Years day as well.  Are you doing a December Daily?

Stay Crafty, My Friends!!  HO HO HO!

Wednesday, December 19, 2012

Button Bookmarks

I was on Pinterest, (OMG, I LOVE PINTEREST!) and saw this tutorial on making button bookmarks, and thought that I had to try it.  I have a huge stash of cool buttons, and a bunch of paper clips.  This is a perfect way to use them up and to have something useful at the same time.  I was thinking that not only would they be great bookmarks, but also awesome to add as decoration/embellishments to a mini album.  What a cool last minute Christmas present for that special someone who loves to read!
 Here are the first ones I made.  I am definitely going to make more.
I used E6000 glue, and strung the paperclips through the back loop of the button.  They came out perfect.

Stay Crafty, My Friends!

Saturday, December 15, 2012

Christmas Decor

The other morning I was hit with a brain storm, and this is what came out of it.  I needed a Christmas decoration to hang on my craft room door.  I didn't want a traditional wreath, and I seem to be into trees this year, so I made this.  I used K and Company border stickers, adhered them to card stock, and used jump rings to attach the pieces.  The bottom tier border sticker is cut at 11", and each one after is 1" shorter.  I tied ribbon to the top, and Taa Daa!!!  I got this cute tree decoration for my craft room!!

Stay crafty, my friends!!!