WELCOME!!

We are so glad you are here! We love making and sharing our projects, and we are excited to have you visiting our site. Please leave us a comment and let us know what you think!

Jackie and Michelle

Followers

Monday, February 28, 2022

Farmhouse Living Album Tutorial, a Design Team Project for Country Craft Creations

 Hello, and here is the tutorial for this album. I created it as a recipe album, and it will hold a ton of recipes and pictures. This is a collection by Echo Park, called Farmhouse Living, and it is a fun collection that has a very country vibe to it. It is available at Country Craft Creations.


I did do a walk through videos and you can see it here:


I reference the following tutorials: Lay Flat Album Cover Method Waterfall Tutorial Tamra's Channel, where she did her latest December Daily Tutorials for 2022 Below is a list of supplies I used. This is a big album, and does require a lot of supplies, but it is worth it! Also I have a cutting list for the pieces needed. Thanks so much for watching, I hope you enjoy the tutorial. Chipboard (12 x 12) - 2 Cardstock Artisan Red, one whole package Artisan Green, 8-10 (I used this for double matting on the front cover, and for accent pieces in the book) Artisan Summer Ivory, 4 Artisan Brown, 1-2 Magnets, 6 large Seambinding, 3 yards Patterned Paper Carta Bella Farmhouse Living, entire package which included stickers Carta Bella Farmhouse Living, Coordinating Solids Kit, one of these I purchased extra papers...two of the single sheet "Barn Wood", and one each of the 3 journaling card papers Flowers: Farmstead Easter Daisies The Cutting Board I used was a Silhouette File, called "Kitchen Set 7" by Studio Ilustrado. His main page in the Silhouette Design Store is here. The fence on the cover was from my stash, purchased at Hobby Lobby. The ladybug was from my stash (unknown), and the charms were from a local shop in my town. I attached the charm with a Tim Holtz brad with eyelet and a chain. I also added one package of 25 recipe cards to this album, which were from Hobby Lobby. Cutting List: COVER: Chipboard: 2 - 8 1/2 x 8 1/4 1 - 3 x 8 1/4 Cardstock to cover Chipboard: 2 - 10 1/2 x 10 1/4 1 - 6 x 10 1/4 1 - 6 x 8 1/8 PAGES:: 5 - 8 3/4 x 8 INSIDE FRONT COVER: Pocket Flaps: 2 - 8 3/4 x 4 1/2 Squash Books: 2 - 7 1/2 x 7 1/2 PAGE 1: Front: Pockets:2 - 7 1/4 x 4 Back: Foldout: 1 - 7 x 11 3/4 Pocket: 1 - 7 x 3 PAGE 2: Front: Waterfall: 1 - 6 x 10 1/2 1 - 6 x 9 1/2 1 - 6 x 8 1/2 Flaps: 2 - 6 x 12 Back: Accordion Belly Band: 1 - 9 x 9 PAGE 3: Front: Pocket Flap: 1 - 6 1/2 x 8 1/2 Pocket: 1 - 9 x 4 Back: Pocket 1 - 9 x 4 Waterfall Closure: 1 - 6 3/4 x 1 3/4 Waterfall: 1 - 3 1/4 x 7 1 - 3 1/4 x 8 1 - 3 1/4 x 9 PAGE 4: Front: "T" Belly Band: 1 - 2 x 9 1 - 2 x 6 Back: Round About Waterfall 4 - 6 x 8 1/2 PAGE 5: Front: Flaps: 2 - 7 x 8 Back: Alternating Accordion Stacked Pockets: 1 - 7 1/2 x 7 1/2 1 - 6 1/2 x 6 1/2 1 - 5 1/2 x 5 1/2 INSIDE BACK COVER: Flap: 1 - 5 x 8 Large Pocket: 1 - 9 1/2 x 4 1/4 Small Pockets: 2 - 5 x 3 1/2 Please note that I have tried my best to make sure that all of the information is accurate, but I'm human. If you notice something or have questions please let me know.

Wednesday, February 23, 2022

Let's Make Some Flowers!! A Design Team Project for Country Craft Creations

 I had a viewer request to share my rolled flowers and how I did them. This is a blast from the past and is not my idea, but they are fun to make and you can do them with scraps! I am going old school also, pulling out my Fiskars decorative scissors!


I will show you a couple versions of rolled flowers and some punched flowers...also a new MUST HAVE flower making tool that you NEED! I'm using leftover scraps from my Configuration Card Project
, which is a design team project for Country Craft Creations.

I'm using the exclusive paper collection "Blossoms in Springtime". You can find it here! The must have tool...The Heartfelt Creations 3D Shaping Mold, Floral Basics. I also want to link Bonnie's channel here...I mention her fantastic flower tutorials in my video. She has done several tutorials on the shaping of the flowers. Stop by and give her some love!

Monday, February 21, 2022

Blossoms in Springtime Configuration Card Tutorial for Country Craft Creations

 I have a new tutorial for you today. Would you like a fun new idea in card making?  I’m using “Blossoms in Springtime” and have created two configuration cards for you. This is exclusively available at Country Craft Creations 

I hope you enjoy the tutorial, have a crafty day! 

Monday, February 14, 2022

Love Letters Gift Box/Album, a project for Country Craft Creations


Hi, and Happy Valentine's Day! As promised to my fellow Scrapbookers of Country Craft Creations Facebook group, here is the walk through-talk through of my "Love Letters" Gift Box/Album. The papers are exclusive to Country Craft Creations. They are GORGEOUS! I used them to create this fun project. I hope you love it as much as I do. For this project I used: 2 wood boxes with drawers from the Dollar Store Chipboard: 2 - 3 3/4 x 6 3/4 1 - 4 x 6 3/4 (the spine) Cardstock to cover chipboard: I used the lay flat method to cover the chipboard just like an album. Here is a tutorial if you wish to view it...https://youtu.be/VDrBoasyqtc 2 - 5 3/4 x 8 3/4 1 - 7 x 8 3/4 1 - 7 x 6 5/8 The inside accordion is 6 x 11, score on the 11 at 1/2, 4 and 7 1/2 The pocket on the inside of the spine is 5 x 3 1/2, score on the 5 at 1/2 each end and on the 3 1/2 at 1/2 I used about about 4 sheets of patterned paper and some scraps. I also used seam binding, about 1 1/2 yards. I used two Tim Holtz knobs that I had in my stash, along with the flowers, which were in my stash. I inked my edges and painted the boxes. When I painted the boxes, I painted the entire inside of the shells of the drawers. Everything else I just painted the edges since I covered them with patterned paper. Thanks for watching and I hope you enjoy the project.

Friday, February 11, 2022

February Country Craft Creations Design Team Haul

I have my February Haul Video available, and it is LOADED with GOODNESS!!! I purchased some extras too... Come check it out!


Please visit Country Craft Creations and get your supplies, then stay tuned for some fun tutorials!!

Stay crafty, my friends!!!

Saturday, February 5, 2022

Love Letters Countdown to Valentine's Day, a Design Team Project for Country Craft Creations


 Good morning!  This is my idea on making a countdown type of calendar for Valentine's Day, a 14 day countdown.   This is a design team project for Country Craft Creations, and I'm so excited to be using the amazing paper collection "Love Letters", sold exclusively by Country Craft Creations.  You can get some for yourself by clicking the link!

This project features little pull out drawers that you can put candy or notes in.  I realize it's the 5th and I'm a little late in posting but it's not too late.  You can make this fairly quickly and still have fun with it!

In the video description I have all of the supply lists and links to get specific things mentioned in the video.  I hope you enjoy and it gives you many more ideas on how to adapt this idea to different projects.  

Thanks for watching and have a crafty day!

Michelle

Tuesday, February 1, 2022

Love Letters Stacked Waterfall Folio, A Design Team Project for Country Craft Creations


Welcome back! I have another design team project for Country Craft Creations, using the beautiful and exclusive collection "Love Letters". In this project I will "change" the focus of the color palate to the gray and pinks in the collection. I think you will like it! For this project I used the 100 lb Artisan cardstock in white, although the 87lb version will also work very nicely. Below is a cutting guide, and a list of links where you can get the products I used that are sold at Country Craft Creations. Stacked Waterfalls: 2 - 6 x 10 1/2 2 - 6 x 9 1/2 2 - 6 x 8 1/2 Spine: 1 - 2 x 6 1/2 Flaps: 2 - 6 3/4 x 6 1/2 Pockets: 2 - 7 x 3 1/2 2 - 5 1/2 x 6 Supplies I used from Country Craft Creations include: Artisan Cardstock: White My Colors Cardstock: Frosted Rose and Polished Stone Art Glitter Glue (be aware this isn't shipped in winter months, as cold affects the glue) Heartfelt Creations Die Seam binding in Pink and Lt Grey Graphic 45 Flowers Thank you so much for stopping by! I'll see you with more tutorials soon, until then, stay crafty, my friends!

Monday, January 31, 2022

Love Letters Configuration Tag, Card, Album Tutorial

Hello and good morning. Here is a tutorial for you that I think will be fun for you to make. I have created another configuration project for you. This can be used as a tag, a card and an album. I'll show you how to create it all, including an envelope to put it in!


This is my design team project for Country Craft Creations.
I'm using "Love Letters", although I also did examples with "Love is in the Air" and "Here Comes the Bride". It's had to say how much paper you will need, as I used scraps for the single tags, and only one sheet of cardstock for the tag and one for the envelope. For the album I used about 8 sheets of patterned paper, and 4 sheets of Kraft Artisan cardstock for the base album. I also used My Colors cardstock, 2 sheets of Frosted Rose. This is a fun project and I hope you enjoy it! Tag base: 1 = 12 x 12, For an album you will need to make two of these Envelope: 1 - 12 x 12 For an album you will also need: Connector/Spine: 1 - 2 1/4 x 8 1/2 (For 1/4" spine) or 1 - 2 1/2 x 8 1/2 (For 1/2" spine) Waterfall: 1 - 3 1/8 x 10 3/4 1 - 3 1/8 x 9 3/4 1 - 3 1/8 x 8 3/4 Pocket: 1 - 6 x 3 1/2 Love Letters Artisan Cardstock, Kraft My Colors, Frosted Rose Seambinding: Pink and Beige Small Magnets

Have fun and stay crafty, my friends!


Tuesday, January 25, 2022

Here Comes the Bride Mini Ornament Album and Flowers!


I used some scraps from my previous tutorial and made a cute companion mini album ornament for the couple's Christmas tree and made some flowers!

Come check out the video and then head on over to Country Craft Creations for your papers, "Here Comes the Bride".  

Monday, January 24, 2022

 Hello and welcome back to my channel. I have an album I think you will love. It is very easy to put together and it is big! This will be an amazing album for a wedding! I'm using the exclusive collection from Country Craft Creations called "Here Comes the Bride" and it is an exquisite collection. The images and colors are amazing. Head over to Country Craft Creations.

During the tutorial I reference a couple of my past tutorials.

Lay Flat Cover Method How to make a stacked waterfall Summer Adventure Mini Album (with tag closure) Below is a cut list and supply list for this project. I used quite a bit of product for this album. The cover is 10x10" and has a 2 1/2" spine. The pages are 9 1/2 x 9 1/2". I used 19 sheets of black cardstock, 3 of Pearl Sheen Gold and 2 of Pearl Sheen Natural. This count DOES NOT INCLUDE extra cardstock used for mats (other than listed below) and mats for cutaparts...I used scraps. I did use almost all of the patterned paper in this collections. I had one 12 x 12 sheet left over and lots of scraps. Because of the size of this album it did take a lot of paper. You will also need seambinding for closures and 2 large magnets. I hope you enjoy the project. I am trying very hard to make sure that the information is accurate. I'm human. If you notice something and/or have a question please ask. I am always willing to help. SUPPLY LIST: Here Comes the Bride Paper Collection Chipboard (Heavy) Art Glitter Glue Score Tape Artisan Cardstock: Black, Pearl Sheen Gold and Pearl Sheen Natural Graphic 45 Tags Lace: The exact lace I used is not available but there are many other selections to choose from Seam Binding in Black, and Ivory Large Magnets Flowers CUTTING LIST: (All cardstock is black unless otherwise noted) Chipboard: 2 -1 0 x 10 1 - 2 1/2 x 10 Cardstock to cover chipboard: 2 - 12 x 12 1 - 5 1/2 x 12 1 - 5 1/2 x 9 7/8 Base Pages: 4 - 9 1/2 x 10 1/4 Inside Covers Flaps: 2 - 8 x 8 1/2 Pockets: 2 - 3 1/2 x 11 Pinwheel Pages (Front page 1 and back page 4) 8 - 4 3/4 x 5 1/4 2 - 4 x 4 I used 8 pieces of Pearl Sheen Natural to mat the backs of these pinwheel pages, 4 5/8 x 4 5/8

Monday, January 17, 2022

Country Craft Creations New Year's Eve Retreat and Crop Projects Review

I posted a review of the Country Craft Creations New Year's Eve Retreat and Crop projects. 


I have links to the crop projects by the designers of Country Craft Creations in the video description.  Please go check them out.  They are all amazing crafters and have a bunch of great tutorials to share.

I had so much fun participating in all of the projects. I hope you enjoy the review.


Saturday, January 15, 2022

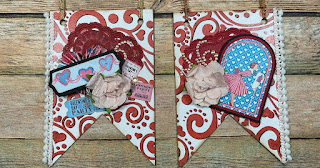
Love is in the Air Exchangeable Banner Pieces


Today I have another project using leftovers from “Love is in the Air!  This collection is exclusive to Country Craft Creations  and is available here. These are going to be for my exchangeable banner. I did a tutorial using Midnight Kiss, the video is here.  

Four of the banner pieces I had in my stash, the largest one I had to make to complete the 5 pieces I needed. If you’d like to make your own, the measurements are below. 


The banner measurements are:

2 - 4 x 6, the peak of the cutout is 2” from the bottom center of the banner

2 - 5 1/8 x 7 7/8, the peak of the cutout is 2 5/8 from the bottom center 

1 - 6 x 9 1/2, the peak of the cutout is 2 7/8 from the bottom center

I used up scraps to cover the chipboard and make the rosettes. I made a heart rosette, and if you need directions on how to do that, check out this tutorial where I show how to do that. I backed cut aparts with cardstock then fussy cut them out. I used Pom Pom trim from the Country Craft Creations store on every piece. Doilies are from my stash. Each banner used 1 yard of ribbon for the ties (cut into 2 pieces for each banner piece), so you’ll need 5 yards total. Ribbon was from my stash. I also used foam tape (from the store) under some elements to give more dimension. Flowers are also from the Country Craft Creations store. 


I can’t wait to change the decorations out for February, I’ll share pics when I do!


Friday, January 14, 2022

Love is in the Air Decor Frame Project


I have completed my decor frame project using Country Craft Creations exclusive paper collection “Love is in the Air” and it is so fun!  Check out this walk through-talk through video then head on over to Country Craft Creations and get your papers!!!

Stay crafty!

Tuesday, January 11, 2022

"Love is in the Air" Z Fold Folio Tutorial


 Hello everyone, and welcome back to my channel. Today I have a fun folio project that was inspired by a recent card tutorial I did using a Z Fold technique. If you want to see that tutorial it is here.


I wanted to use that concept in a folio, and this is what I came up with. I created this simple design with multiple pockets that you can fill to the brim with tags and photo mats. When you open it you see amazing goodness and I think using this exclusive paper collection "Love is in the Air" by Country Craft Creations made this project just amazing. You can check out Country Craft Creations here
.

Below I will link specific items that I used from the store, and also will have a cut list for you. It only took 10 pieces of cardstock in the base color to make the album, plus 4 of a coordinating color. Then I used approximately 16 pieces of patterned paper from the collection plus a sheet of cut aparts and journal cards. I filled it with several different tags and photo mats. In the tutorial I'll go through all of it...and we will do the heart shaped rosettes that I used on the cover! Thanks for watching!! CUT LIST: Cover: 2 - 9 1/2 x 11 (main color) 4 - 8 3/8 x 8 3/8 (coordinating color) Pages: All main color 2 - 8 x 8 3/4 2 - 6 1/2 x 8 3/4 2 - 5 x 8 3/4 Pockets: Main color 6 - 9 x 3 Waterfalls: Main color 2 - 6 x 10 1/2 2 - 6 x 9 1/2 2 - 6 x 8 1/2 Rosettes are made with 1 x 12" strips. The items I used from Country Craft Creations include: Love is in the Air paper collection Artisan Cardstock Art Glitter Glue Heart Felt Creations Dies: Leaves Tickets and Tags Graphic 45 dies are currently unavailable but check back at the store soon Seam Binding Pom Pom Trim

Monday, January 10, 2022

 Happy New Year!  

Let's make some fun inserts for your Travelers Notebook!


I am adding to the Travelers Notebook that I just made for the Country Craft Creations New Year's Eve Crop.  


I am making a folder and even some junk journals for it.  I will also show you how to make a simplified larger junk journal with the pamphlet stitch.  

I am using found papers from my stash and leftover design team package papers for this tutorial.  

I hope that you like the tutorial.  This junk journal was done from a request from one of our Country Craft Creations members!  Other designers will be doing other projects also.  I can't wait to see what they come up with.  

Check out Country Craft Creations for the Graphic 45 Travelers Notebook, the Simple Stories Hearth and Home paper collection, and the Kraft Artisan Cardstock.  

Wednesday, January 5, 2022

A new take on an Infinity Explosion Box


I came up with another idea using my We R Memory Keepers Explosion Scoreboard!  This is a fun new idea, and would be great in any papers you wanted, it would make a great small gift box!  

The boards are on order (again!) and will be available soon at Country Craft Creations 

Thanks for stopping by!  I hope you enjoy the tutorial. 

Stay crafty!

Monday, December 27, 2021

Hearth and Home Kitchen Center Altered Box Project


This is a quick walk through-talk through video that I did as a part of the Country Craft Creations design team.  I love this paper collection!!  Hearth and Home is by Simple Stories, and is available at Country Craft Creations.

I had these wooden boxes in my craft room and the inspiration struck me.  I think the colors are fantastic and they match my kitchen PERFECTLY!

I hope you like the video and it gives you inspiration!  Have a great day, and stay crafty!

Michelle

Wednesday, December 22, 2021

Midnight Kiss 3D Cards, A Design Team Project for Country Craft Creations


This is a design team project for Country Craft Creations. I procrastinated on my Christmas Cards, so I decided to make some Happy New Year Cards! I'm using the amazing collection "Midnight Kiss", exclusively available at Country Craft Creations. We will make 4 cards: These are not new designs. I did not create these cards, they have been done before and around for a long while. I have been wanting to play with these designs, so I did. :) Pinwheel Tower (or Column) Card W Fold Card Z Fold Card Box Card (aka: Box Pop Up Card, Z Fold Box Card) I will give all of the measurements and the instructions during the tutorial. But, here are the basic cardstock measurements for these cards. Pinwheel Tower (or Column) Card 1 - 5 x 4 1/2 4 - 5 x 3 1/2 W Fold Card 1 - 4 1/4 x 11 1 - 1 3/4 x 11 Z Fold Card 1 - 12 x 9 (This will actually give you two card bases) Box Card (aka: Box Pop Up Card, Z Fold Box Card) 1 - 4 1/4 x 11 2 - 2 1/8 x 11 Supplies used: You can click the links to get directly to the store if you wish. Cardstock for Bases, Artisan Black Mirror Gold Paper Other options for coordinating cardstock that match this paper collection include: Pearl Sheen Natural and White Mirrored Gold and Mirrored Silver (See link above) Artisan Cardstock: Grey, Winter Grey (See link above) My Colors: Pink Delight Shimmer, White, Granite Shimmer, Golden Yellow Shimmer Patterned papers for the fronts of the banners, I used 5 different papers from "Midnight Kiss" Art Glitter Glue Black foam tape I used some ribbon from my stash as well. I hope you enjoy the tutorial and have a fantastic holiday season!

Tuesday, December 21, 2021

Midnight Kiss Exchangeable Banner Tutorial

 HELLO! It's almost the new year...finally, right?

I had an idea and this is the tutorial! I am using the magnificent paper collection by Country Craft Creations called "Midnight Kiss". It is a beautiful collection for New Year's, and also could be used for any fancy "night on the town". It is available at Country Craft Creations exclusively.


I made a banner, but there are a few different things with this banner.  


First, it is "offset", meaning it has an angle to it, which is a little different. Second, it is exchangeable! I found a beaded garland and had an idea...hang the garland, and make the banner pieces so that you can exchange them out! How many of us make banners for decorations? This way, with this idea, you can leave the garland up, and just exchange banner pieces for different holidays and events. I hope you enjoy the tutorial!!

There is a detailed description of the supplies you need to make this project in the video's description. Just click on the picture and it will take you to YouTube! And don't forget to check out Country Craft Creations for your paper crafting needs.

Happy EVERYTHING!!
Michelle

Monday, December 20, 2021

Midnight Kiss 3D Decor

 I did a walk through-talk through video on YouTube sharing this amazing paper collection "Midnight Kiss" by Country Craft Creations.  


This paper is amazing!!!  You can get yours in the Country Craft Creations store.