We are so glad you are here! We love making and sharing our projects, and we are excited to have you visiting our site. Please leave us a comment and let us know what you think!
While I’m working on my next design team tutorial for Country Craft Creations I thought I’d share this. I had scraps leftover from a previous design team package that I used to decorate this new box project that I used the Explosion scoreboard to make. If you don’t have the scoreboard the only things you need to change are: score the 12x12 at 4” on all 4 sides and score the sides at 2” on all 4 sides.
Ladies and Gentlemen, I give you the exclusive paper collection from Country Craft Creations...Retro Men!!! This is a new design team package I just received and I am IN LOVE with it, and you will be too!!! I have a new album coming this week using this paper that you will also love.
Check out this quick video show and tell.
Please visit Country Craft Creations and get this paper collection quick, as I have a feeling it will sell out fast! When you do, please mention that Michelle sent you!
Hi Everyone! I have another tutorial for you today.
This isn't a Country Craft Creations design team project, but it does use Artisan Kraft and Artisan White paper in it that I did purchase from Country Craft Creations. It is the best best best ever cardstock, please, if you haven't tried it go to the store and check it out. I promise you won't be disappointed!
The patterned paper is from my stash, Echo Park's "Rustic Elegance".
I was playing with the scoreboard again, and was coming up with different ways to incorporate the heart templates that come with the board into the box design. I hope you like it! Have a great day!!
The other day I wanted to figure out how to make a rectangular box using the We Are Memory Keepers Explosion Score Board, and I did. I figured out all 7 sizes and I did a tutorial that showed how to make them and what do do. It is a great project, and I can see it being a great sized gift box and a card all in one! The video is here.
But then, I had an idea, and used the same principles but made a gift box/album. The difference with this one is that I did it in such a way so that you can use the explosion board AND I give directions for use with a conventional score board. It also has more room between the boxes so that you can add more embellishments or elements on the pages.
I used the exclusive patterned paper collection "Tea In Wonderland" from Country Craft Creations. This paper collection is AMAZING! It is beautiful and girlie and full of enchantment all at once. You will love it!
I give all cutting lists and dimensions for the boxes and lids in both tutorial's descriptions.
Thanks for watching. I really appreciate your support.
I was able to get this tutorial posted and I thought you would like to check it out.
I made this mini album with the exclusive papers "Tea in Wonderland", available at Country Craft Creations. You will love these papers, the patterns are amazing and the colors are just exquisite.
This album was super fun and easy to make. I have all sorts of tags and elements in this album, so you can hold a ton of pictures in it. Below I have information about the supplies I used, and the cutting list for this project. Thank you so much for all of your support, and have fun making the album.
Stay crafty,
Michelle
I used approximately 16 sheets of Artisan Cardstock in Baby Blue, and 4 sheets of the Black. I also used approximately 16 sheets of patterned paper. I used 2 sheets of heavy weight chipboard, 2 sheets of score tape, 6 Graphic 45 Tags, 4 Paper Studio Tags, and about 5-6 yards total of seambinding. Below is a cutting guide for the album.
Cover:
Chipboard:
2 - 8 1/2 x 6 1/2
1 - 6 1/2 x 3
Cardstock to cover chipboard:
2 - 10 1/2 x 8 1/2
2 - 8 1/2 x 6
1 - 6 3/8 x 6
Base Pages:
5 - 9 1/4 x 12
2 - 1 x 5 15/16
Pages 1 and 10, Never Ending Elements:
6 - 8 x 6
Page 2, Horizontal Pockets:
1 - 4 3/4 x 9
1 - 2 3/4 x 9
Page 3, Vertical Pockets:
1 - 4 3/4 x 7
1 - 2 3/4 x 7
Pages 4 and 5: Waterfalls
Piece A: 2 - 9 1/2 x 6
Piece B: 2 - 8 1/2 x 6
Pages 6 and 7, Stacked Gatefold Pages
8 - 5 x 6
2 - 4 x 4
Pages 8 and 9, Accordions
2 - 6 x 12
I just used leftover cardstock and created photo mats for the inside of the front and back covers. I did double mat the covers inside and out only, I did not double mat the patterned paper for the inside of the album.
I have another video tutorial using the Explosion Board...today we make tall gift boxes in two ways. I am using a variety of papers from Country Craft Creations, including the exclusive Country Bunny papers. I hope you enjoy this project!
These papers are absolutely gorgeous, you are going to love the detail and the beautiful designs. I also used Artisan cardstock in Black and Summer Yellow.
One of my YouTube viewers asked if I could do a configuration style page using 8 1/2 x 11 paper. So I came up with this. The really fun thing about this album is that all of the pages start off with the same size paper but I scored them all a little different and made them into 5 different widths. The pages graduate in size. Check out this video and you’ll see who fun this album is and how versatile it is.
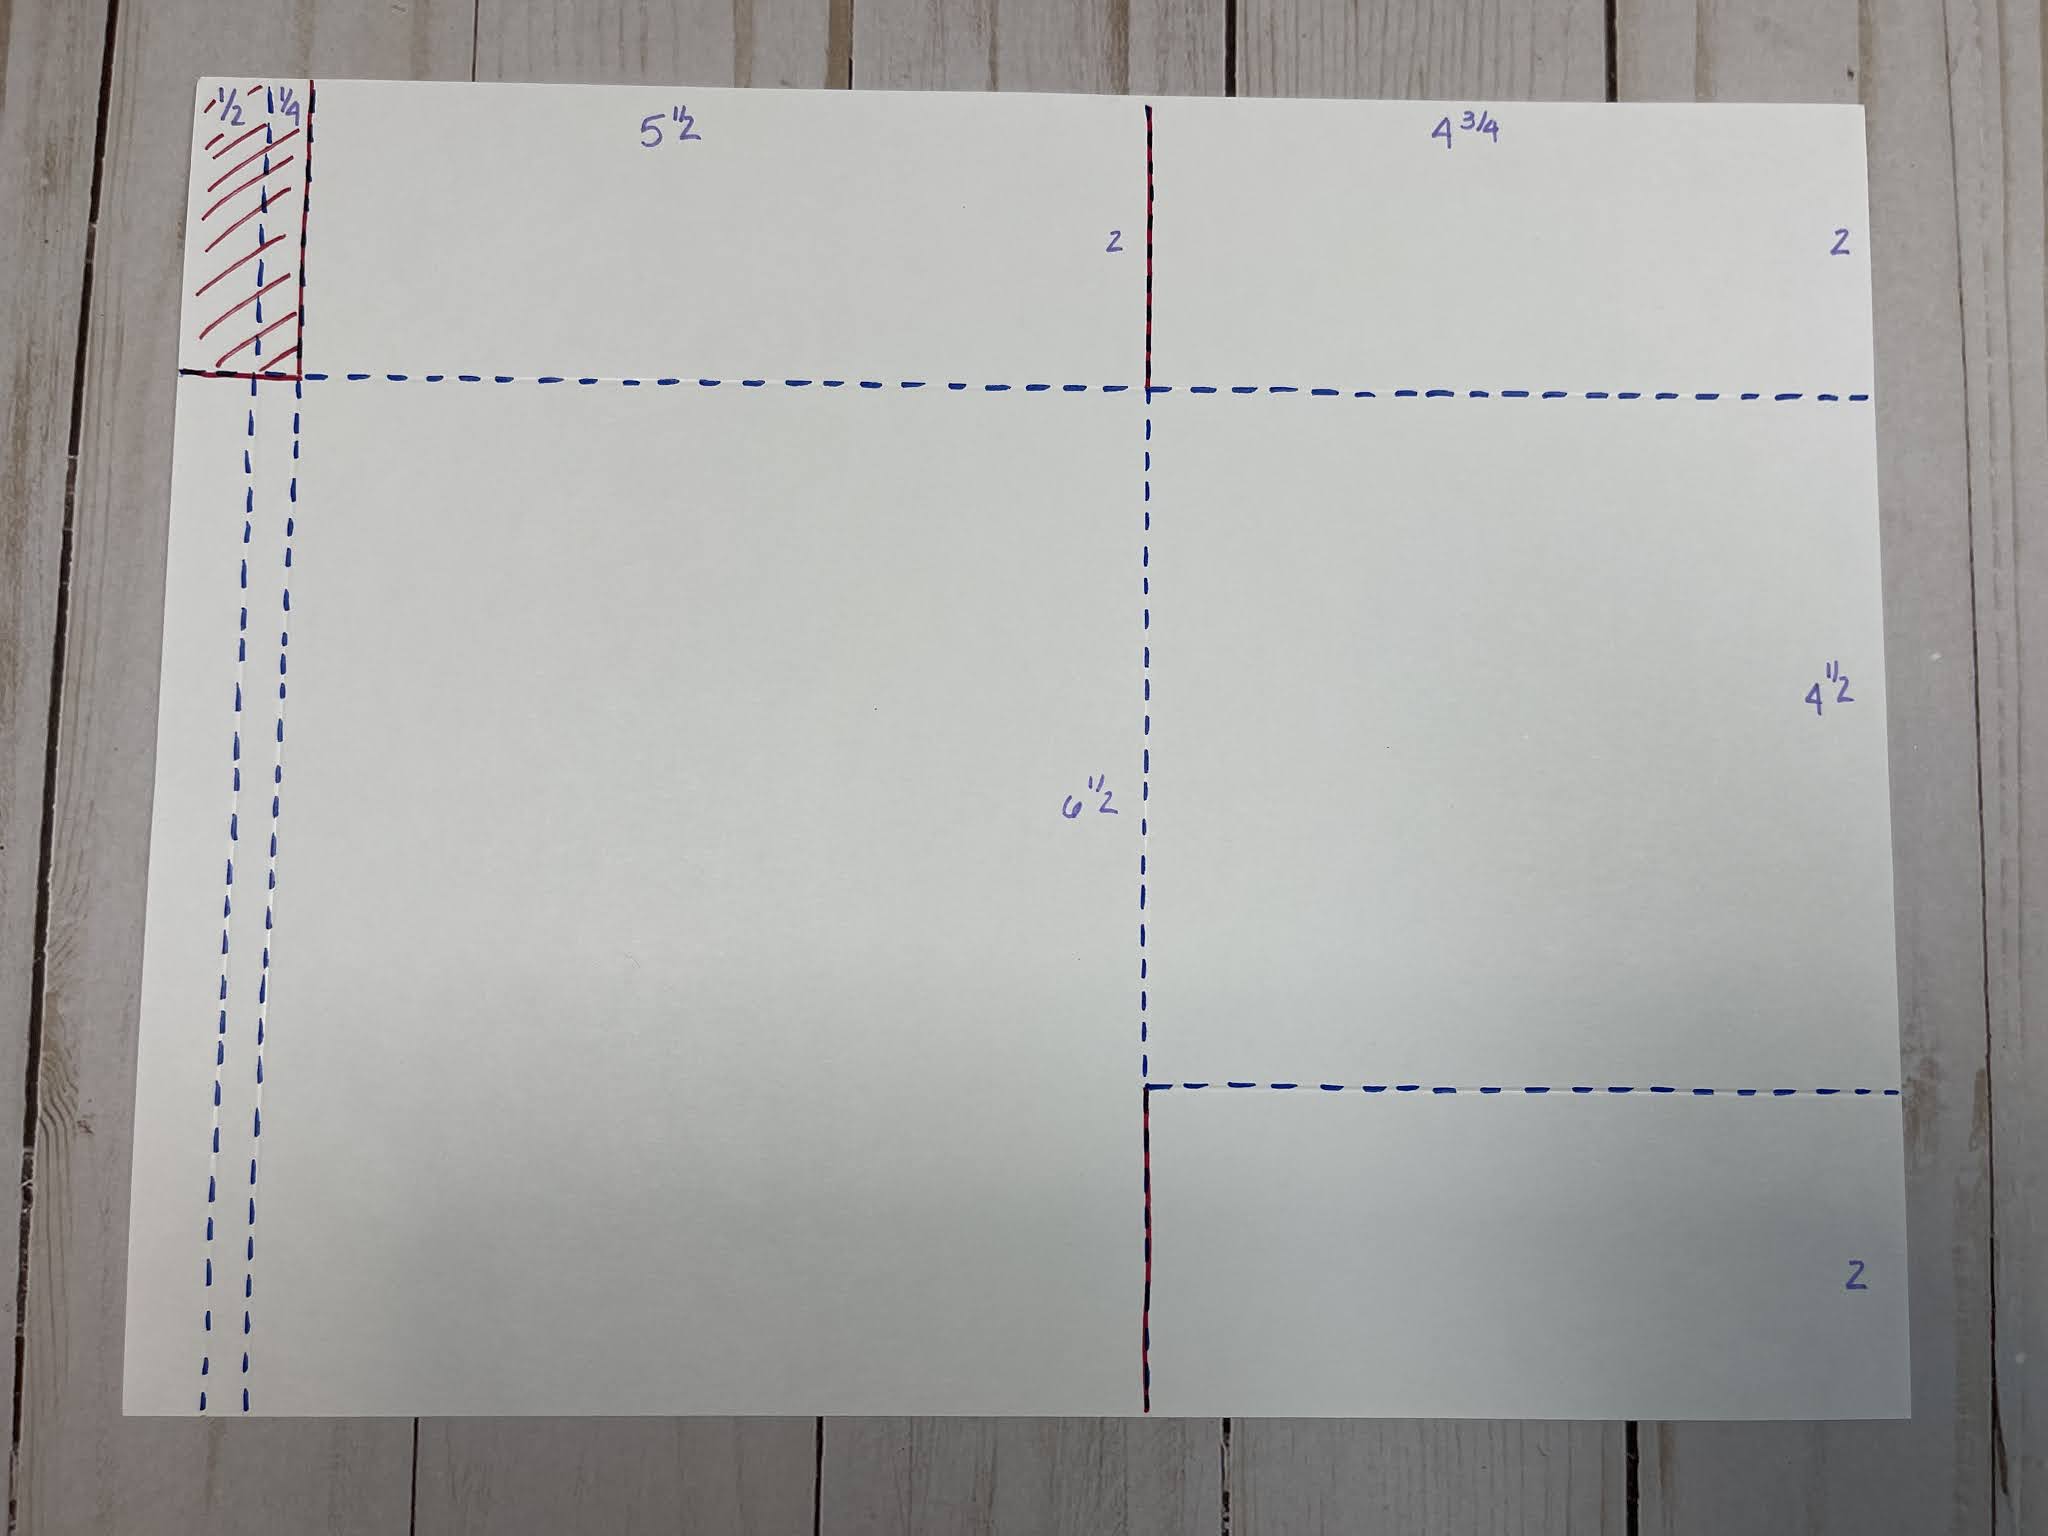
Here are pictures of the scoring I used to make the pages with. The blue dashes are the score lines, the red indicates where to cut “slits” in the paper, or where to cut pieces out. I go over all of this in the video. The cutting list will be below that.
CUT LIST:
Chipboard:
2 - 7 x 7
1 - 3 x 7
Cardstock to cover the Chipboard: (I used Artisan Black for this)
2 - 9 x 9
1 - 6 x 9
1 - 6 x 6 7/8
I did mat the patterned paper on the front of the album with Artisan Summer Ivory. I used 4 pieces at 6 7/8 x 6 7/8, two for the outside of the covers and 2 for the inside covers. I also cut a piece 2 7/8 x 6 7/8 for the outside spine.
Pages:
5 - 8 1/2 x 11
From the scraps from cutting the pages above from the 12 x 12 Artisan Black, you will have 1" pieces. I used these for pocket connectors/hinges. I scored them down the middle at 1/2" and then cut them to fit the pockets. I go over all of this in the tutorial.
Waterfalls (Stacked, one for the front and one for the back inside covers)
2 - 6 x 9 1/2
2 - 6 x 8 1/2
Waterfall closures (trimmed to make tag shapes)
4 - 3 1/2 x 3
Out of the scraps I made a variety of tags and photo mats that I added to the pockets. I also used 2 extra pieces of Artisan Black for this purpose.
The triangle pocket under the front cover waterfall was made with a scrap left over, as is the pocket under the back cover waterfall. These were "after thought" pockets, and are optional.
Hello! This is the third design team project I am doing for Country Craft Creations (https//countrycraftcreations.com) using the gorgeous "Summer" paper collection by Carta Bella. It is a beautiful paper collection and you will love what I did with what I had left! I had 2 sheets of 12 x 12 patterned paper and scraps...this is what I made.
This is a folio meant to hold cards and tags. I envision it as something you can fill with goodies and give as a gift. I filled it with cards that can be used for pretty much any purpose...imagine holidays...WOW! Below is a cutting list for you. I did not do a visual cutting guide as this is a simple project and only took 3 sheets of cardstock to make. You will need some ribbon, copier paper, and one magnet. Have fun and let your imagination go with this one. Thanks for watching!!Cover: 2 - 7 1/2 x 7 1/2Front inside cover accordion with dividers:2 - 6 x 3 (accordions)2 - 4 7/8 x 3 (dividers)1 - 4 x 5 (accordion front)1 - 6 x 5 (flap)Middle page:1 - 5 1/2 x 6 1/2Middle page accordion pockets:2 - 7 3/4 x 2 1/2Middle page flat pockets2 - 5 3/4 x 2 1/2