WELCOME!!

We are so glad you are here! We love making and sharing our projects, and we are excited to have you visiting our site. Please leave us a comment and let us know what you think!

Jackie and Michelle

Followers

Wednesday, August 28, 2013

Baby Shower Fun

I made these goodies for a dear friend of mine who was having her first little bundle of love.  Since I made this she has given birth to a beautiful baby girl!  Both Mom and Taryn are doing great!  I made her this mini album, and I wanted to share with you also!
 I gathered my K and Co. papers and a bunch of baby stuff and set to work.
 It's a simple album, made with envelopes and cards.  I made it so that she could stick the pictures in without having to cut them, so a 4x6" print fits perfectly.
 I decorated the spine with some charms I got at a party store...I'll show you what I did with these at the end of the post.
 This is picture heavy, but it sure is cute!
 I used the "Stack the deck" binding system for this book.


 The stickers are placed so that pictures can go right on the pages.  If the stickers were a little too big, I made them so that the pictures could tuck behind them.


The tags are made from the greeting cards that came with the envelopes.  Again, they are full size and simple.  After all, the baby is the most important, not the papers or the embellishments!
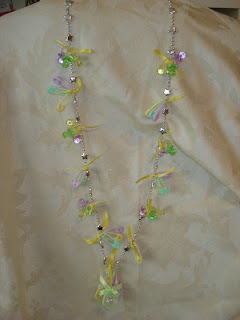
 For the shower, I made her a necklace that she had to wear.  I used the Mardi Gras beaded necklace, and tied the party favors to it.
It turned out super cute!

I also made her a card to go with everything.


 And then I made one of these awesome fruit babies!!!


Stay crafty, my friends!

Saturday, August 24, 2013

One More Sticky Note Page

Yep, another sticky note page.  I think I'm on some sort of obsessive thing with these.  

I was at a book sale fundraiser at my work, and I spied these sticky note sets...they were VERY inexpensive, so I got them.

 I love this one, pink and black...what's NOT to love.  
 This one was just plain cute.  
 I love the simple design, and the fun colors.
OK, now on to my obsession.  I decided to do another sticky note page.  I did not, however, make them and photocopy them.  I just stuck them right into my planner.  I added some stitching lines to help the white spaces stand out a bit better.  Layer, layer, layer.  And, taa daa...my page for the week was done.  

Thanks for looking, and remember...

Stay crafty, my friends!

Wednesday, August 21, 2013

Another Sticky Note Page

I just wanted to share this.  You may remember my first sticky note page for my Arc Planner.
Well, I decided to make another one using come sticky notes from my collection by Cavallini and Co.
I have used the first one, and it worked out great, I can't wait to try this one.

Have you made some for your planner?  Please let me know, I would love to see!

Stay crafty my friends!

Wednesday, August 14, 2013

"A Perfect Day" Mini Album

Hi, everyone!!  I hope you are all doing well!  I have been super busy...I have had a creative storm going on in my craft room.  It's funny how that happens.  Sometimes I have no idea what to make, and other times I can't make things fast enough.

I had some papers from a Prima collection (I believe it was called "Romantic Novel").  I decided to make a mini album with it, but needed a few more papers, so I then went to Marion Smith's site and downloaded the "Vintage Telegram" collection.  Here is what I came up with.

I made this book using envelopes and cards.  There is no chipboard in this album.  The pages are the binding. There is no separate binding mechanism.  I used the papers as mentioned above.  The flowers are a combination of Prima, Petaloo and Recollections.  The bling is by Recollections as well. The leaves for the flowers are 7 Gypsies.  The closure is a simple ribbon closure.
On the spine, I used two Prima key paper clips, then treaded the ribbon through it and tied a knot.
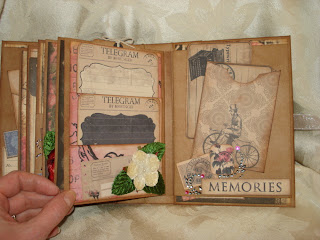
 When you open the book you see this.  The envelope on the left is adhered on two sides, creating a pocket for the tags behind it.  The envelope has a tag in it as well.  There is a pocket on the right, with more tags.  The page on the left is a double duty page, as it is held closed with a magnet...
 ...when you open it up, you get another area for pictures, and pockets for tags.
 There are a lot of pictures.  This page layout features a mini pocket with a tag.
 The "Perfect Day" die cut is adhered on the bottom so a tag can slip behind.
 Another pocket on the left, and a pocket page on the right.  The left page has a nice feature...
It has two pages on that page...
 It just keeps going.

 I really loved making this album and coming up with all of the pockets for the tags.
 The page on the right has a slit in it, that the tag slips into.
The envelope is adhered to create a pocket behind it, as well as has a tag in it.
 The last page on the right is again held closed with a magnet ...
...and it opens for more pockets and tags.

I hope you enjoyed this project. I loved making it.  I am going to do a tutorial on how I made it very soon, and will do a video as well.

Have a great day...Stay Crafty, My Friends!!

Wednesday, August 7, 2013

The Final Walk-Through of the Happy Day's Mini Album

I have the final video available for the album I did a tutorial series on YouTube.  You can find it here.


The paper collection is the DIY Shop by Crate Paper.

There are two videos on my YouTube channel that show how I made this book.


Thanks for looking, and stay crafty, my friends!

Saturday, August 3, 2013

Arc Planner Sticky Note Idea and Pages

Yet another Arc notebook planner post!  I really love this planner!

I came up with a page using sticky notes to create blocks for my "to do" lists.


I took a piece of paper, and using 1/2" borders to accommodate the punch, just started placing sticky notes in a random fashion.  I was going for blocks that I could categorize my to do's in.


Then I made copies and cut and punched the pages.


And this is what I have for next weeks pages!  I always use my weekly calendar on the right, and the left is the page for my to do's and lists and such.  I think it is kind of fun.

Here are the last two weeks of pages for your viewing pleasure.


I found this idea on Pinterest...a mini calendar to have on your pages so that at a glance you can see the whole month.  I thought if I wrote it quickly on a sticky note, it would serve the same purpose!  I love it!  It helps me with my planning!


Here is the other side, August.  It took just a couple of minutes to do, and it is awesome!

Stay Crafty, and Organized, My Friends!