Hello, and welcome to my post on my new "Blog Planner!" I am so excited about this project. I am a planner person and it is only natural that when it comes to blogging, I'd want to plan that out too.
I searched all over the net looking at various planners. It came down to a couple of key points for me.
1. I am not doing this for a business, so it didn't have to include financial information.
2. I share on Pinterest, Facebook, and YouTube, so I wanted to make sure I could include information and checklists to help with that.
3. It had to be simple and flexible so that I would use it, but also have enough space to plan, make checklists, etc.
This is what I eventually ended up with. I will include information on where I found all of these free printables so that if you want to check it out, you can.
I started with my Arc notebook, that I purchased at Staples. It is a full sized 8 1/2" by 11" notebook. I bought a zippered pouch that I put on the OUTSIDE of the planner, and I also used a Smash Book elastic band to hold it all closed.
I put the pouch on the outside because then I can just remove it when I am working on my planner. The Arc system allows you to remove and replace all of the components with ease, and I love that. I filled my pouch with multicolored pens, some highlighter tape, a correction tape, and some binder clips. There is plenty of room to add more things if I need to. I suppose I could put it in the planner, but the bulkyness of it bothered me, so the outside seemed the best place for it.
Inside the front cover, some sticky notes, and some mini note pad papers that I got from
Levenger.
I printed off the first page of our blog and put it in the book, just because I could!
The first section is the monthly section. I added a yearly calendar I got from
Calendarpedia.
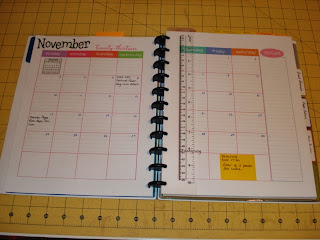
Then, I printed off these lovely monthly calendars and wrote in my dates. I used month stickers that I had in my stash from Boxer. The calendars came from
The Mac and Cheese Chronicles. I am just putting the basic information about the posts here. This way, at a glance, I can see what I did, or what I am planning.
That same link above is also where I got these lovely weekly pages. Here is where I am going to put more information. What the post is about, checklists, to do's, links, etc.
I found these quarterly planners At
Template Trove. I'm not sure what I am going to do with them, but I thought they were cool, so I added them.
I found this "Blog Post at a Glance" at
Living Live Brightly.
And this page for planning an marketing here at
Oh My Handmade Goodness. I thought that if a daily post was super detailed that I could have a whole page dedicated to it. The beauty of this Arc planner is that I can add or subtract pages anywhere in the book with ease. (Gotta love that!)
I thought this "Blog Post Checklist" by
Girl Loves Glam had some great information, so I included it in my notebook as well.
These are "Ideas and Notes" pages, and I got them from
Ironic Adventures. I am jotting down ideas I have, blog to do's, etc, on these pages. I covered them up because I want you to be surprised.
This is a lesson plan. I was thinking that if I was to do some sort of series (like a several part tutorial) this grid might come in handy. I got this form from
"Printable Paper". They have an amazing assortment of papers you can print. This link takes you to just the "teacher" section, there are other sections. If you haven't, you should go check out this site.
This last section is in progress. I want to create some sort of simple index of the blog posts. Jackie and I tried to use a lot of tags to help categorize things, but it is long. I am going to simplify it for my own use. I haven't started yet, we will see how it goes.
Last, but not least, the catetories of my tabs. Blog Posts, Craft Groups (information about the group I am involved with
"Sassy 6" lead by our awesome Stamp-Master Elsa!), Post Ideas, Post Index. I have one more tab, and I don't know what I'm going to do with it yet. I also have some Arc Pockets in the back to hold stuff as I need to.
That's it, my planner. I hope you liked it! I have just started using it, and so far...I love it. Hopefully it will keep me more on track with writing posts more frequently! Maybe I'll be so organized I can have themes! Maybe, just maybe. :)
Stay Crafty, My Friends!


