WELCOME!!

We are so glad you are here! We love making and sharing our projects, and we are excited to have you visiting our site. Please leave us a comment and let us know what you think!

Jackie and Michelle

Followers

Saturday, May 31, 2014

"Our Girls" Mini Album

I made this album for my twin granddaughters that are due in August!  I'm so excited, and wanted to make an album for them.  It is not a very big album, but bigger than a brag book.  I love how it turned out!
 I used an album by Chatterbox that I had in my stash.  The papers are DCWV, and Bazzill for the card stock.
 I also used journaling cards by Project Life and MAMBI.  Each page has a yellow card stock mat, all ready to accept a 4 x 6 picture.
I also found flower die cuts by Pebbles, and I used a few of them in this mini.
                                      
  All of the elements on the pages are adhered so that the picture can slip behind them.

 These pages have a flap that lifts up, for two more spots for pictures.  I made this flip a pocket, and put some journaling cards in it.

 I love how the colors turned out.

  I also used stickers by Little Yellow Bicycle, Bella Blvd, Deja View, K and Company, Jolee's, AC (the Thickers for the title), and Paper House.
Thanks for looking!!!

Stay crafty, my friends!!!

Wednesday, May 28, 2014

XOXO

On National Scrapbooking Day I went to my local Craft Warehouse, and did a free make-and-take that I wanted to share with you.
It was a simple envelope mini album.  At the store we made the base book and the cover, then they gave us an envelope full of goodies to finish the album at home.  
 I  love the happy colors this album had!  I did add a little of my own card stock for some of the pages, but the rest was part of the make-and-take.
 There are journaling cards for the envelope pockets.

I also used the envelope that was full of goodies to add another page to the album.  I think it will be a cute day mini album, don't you?

Stay crafty, my friends!

Saturday, May 24, 2014

"Made From Scratch" Mini Album

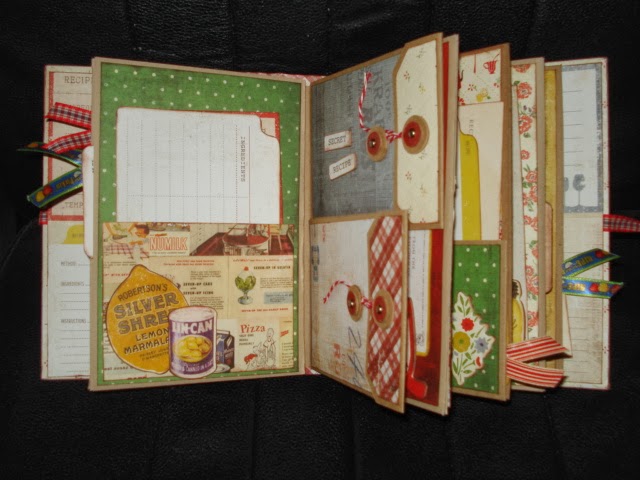
 I made this album from a kit that I bought from "The Hen's Den" at their booth at the Creating Keepsakes Convention.  I had to have it!  It was made with papers from The Farmhouse.  I did add, of course, some of my own ideas to it, and I think it turned out very nice!  I added the charm assembly on the spine, using a Tim Holtz chain, and then leftover chipboard pieces.

 There are lots of pockets and pull outs and stuff, this is a very interactive book!
     
                                      
 These policy envelope pieces are adorable!
 I made this left sided page, using some leftover papers to create an accordion type piece.  I think I will put pictures of the food dishes in here.
 I added these brown paper pockets for cards, and I adhered the mason jar chipboard pieces to create another place to put a recipe card.

Go check out "The Hen's Den".  I have purchases a couple of their kits, and they are always a joy to put together and fun to do…not to mention beautiful!

Stay crafty, my friends!

Wednesday, May 21, 2014

"Market Square" Mini Album

 This album, "Market Square", was one of the classes Jackie and I took when we went to the Creative Keepsake Convention last November.  I wasn't able to finish it in class, and I finally was able to get around to putting the rest of it together.
 The kit is by Button Farm.  Check out their site, they have amazing kits!
 The papers are her own line, by Farmhouse.  I love the vintage feel of everything!  I haven't seen the paper line anywhere else but at the convention and in her kits.  I sure hope that my local scrap store will stock them!  They are excellent quality, and the designs are beautiful.

I made the back cover myself.  I like mini's better when the back is also pretty.

Stay crafty, my friends!

Saturday, May 17, 2014

Date Night!

At work we have a wonderful lady who's daughter was diagnosed with a brain tumor.  All of us are pooling our resources to have a charity night in their honor, all proceeds are going to help them with the mountain of medical bills that they have.  

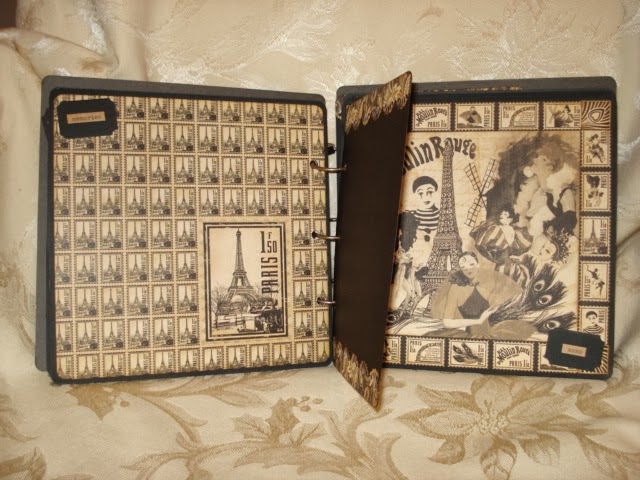
We are including movie tickets, and gift certificates for dinner at a local restaurant, along with other things like romantic comedy DVD's, wine, chocolates, and the like.  My "core" is putting together a "Date Night" basket for auction.  One of the things that I was asked to do is to make a sign for the basket.  I created this rosette using Graphic 45's "Curtain Call" paper line.  I also used the Martha Stewart circle edge punch for the rosette and the Tim Holtz filmstrip die to create it.
 I then decided to make an album to include in the basket.  I had leftover papers, so I thought, why not? I used a Teresa Collins cover that I had in my stash.
 I made it very simple to put pictures in it, as I don't know who is going to buy it, and I don't know if they are scrapbookers or not.  A photo will slip right behind the filmstrip, and a photo will tuck under the die cut edges on the black page.

 Some pages have pockets, and I created tags for them.  They are double sided so that 2 pictures can go on each tag.  The word cards are by 7 Gypsies, and the small words are by Tim Holtz.  The flowers are Recollections, and the bling is by Prima.


Stay crafty, my friends!

Wednesday, May 14, 2014

Tag Swap with "Sassy and We Know It" (and a YouTube Tutorial Link)

 My crafty sisters from "Sassy and We Know It" decided to do a tag swap amongst ourselves…and this is what I came up with.  It was to be a "Spring" theme, and we were cutting our tags 6" x 3".
I used papers by K and Company, along with their embellishments that came with the paper line.  I added ribbons, bling and flowers from Recollections.  I used the lace from my stash, and some pearl "ribbon" to decorate it as well.   I made the butterflies with a Martha Stewart layering punch, and added Stickles to create the body of the butterfly.  The Tim Holtz paper clip is there because my tags open up…
I added flowers to the bottom of the tag, but they are adhered so that if the ladies want to place a picture in the tag, they can tuck it under the flowers.  The other tag shows the back.

I also wanted to share with you a link to the tutorial on how I made the pages in my "Bohemian Bazaar" mini album.
The video can be found here, so please go and check it out!!
Thanks for looking, and remember to stay crafty!!

Saturday, May 10, 2014

Another Arc Notebook Idea!

 I made my own cover for another Arc notebook out of a sheet protector!  I covered the "spine" of the protectors with patterned paper, and repunched it.  I did that to add a bit more stability to the cover.  Then, I covered two pieces of chipboard with patterned paper and slipped it into the sheet protector.
I filled the notebook with some paper and TAA DAA!  This one is going by my bed to catch notes in as I lay there thinking, but not willing to get up!    The cool part of this idea is that I can change my covers anytime I want!  I think that's pretty neat!

Stay crafty, and organized, my friends!

Wednesday, May 7, 2014

ARC Planner Goodies for You!

 I found the coolest punch the other day at JoAnn's and I knew it would make some cool goodies for my ARC Planner!  It is by EK Success.  It punches out two sizes each of hands pointing, and arrows.  I thought to myself, "Self, this would be cool to make for my planner to highlight appointments."  So, I went to town punching out shapes, using up scraps, and running them through my sticker maker.
I was right, they are COOL!  In the future, I can write the time of the appointment in the shape, which I think will make my appointments stand out.  (I had already written this one down before doing this.)

 I also came up with my little notebook for my purse.  I gathered up my supplies and went to work.  I used a divider for my ARC planner that I no longer use.  I cut it to 3" x 5" and cut my papers the same size.  Then I punched…but here is the cool trick…see below.
 If you have the ARC punch, and you push the paper guide all of the way in, as far as it can go, to the right. When you do this, you get perfect alignment for your 3" end.
 It lines up perfectly, and you get this awesome notebook for your pocket, or your purse.
I used blank paper so that I can write portrait or landscape, then put the papers in my planner where I need them.  I love it.  I have one in my purse, and one in my locker for while I'm at work.

Stay organized, my friends!