

Monday, January 31, 2011
Friday, January 28, 2011
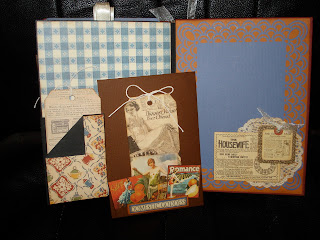
Three Tags Mini Album Tutorial


Choosing paper is critical. Double sided papers would eliminate covering cardstock with patterned papers, BUT BE CAREFUL WITH DIRECTIONALLY DESIGNED PAPERS! Also, I found it easier to score the paper UPSIDE DOWN, so please remember that if you have a particular edge you want in a particular spot!
The small pocket holds a shipping tag that is 2 3/8" by 4 3/4".
The middle pocket holds a tag that I cut to 6 1/2" by 4 1/2".
The large pocket holds a tag that I cut to 7 1/2" by 5 1/2". If you did a binding that takes up some of the pocket size, please measure and adjust accordingly.
I hope you have fun with this design! If you have any questions, let me know. Stay Crafty!
Wednesday, January 26, 2011
Domestic Goddess Mini Album
This post will be a two part series. First, I give you the finished project...
 I made this with a new fold that I was playing around with. I am not sure what to call the new fold though. I am going to have to think about it! Anyway, the book is 8x6"! It's huge...and it holds a ton of space for journaling and tags.
 I made the red ribbon rose, and used a pearl bead in the center. I made the white flower from three different sized doilies from Little Yellow Bicycle that I inked with Tim Holtz distressing inks. The leaves are from 7 Gypsies, the small flowers are from Recollections. The big metal butterfly is from Blue Moon Beads, as is the birdcage charm in the top photo. I used 7 Gypsies charms and the key is Tattered Angels. I used Martha Stewart punches throughout the book. The papers are from Bazzill and Graphic 45's Domestic Goddess line.
 First page of the book. Each page has two pockets on the surface, and there is a middle pocket as well, which means that every page houses 5 tags total, in three different sizes. Some of the middle sized tags also have tags as well. The smaller tags are shipping tags that I covered in some other papers from K and Company.
 On the backs of the middle sized tags are photomats, the large sized tags have three photomats total, one large and two smaller ones.
 The next page...
 And the next. I used different papers throughout.
 This tag has a lift-up ribbon to show more photo space.

 I made another pocket on this tag, and put the pictures in them.

 This tag has a collage of things creating another pocket with another tag in it.
 I used an accordion type binding for this. You could do whatever binding you chose. In the next post, I will show you how to make each page. What do you think?
Stay crafty, my friends!!


 | ||
|


Stay crafty, my friends!!
Monday, January 24, 2011
A new kind of Paper Bag Book
While checking out the latest postings on Youtube, I came across this great paperbag book tutorial by Mary Anne Walters. You can find the link to the printable PDF here: http://scrappystickyinkymess.wordpress.com/2010/04/16/that-pbb-pdf/
I have yet to embelish, but here is the base of mine,


 I also added a little heat embosssing!
I have yet to embelish, but here is the base of mine,


I used Glimmer Mist on the entire book! My adhesive of choice was Scor-tape and Beacon's 3in1


Wednesday, January 19, 2011
Pockets and Flaps Album

The book measures 6"x6", and holds a minimum of 13 tags with a bunch of space for more pictures and journaling.


I hope you enjoyed this little tutorial. Have a great and crafty day!!!
Monday, January 17, 2011
One Good Dog

Friday, January 14, 2011
Happy Birthday Bouquet
I wanted to do something a little different for my Mom...
 I realize that the picture isn't the greatest, but it's all I have! Maybe next Christmas I will ask Santa for a really good camera.
I used a drink mix container for the vase. I covered it with papers (K and CO.), and punched border papers with punches. I made the flowers, punched and bejeweled the butterfly, punched the heart, stamped the sentiment. The bamboo skewers were painted...
 My mom loved it. I just wanted to do something a little different, and it turned out really nice.
Happy Birthday, Mom!

I used a drink mix container for the vase. I covered it with papers (K and CO.), and punched border papers with punches. I made the flowers, punched and bejeweled the butterfly, punched the heart, stamped the sentiment. The bamboo skewers were painted...

Happy Birthday, Mom!
Subscribe to:
Posts (Atom)