WELCOME!!

We are so glad you are here! We love making and sharing our projects, and we are excited to have you visiting our site. Please leave us a comment and let us know what you think!

Jackie and Michelle

Followers

Showing posts with label DIY. Show all posts

Monday, March 4, 2019

It's Planner Time!

Hello all!  

I hope you are all having a good start to your week!  I have been sick, but am now feeling better, FINALLY!  While I was sitting on the couch feeling miserable, I decided to make some planner pages for myself.  

The Happy Planner is coming out with a bunch of new things, and I haven't been able to get my hands on them.  I have a ton of the supplies, and I thought I should use them instead of hoarding them!  I grabbed papers, sticker books, and just started making these pages.  I keep them in a book, so that when I need one I can just flip through all of my DIY pages and pick which one suits my needs.


This one is from my Miss Maker sticker book.  I have been working on some swaps an challenges, and I thought this would help keep me organized.


These pages, and the ones below, are made from stickers I don't usually use in my planner.  I use the monthly layout with the lists, and my lists are kind of full.  So, why not make notes pages.  I used stickers from a single book to make each page.


I think they turned out super cute!


There is a half sheet pack that is coming out that has the three top daily priorities.  Since I can't get out, I thought I would recreate my own.  I had all of these half sheets in my stash.  Add stickers, and now I have an assortment of my own sheets.


I used a teacher sticker pack to make this page above.  I thought it would be a great note page.


This page was inspired by my Travel sticker pack and a trip I am planning with my BFF, Jackie, later this year.  It will work great to plan our adventures.


This is a nice page for my yearly aspirations.  Guess I should fill it out!!


Another mermaid note page...I wouldn't use these stickers in my planner, but they sure are cute note pages.


I saw this somewhere, and now I can't remember where.  If I find it I will sure give credit and edit this post.  The lady who originally did this did it for a month at a glance page.  I am sure it will be perfect for this, and for any other list I need to make.


 The page above and below are scripture pages that I bought with the purpose of repurposing.  The stickers are pretty self explanatory, and they make a great addition to my DIY page book.


These are assignments pages that I bought, again with the idea of repurposing them.  These make great half sheet planners for specific events.  I even found a sticker that was a perfect party planner.


I know this has been picture heavy, but I wanted to share the ideas.  I love sharing ideas, and I hope that you can use some of them in your Happy Planner.  

đŸ’–Michelle

Saturday, July 23, 2016

Pie Plate Lazy Susan

Hey all!!!  How is everyone today?  I hope that your July is off to a wonderful start and that your summer is going most awesome!

I want to share with you another Lazy Susan project.  I made one before, and you can see
the post here. 

I got the original idea from Alejandra, and you can see her tutorial here.

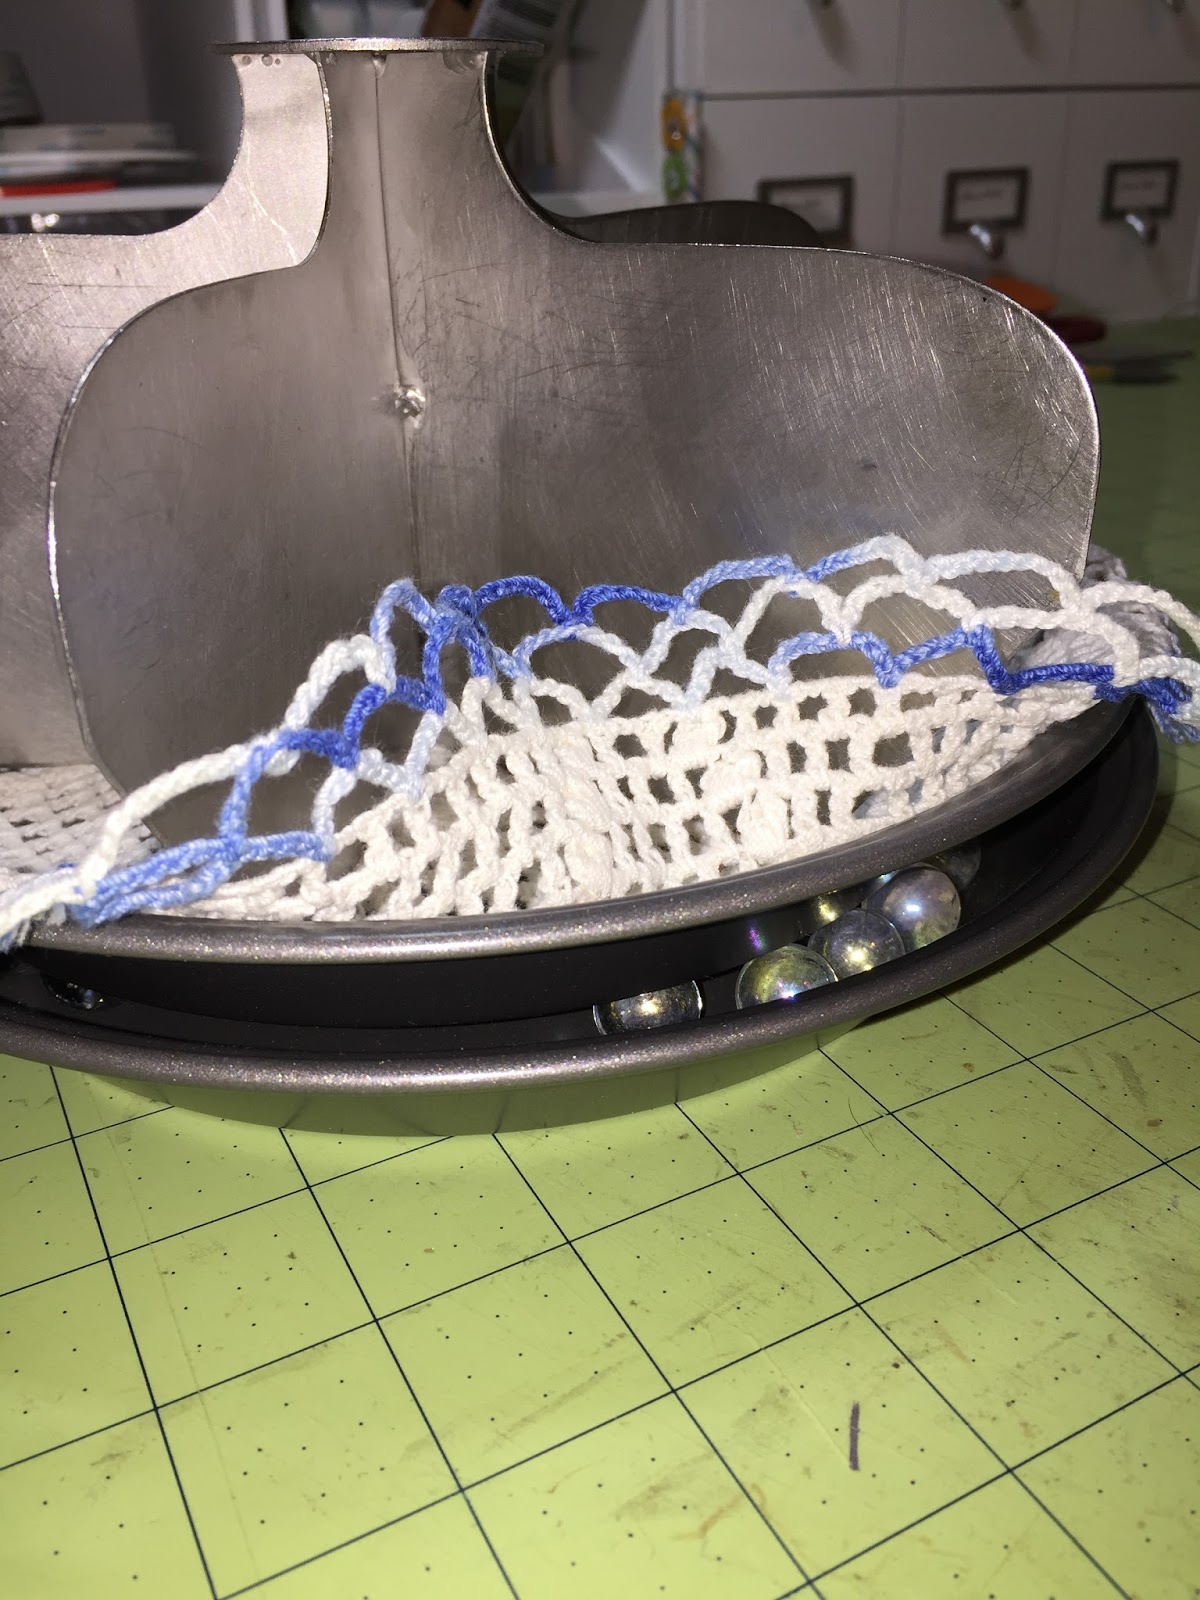
I took it another step and used a pie plate and a pie cutter for the organizer!
Isn't it pretty??  I used an old doily that I had in my closet.  I found this awesome pie cutter at a vintage store in my town.  Foxtrot Vintage is an awesome store.  Here is their Facebook Page in case you want to check it out.  I didn't see a blog or a website for their store, this is as close as I could get. It's a fantastic store.  I have purchased many cool little items for our home here.

Anyway...I spied the pie cutter and had to have it.  This is how I put together the organizer.

 I got two pie plates from the store.  They were on sale, and two of them cost me just a few dollars.
 I blocked the doily to make it all pretty...
 ...I filled one pie plate with marbles.  (I added more after the picture was taken, you should fill the bottom of the plate you are using.  It makes it turn nicer.)
I layered the other pie plate on top, then the doily, then the cutter.
Now I have a cute Lazy Susan with divided areas for my craft goodies.  You can see the other one I made out of cake plates in the upper left hand corner of the picture.  I love them!

Well, that's all for today.  Stay crafty and organized, my friends!

Saturday, May 30, 2015

A DIY Lazy Susan that really works!

 I found this idea on Pinterest.  You can find the video here, on Alejandra's website.  She had a video that showed several organizational ideas.  This one was COOL!  She used two cake pans and marbles to create a simple DIY lazy Susan.  I LOVE IT!  I found these round cake pans, and got the marbles from the craft store.  They are supposed to be used for vases and candle decorations.
You put the marbles in the bottom of one cake pan, then place the second one on top.  Done.  I found these cool little metal buckets and tubs that fit perfectly into the cake pan.  I filled it with some embellishments that I am using for for an upcoming project that you all are going to LOVE!

Stay crafty and organized, my friends!

Wednesday, January 9, 2013

Old Envelopes into New

I found these gorgeous envelopes while I was surfing the net looking for recycling ideas.  When I saw them, I knew I had to try them out.  I have played with recycled business return envelopes before, but these were too cute to pass up.

Here is my version of these awesome little gems.

 What you do is to carefully tear apart the envelope, reverse it and put it back together so that you can reuse them for fun mail!
 I refastened the sides with various pieces of washi and washi-type tape from my stash, then to reseal the envelopes when it comes time, I used a strip of Score-tape...I'll just peel and stick when the time comes.
I raided my stash of black and white papers, and covered the flaps of the envelopes.  They all had the gummed edge, and it is on the outside of the envelope when you reverse it.  I thought this was a pretty way to cover that up!
Then, on the front of the envelopes I had to do something to cover up the windows in the envelopes were the business address usually ends up.  Cathy Holden of Just Something I Made has a link to a bunch of free printables she has created and these were perfect.  They are meant to be printed on label sticker paper, but I didn't want to close the envelope, so I just printed them on regular paper.  I added tape to the edges of the label, and taa daa!!  Now I have beautiful recycled envelopes to use for sending fun things in the mail!!!

This is easy to do and fun.  Save business return envelopes that have pretty security designs and see what you can create!!!

Stay Crafty, My Friends!!!

Saturday, December 29, 2012

A New Planner

It's going to be a new year and I need a new planner!  I had been using the one on the right, made with Graphic 45 papers, for a while, I think 2 years...  I loved it, but it is small and I decided that I needed something a little bigger that I can keep all of my things together in, in ONE PLACE!  One of my goals is to be more organized, and I am hoping that this will help.  I custom designed it.  I made it classic size, and I think it will meet my needs.  I don't have a hugely busy life.  I work a lot.  I don't have kids in the house anymore, so school and after-school stuff is not an issue.  My planner is simple, and does what I need it to do.

I got the ARC binding system from Staples.  So far I love it!  I decided to use up some of my hoarded stash, and this is what I came up with.  I have included a bunch of links that inspired my creation so that you can see them also.

The cover, pockets and dividers were made from seriously heavy duty file folders I bought at New Seasons, by Cavallini and Co.

WARNING:  VERY PICTURE HEAVY, BUT I THINK YOU WILL LIKE IT!!!

 I cut the folders and created pockets on both of the covers.  The piece on the right folds out...
 ...Where I put a Post-It pocket on one side and created a pocket on on the other for my coupons.
 Turn the page, I added some other Post-It notes for use later.  And, they match!!
 Turn that page and I am going to use this section for my stuff, ideas, journaling, lists, home stuff, etc.
 I used some left over stickers to make this page.  Once I started listing all of the projects I need to FINISH, I was amazed!  I better get busy!
 I found this list of ways to stay creative on Pinterest, printed it and put it in the book for inspiration.  This section has graph paper that I folded.  I figure I can draw out my plans for projects on the graph paper and...
 ...it opens up to blank paper so that I can write notes, steps, etc.
 Another pocket...turn this page...
 ...and a section of papers for notes about work...my schedule, call schedule, etc.
 I got this idea from a brilliant person!  Beckie at Infarrantly Creative had created a system that I incorporated for my monthly/weekly planner section.  It looks like above when first opened.  When you flip open the left side...
 I have clipped inside a calendar I created from this site, here.  This flip out section also hides some project cards that I made using Rolodex cards I got for super cheap at Tuesday Morning, and a variety of craft tapes in my stash.
 I have my project cards, a year/day reference and my birthday/occasion sheet safely tucked away under this flap.
 I also made a tape page.  I took a piece of graph paper and sandwiched it inside a piece of folded waxed paper.  Then I put on some of my tapes, so that I can have some to use as I need it.
 The tapes come from a variety of sources, I think some are Washi, some are Cavallini and Co., some are Recollections and some are from Smash Book.
 So, the reason that I did the flip page this way is so that when I am looking at my weekly section (on the right) I can flip out the monthly section to see it while I plan.  I use the blank page on the back of the weekly pages (in the middle) to write to do lists, make notes, etc.
 If I don't need to see the monthly calendar, it just tucks away.  I used a piece of file folder to create the page marker.  On the other side of it, not shown, I put some sticky notes made from the same paper line as the file folders.  Here is one of my project cards.  If I have a big project that will span over a couple of weeks, I can just remove it and place it in the next week.  When done, I can just toss it.
 My week pages, you notice are different.  I have almost every weekend off and every Wednesday off. These are the days I can make appointments.  The other four days of the week are work, 10 hours a day with about 2 hours of commute.  I don't get much done during those days.  So...I made the weekly pages so that I had more room for my days off, and less for my working days.
 I also created a little mini page that folds, so I can try to do some menu planning and grocery shopping planning.  I need to get better at that, since I get home so late.  The left side is the back of the previous week page that I will use for notes.
 I found these free printable address pages at SampleWords.  They have tons of free printables.
 Phew, this is long!!  I put another Post-It pocket on this divider page for stamps and stickers.  I had some labels, again by Cavallini and Co., and I also put some slide stickers by Industrial Chic...you never know when you need to embellish something.
 The blog planner is based loosely off of a bunch that I have seen.  I am going to try to plan and stay more organized with my posts. This is the section where I will also keep track of my activities and assignments with the group, Just a Few Friends, headed by Elsa, of Just a Few Designs.
The back cover, is another pocket.  I also took another scrap of a folder and made a pen holder, the rectangle on the far right.

Woo Hoo!!  Done!!  I hope you enjoyed it.  I had a bunch of influences that inspired me when I was creating this book.  Please check out the links and check them out for yourself.

Stay crafty and organized, my friends!!