Wednesday, August 8, 2012
Pull Out Page Mini Album Tutorial
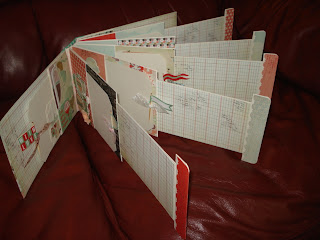
Here is how I made my "Come Fly With Me" Mini album. I tried to make this tutorial simple. I used post-it notes on the pieces, taking pics as I did it. Then I tried to make descriptions that were clear under the photos. I sure hope this tutorial makes sense. Please let me know if you have any questions!
I used greeting cards and envelopes I got at Michael's. I think you could use any envelope and card (or card stock cut to fit) set you wanted, but I think the bigger the better so that you can fit nice pictures in it.
Seal the envelope, and cut a sliver off of it on the left side. Set aside.
Take the card, add adhesive and fold it in half to make it double thickness...BUT don't adhere all the way on the right side, leave about 1" of room to attach the pull tab later. Then, measure 1/2" in from the left, and cut a 1/2" strip off of the top and bottom as shown.
With the open end of the envelope on the left, line up the card and envelope as shown, center the card piece to the sealed right end of the envelop, mark the envelope.
Cut a very small slice off of the envelope between the marks. Put the card into the slit to check to see of it is large enough. Note that there will be an area above and below the marks that are not cut...this keeps the pullout from coming out.
Remove the card from the slit just cut, and insert it into the envelope from the left side as shown...
sliding it all of the way through the envelope, through the slit you just made. Taa dad, the page is placed, and it will catch and not come through.
To make the pull tab, I cut a 3" wide paper (shown in black for contrast) the height of the envelope. I scored it in the middle, folded, and cut away a piece at the 1/2" mark, angling the tab a little so that it won't show on the pull out page.
Insert the tab between the open area of the card. Adhere.
Pull out page inserted into the envelope...
Pull out page pulled out.
I hope this made sense! To attach the pages you could do a bunch of different things, but how I did it was to use another envelope. I sealed it, opened both ends. I scored it to create a 1/4" gusset, and adhered it to each page, thus creating the pockets on the outside of the pages. Then I covered the pages with the patterned papers.
Stay Crafty, My Friends!
Subscribe to:
Post Comments (Atom)


My friend, thanks so much for the tutorial -- great job!!!
ReplyDeleteI just love this!
Thank you for the tutorial. It is very clear and easy to understand! Great idea!
ReplyDeleteThis is fabulous! Thank-you very much for sharing this tutorial.
ReplyDeleteトリーバーチは2004年にファッション界登場してきたばかりのブランド品です。短い時間で、すぐ世界のオシャレなファッション界に大きな風を吹きました。多くの女性は絶えずにアメリカに行って、そのブランド品のモノを手に入れて、ファッションショーを演出してくれます。スタイリッシュをトリーバーチ 財布を通じて、どんどんみんなに表してくれます。パーテイへ財布を持っていると、素敵なアクセサリーになります。
ReplyDeleteThank you for sharing this tutorial - definitely going to try this!
ReplyDelete