WELCOME!!

We are so glad you are here! We love making and sharing our projects, and we are excited to have you visiting our site. Please leave us a comment and let us know what you think!

Jackie and Michelle

Followers

Saturday, March 28, 2015

I had to try it!

 I have seen many tutorials on Pinterest about making organizers out of boxes, and so I had to try it.  We had an empty Kleenex box, so I cut it and folded it and covered it with papers...
Taa daa!  It was quick, easy, and it recycled!!!  The paper I used was by Bo Bunny, with kraft colored card stock.  I think it turned out cute!  Now I need some more empty boxes!

Stay crafty, my friends!

Thursday, March 26, 2015

It's FINALLY finished!!

I have finished the Halloween Make A Mini Album Series…FINALLY!!!


Part 8, the Finished Piece, is now available on my YouTube channel, and you can see it here!

Thanks for hanging in there with me, and being so patient!!

Stay crafty, my friends.

Saturday, March 21, 2015

A Pretty Folder

I was in the hospital not too long ago.  There are a lot of papers you have to keep sorted when that happens.  So, I decided to get organized.  I had this folder in my stash, and decided to use it.  But, the problem was that it wasn't pretty enough.  I can fix that.
I covered all sides of the folder, but had to make a template so that I could punch holes in the papers for the document tines.  I covered the whole folder (pictures to follow), and decided to add pocket pages.
 I measured the page, and cut a piece of paper that size, plus 1" more on the side to create a hinge to attach the pocket page to the folder.  I then cut and added a pocket to the page.  There is another pocket on the other side of this page as well.
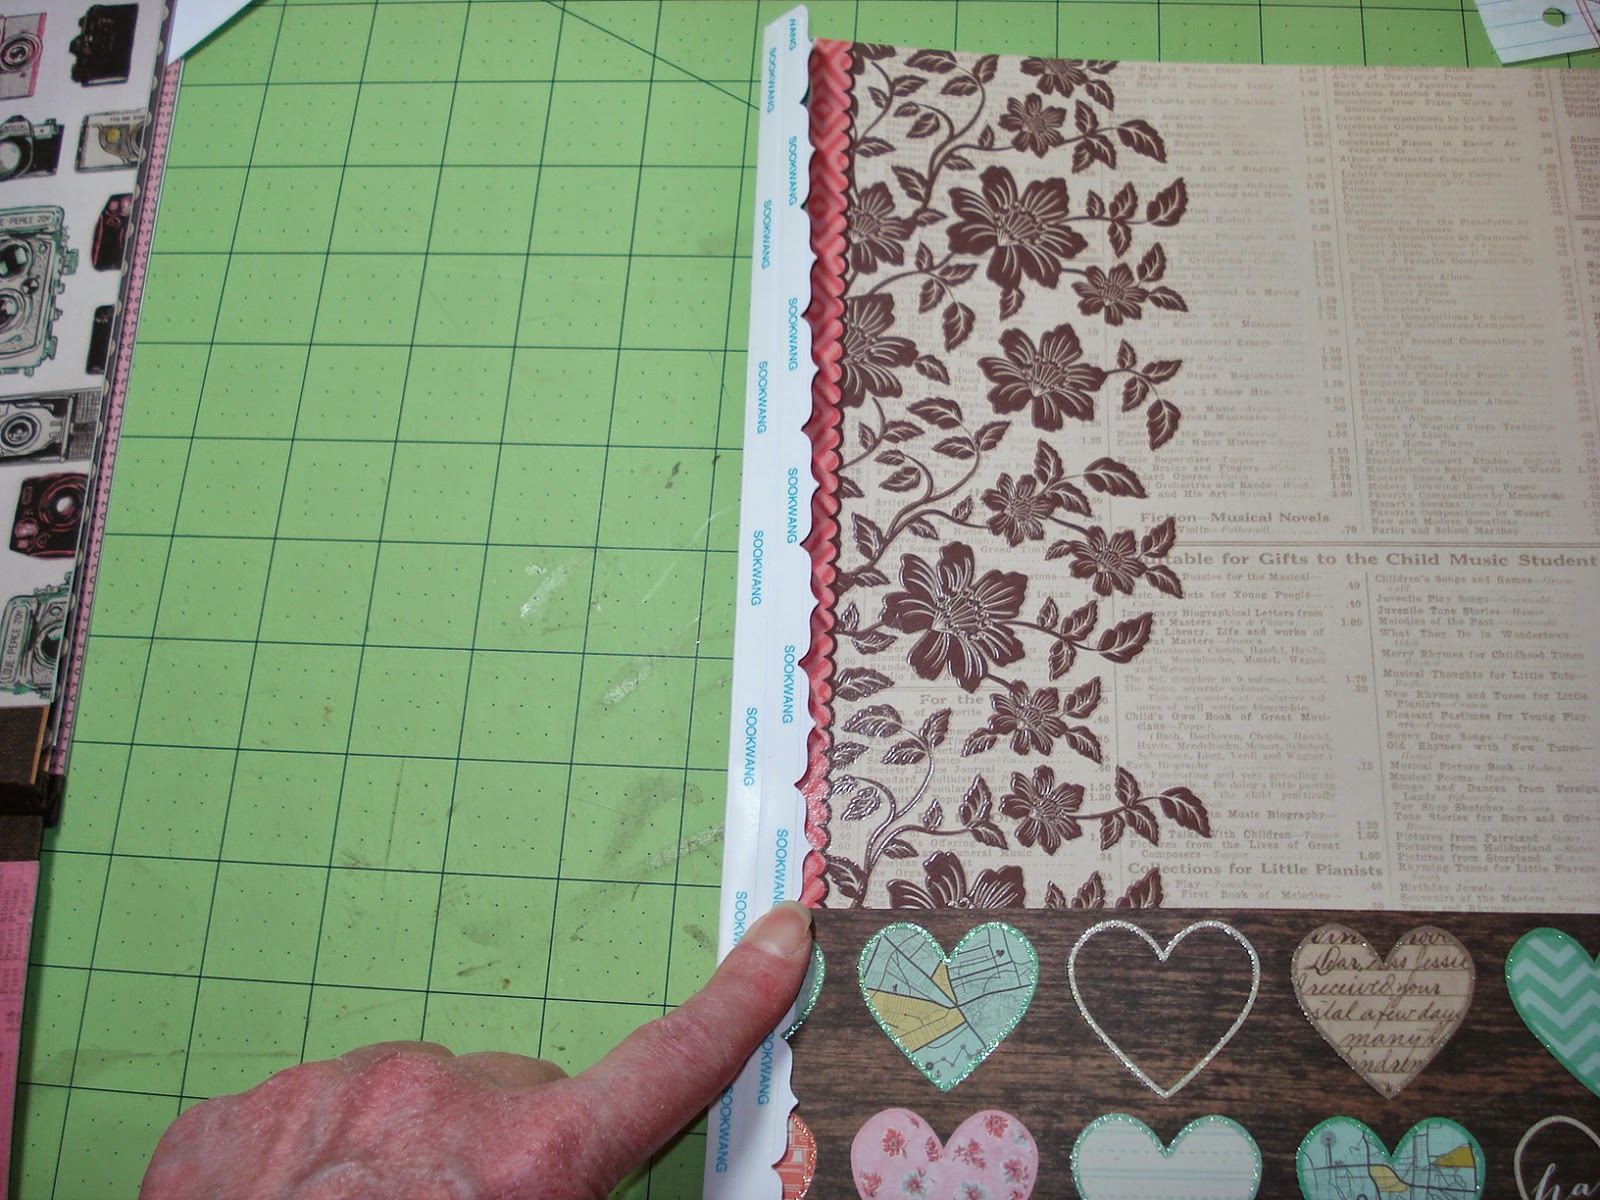
This is a picture of the hinge.  I punched the edge after I added score tape to it, so that the design will stick to the folder properly.  I made two of these pocket pages for my folder.
 Then I made a page with pockets on the long side.  It is super simple.  Measure two pieces of paper, with enough off of the side to fold over and create a pocket.  I adhered the papers to each other, then folded over the overlapping part  to create the pocket.
 Side one...
Flip it over, side two.  I attached another strip to this pocket page to adhere it to the folder…but I did it so that it created more pockets.  In the following pictures, you will see this.

The following pictures are the entire folder, all finished.
 The cover.
 Page one with the document tines and the pocket page I created.
 The back of the pocket page, and another folder page with the tines.
 The back of the folder page, and the long pocket page I created.  I added a leftover piece of paper from covering the folder, it attaches to the left side of the folder, and to the pocket page, I attached it with some stripes of glue to create business card pockets (denoted by the white cards) Papers can go in the pocket, and I can store business cards.
 This is the back of that pocket page.  I used strips of paper the width of the page, folded in half, and added to the top and the bottom of the pocket page…this is how I closed the pockets.
 My other pocket page.

The back of the folder.

I hope you enjoyed this little kind-a-sort-a tutorial.  It works great to organize all of the papers I am having to deal with.

Stay crafty, my friends!

Saturday, March 14, 2015

My desk calendar holder redo

I got this calendar at Bi Mart, on sale, since it is already February.  It has a ton of cool crochet projects, and I love to crochet…so it was a no-brainer, I had to buy it.
 The only problem was that the packaging was supposed to be the holder, and it wasn't very pretty.  I can fix that!
 I measured the original container, and remade one of chipboard.  I covered it with black paper and then with some scraps of Graphic 45's Communique paper line, and then added the Graphic 45 drawer pull.
 It is soooooo much prettier!

And now, it is going to sit on my desk, tell me the date, and inspire some creativity with yarn and thread!

Stay crafty, my friends.

Saturday, March 7, 2015

An organizer for my planner stuff

 I saw this idea somewhere, I'm sorry I can't remember where.  But I had some stuff and some time and decided to give it a go.  I made this shelving unit for my organizer shelves by my desk.  It fits my boxes that I have had in my stash for a long time.
 I just used chipboard that I covered in white paper to create the box.  Then I made the shelf supports, and the chipboard shelf pieces.  The shelf slides into place between the supports.
 Here is a picture of the supports without the shelf.  They are all measured to fit the boxes I wanted to put into it.
 Here are the boxes.  I get them at work, and have been saving them for a long time.  They are awesome!  I have used them, decorated, as gift boxes.  I have used them for other storage (of my washi tape collection to be precise).
 They are heavy duty and being all white, perfect for this job.
 I covered them with DCWV papers, and used a Tim Holtz Drawer Label Pull on them.
 Here are the four covered boxes.
 Here they are in the box holder.
 And here they are in my shelving unit.  I think I am going to organize my collection of sticky notes in these.    This was super simple to create, and I had a lot of fun doing it.  I also recycled and organized, and who doesn't love to do that??

Stay crafty, and organized, my friends!