 These are the basic supplies needed:
4 paper bags, SIZE MAY VARY, so take MY measurements as an example!
Adhesive (ATG, glue stick, etc)
Paper cutter, scissors, hole punch OR Bind-It-All
Ruler, bone folder
Ink for edges of paper
Eyelets and binding rings OR O-wires for binding
Patterned papers of choice
Cardstock for binding
Embellishments of choice
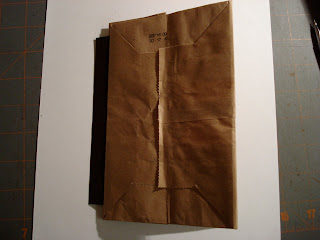
 My bags were 7”x 13 3/4”. Your bag size may vary, it doesn’t really matter what size they are. Fold your bag in thirds, with the bottom of the bag being on the top, which is really opposite from what you naturally want to do. Crease well with your bone folder.
Open the bag and trim the opening of the bag to give your some space between the opening and the fold. I trimmed off 1/2” so that when I folded the bag in thirds, there is about 1/2” of space between the open end of the bag and the fold, as shown in the third picture above. So the final size of my bags because 7” by 13 1/4”. Do this will all of your bags.
 Take your cardstock and create four pieces 1” smaller than the width of your book, and 3” wide, score at the 1 1 /2” mark. This will be the binding edge of your book.
With your bag in front of you, lift up the left side, under the bottom of the bag will be a small fold. This is where the binding will be placed. Fold your cardstock so that it is double thickness, and adhere in this space to each side of your “page” in this fold area. I did it so that about 1/2” of cardstock was left sticking out of the “page”. Once adhered your page should look like the picture above. Do this for all your pages. Ink all edges if desired.
Now is the time to decide on the binding. Punch the appropriate holes into the cardstock binding pieces. Set the eyelets if desired. It is best to bind the project after you have completed placing all of your papers and embellishments.

For my book...each bag is one “page”. Each “page” has 6 sections. For my bags measurements, I needed:
4 pieces of patterned paper measuring 4 1/4” x 6 3/4”...and
2 pieces of patterned paper measuring 3 3/4” x 6 3/4”.
The smaller size papers were for the right section of the “page” where the bag opening is. MEASURE YOUR BAGS BEFORE CUTTING YOUR PAPER!!!!!

For my book...
The opening of the bag, which is the right sided section of the “page”, has a tag placed. You will need one tag for each of these, so I had four pieces of paper measuring 6 3/4” x 4”.
MEASURE YOUR RIGHT SECTION OF YOUR “PAGE” BEFORE CUTTING YOUR PAPER!!!!!


 The inside of my “page, with the left section in the gray paper, the middle in the monochromatic rose paper and the right section with the multi-colored paper.
I punched a half circle in the opening of the bag to aid in the removal of the tag inside of the book.
I sewed a line of straight stitch on my sewing machine at this crease also, to prevent movement of the tag through to the inside of the bag “page”. This is optional.
Now, decorate, add pictures and bind, and you have a Triple Fold Paper Bag Mini Album! See our Creative Gallery for more pictures of the book!
Stay crafty, my friends!


Your book is beautiful. Thanks for such detailed instructions.
ReplyDeleteLori
Wow ~ this is a great mini book!! Love your instructions! I thought they were easy to follow!
ReplyDeleteI am a Team Fairy for www.cuteandsome.blogspot.com and we have a weekly showcase for projects. You should consider entering this in the showcase!!
Love this project! I'm so going to make one of these books!
ReplyDeleteP.S. I am also an RN who scraps:) I'm bookmarking this blog as we speak.
Beatiful creations! I gladly joined your site. I also enjoy making paper bag albums. www.tinytreasuresbyt.blogspot.com Let's keep the sharing going!
ReplyDelete