Hi Everyone!!!
I hope you all are doing well! I want to say thank you to all of you who pounced on over and saw the wonderful creations my Den Siblings did. We really appreciate it!!! I have had a few requests to do a tutorial on my latest file folder album I did for The Pride's Surprise Swap. I am going to get the tutorial done as soon as I can.
I have a couple of other things brewing on my work table. For now, I thought I would show you this little variation on my Pull Out Page Mini Album that I came up with.
A couple of days ago I posted this book, and how I made the pages. After I did that I had another idea for how to construct the pages, and so I am posting that idea today. I used some leftover papers I had from a tag project I made for the Just a Few Friends Swap, and some other goodies and made a mini packed with tags and space for photos.I made the first piece just as I showed in the tutorial here.
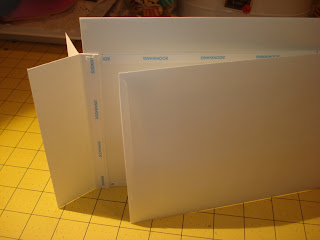
I then cut the second envelope on the left side, just like before, but I made the card to come out of the top of the envelope. I cut the slit for the card on the top, after measuring it like before.
I put the card into the left side, then slipped it up through the top...
...like this.
I made a binding piece, just one because I was only planning on doing one page for this mini. You can bind them however you wish.
Then I stacked the envelope pages with the side pull out on top, and the top pull out on the bottom, then I added the binding piece between the envelopes before I adhered them all the way together.
I took another envelope and sealed it, then opened the top and bottom. Then scored it and folded it down the middle. This folded over the bottom of the assembled pages...making a pocket on each side. And, of course, I didn't get a picture of that...Sorry. In the next pages you will be able to see it.
So then I made a card stock cover, and went to town with tags and stickers and patterned papers. I used Carta Bella's Beautiful Moments. I also used Recollections flowers and bling, and the butterflies are by Momenta.
This is a mini with only the covers and ONE page assembly.
I used some papers and made a pocket on the front inside cover and the back inside cover. In this picture on the right, you can see the pocket created with the folded envelope I didn't get the picture of!
Here are the tags. I used a card (from the envelope set) to make a big tag, then some of the papers and the cut out journaling cards from the paper set. The big red tag is card stock, cut at 4 1/2 x 6 1/2" and left plain for placing a photo.
Here are the pull outs on the front of this page...
...and the back of the page. Here is also the other side of that envelope pocket I created with that folded envelope. Also, here is the back page. I made this pocket with a journaling tag from the set.
These are the tags I made for this side of the mini.
The card "tags" are cut at 4 1/2 x 6 1/2" and the border strips are adhered so that you can slip the pictures underneath them.
I left the cards whole, so I could put 4 pictures on each one.
And the back of the card tags.
I hope you enjoyed this alternative to my Pull Out Mini Album! Again, please let me know if you have any questions!!!
As always, Stay Crafty, My Friends!


I love this mini! So cute and I love the way you put it together! Great Job!
ReplyDeleteBeautiful book, thanks for sharing!
ReplyDeleteLove it. You are so talented...love how your mind works...you see these envelopes and think of this gorgeous creation!!!
ReplyDeleteLove it, and thanks for sharing!!! You always do a wonderful job, and I know we all appreciate the tutorials!!!
ReplyDeleteLove this mini - thanks SO much for your explanations of how things were done!!
ReplyDeleteWow cant wair for the video. This is so cute.
ReplyDelete