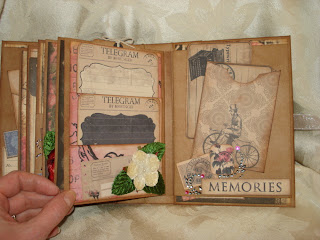
I had some papers from a Prima collection (I believe it was called "Romantic Novel"). I decided to make a mini album with it, but needed a few more papers, so I then went to Marion Smith's site and downloaded the "Vintage Telegram" collection. Here is what I came up with.
I made this book using envelopes and cards. There is no chipboard in this album. The pages are the binding. There is no separate binding mechanism. I used the papers as mentioned above. The flowers are a combination of Prima, Petaloo and Recollections. The bling is by Recollections as well. The leaves for the flowers are 7 Gypsies. The closure is a simple ribbon closure.
On the spine, I used two Prima key paper clips, then treaded the ribbon through it and tied a knot.
When you open the book you see this. The envelope on the left is adhered on two sides, creating a pocket for the tags behind it. The envelope has a tag in it as well. There is a pocket on the right, with more tags. The page on the left is a double duty page, as it is held closed with a magnet......when you open it up, you get another area for pictures, and pockets for tags.
There are a lot of pictures. This page layout features a mini pocket with a tag.
The "Perfect Day" die cut is adhered on the bottom so a tag can slip behind.
Another pocket on the left, and a pocket page on the right. The left page has a nice feature...
It has two pages on that page...
It just keeps going.
I really loved making this album and coming up with all of the pockets for the tags.
The page on the right has a slit in it, that the tag slips into.
The envelope is adhered to create a pocket behind it, as well as has a tag in it.
The last page on the right is again held closed with a magnet ...
...and it opens for more pockets and tags.
I hope you enjoyed this project. I loved making it. I am going to do a tutorial on how I made it very soon, and will do a video as well.
Have a great day...Stay Crafty, My Friends!!


This is just gorgeous, I must try making one myself.
ReplyDeleteMoira xxx
I love your mini with all the pockets and tage. I can't wait to see the tutorial.
ReplyDeleteI would love to see the tutorial on putting this mini together especially the binding. It is beautiful.
ReplyDeleteI would love to see the tutorial on putting this mini together especially the binding. It is beautiful.
ReplyDeleteI came across your mini album on Pintrest. I would love to see a tutorial. Thanks!!! Debbie
ReplyDeleteWoW!! A perfect day, ánd a perfect mini, SUPER!!
ReplyDeleteI cant wait for the tutoria --have you done it already/ and if u have can u direct me to it?
ReplyDeleteJust lovely. Thanks for sharing it. Saw it on pinterest. I hope you are having another perfect day.
ReplyDeleteI would LOVE to see a tutorial on this album. Please share link when/if you have one ready.
ReplyDeleteI love this cant wait for the video
ReplyDeletedid you ever make a video? hope you did!!!!! awsome!
ReplyDeletePrecioso, me encanta, lo que no entiendo bien es lo de la unión, pienso que va pegando una cara con la anterior, peor no estoy segura.
ReplyDelete