WELCOME!!

We are so glad you are here! We love making and sharing our projects, and we are excited to have you visiting our site. Please leave us a comment and let us know what you think!

Jackie and Michelle

Followers

Friday, February 22, 2013

Tall Skinny Mini #2

Hi all!  Here is the next installment of the Tall Skinny Mini tutorial series.  The original book is here.  The first tutorial on the cover and binding is here.  I hope you all like it.  Today I am going to focus on the first two page assemblies for the book.  I have also done a video tutorial on YouTube that you can check out!  It might make it easier to understand.

Here is how I want to do this...I am showing you how to create the pages on white paper (for demo purposes), then using the card stock that will have to be covered with patterned paper, then how to do it with patterned paper only.  I am trying to make this super easy to follow, but if you have questions, please don't hesitate to let me know!

We are going to make the pages first, then, when all of the pages are made, we will bind them into the book.  The last step is to decorate!

For page #1:  Take the 12x12" card stock, and score it at 2", 6" and 10".  Fold the 2" as a valley fold, the 6" as a mountain fold, and the 10" as a valley fold.

 The red lines indicate where to put WET glue.
Please don't do it yet, read the whole post first!!!
 When you get it all folded and glued, there will be a pocket on each side of the page.  The open end of the page is where the binding edge will be.  This is how we will adhere it to the book.
 Now that you saw the "tutorial" piece, this is how a card stock piece will look.  After scoring and folding, but BEFORE GLUING, adhere patterned paper as desired.
 I cut mine at 11 7/8" x 3 7/8".  I also distressed edges with distress inks.
 After adding the papers, I folded the 2" sides over and glued in place with wet glue.  Pockets created.
 The open edge will stay open at the top for a pocket, the side is how the page binds to the book, and the bottom will be glued AT THE BINDING TIME to close the "inner tall pocket".
You can do the same thing with patterned paper. 
 You can skip the card stock and just make the pages out of double sided patterned paper.  It will save some time.  The pages will be "thinner" but will be just as pretty.  This shows the folding of the pages, and how the side pockets will look.
 And now for page #2.
 Take the card stock (or patterned paper) and score at 4" and 8".  Then, on the 8" score, cut down to the 4" mark, then cut across...
 Remove this piece and save it for tags or embellishing later.  The bottom 4x4" piece creates a pocket. The red lines indicate where to put the wet glue on the lower 4x4" pocket piece.
 It folds over and, Taa Daa...you can, if you want, reverse the cutting to the other side and have the pocket on the other side if you want.

Here it is, with card stock.  
 Add the patterned paper BEFORE YOU GLUE THE 4x4" POCKET DOWN, if desired.
Fold the 4x4" piece over, and your page is done.
 Here it is, using patterned paper.
 When all finished, this is the "front" of the page.  The top will stay open for tags, the side is the binding edge, and the bottom will be wet glued to close the "inner tall pocket".
Once all adhered inside the book, when you turn the page, this is the pocket you will get.

Two pages down, 8 more to go, plus a few more goodies too!  Thanks for looking, and I hope you have fun with this.  I will be back soon to do a couple more pages!

Stay crafty, my friends!!

Saturday, February 16, 2013

Tall Skinny Mini Album Tutorial #1


Hey everybody!!  I am finally getting this tutorial series underway!!  WOO HOO!!!  Thank you for being patient with me, I really appreciate it!

My plan is this:  I am going to do the cover and binding today, and then start with the pages, a couple at a time.  I am planning on trying to do the page tutorials on YouTube, as it will be a little bit easier to explain, but if it doesn't work out, I will do the tutorials all here on the blog.  Either way, you will get all of the information you need to make your own "Tall Skinny Mini"!

Let's get busy!!!  First, a few notes. The inspiration for this mini came from the "Witches Journal" I saw on YouTube.  The use of the Tyvek for reinforcing the spine came from Kathy at Paper Phenomenon.  It really does work and is a great way to recycle those Tyvek envelopes you get in mailings.  The "Stack the Deck" binding is by Laura at Following the Paper Trail.  The pages of this book are my creations.  I sure hope you like them!

 For this tutorial, I am going to use the papers from Basic Grey, Fact or Fiction, and Hello.  I have three paper stacks and a bunch of accessories to embellish it with!
 I also am going to use Bazzill card stock.  You will also need some chipboard for the covers and some strong adhesive.  I am using Score Tape...I love this stuff!

First, cut three pieces of chipboard for the covers, two at 12" x 6" and one at 12" x 2 1/2".
 I cut a strip of Tyvek, 12" x 5", and centered the spine piece on it.  I put a piece of 1/4" score tape along each side of the chipboard.  You use this as a space measurement between the cover pieces and the spine pieces.  Put more score tape on the rest of the Tyvek.
 Adhere the cover pieces.  This is what it should look like, this will be the inside of the cover.
 This is the outside of the cover.
 I inked up the corners of the book because they will not be totally covered with the card stock.  This is important, because if the chipboard isn't inked you will be able to see it once the card stock is on the piece if it is not super precise.
I cut strips of card stock as follows:  two at 12"x 1 1/2", and four at 9 1/4" by 1 1/2".  These pieces will edge your chipboard piece.  I like wrapped edges on my chipboard covers, so this is how I figured out how to cover the piece, since it is 12" tall.  You don't have to do this, you can simply just cover the chipboard and trim the edges if you desire.  If you decide to do that, ink the entire edge of your chipboard piece.
 The pieces layered onto the card stock.  The 12" pieces go on the sides, the others go on the top and the bottom.
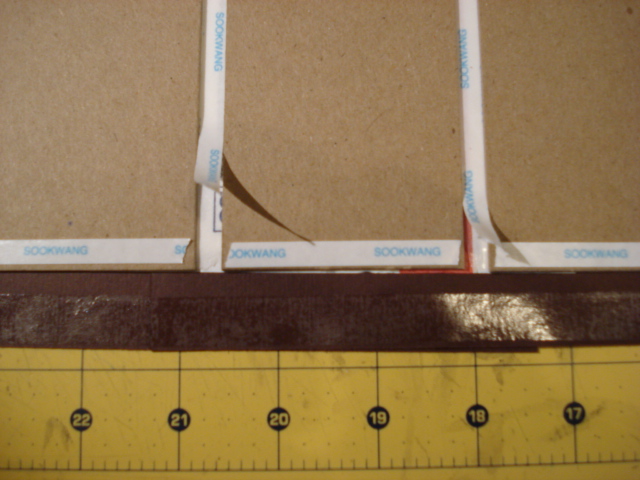
 Use lots of score tape to adhere everything.  And, DON'T FORGET TO PICK UP THE STRIPS OFF OF THE GUSSETS BY THE SPINE BEFORE YOU ADHERE THE CARDSTOCK COMPLETELY DOWN.  See below.
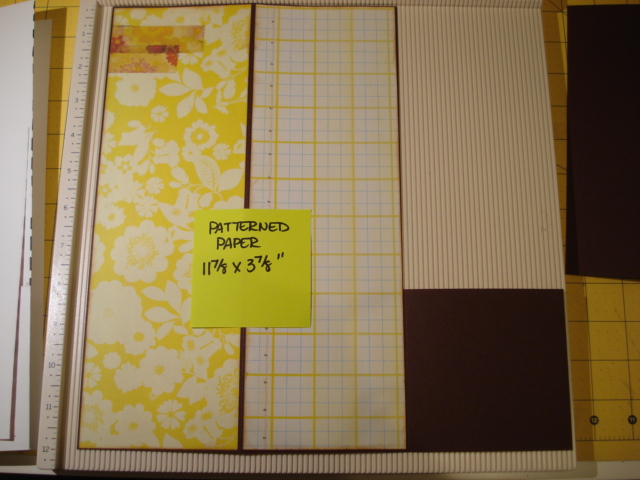
 Wrap your edges.  I then used two pieces of patterned paper, cut 11 3/4" by 5 3/4", and covered the front and back outside covers.  This leaves the spine exposed.  I cut a piece of card stock at 12" x 6" and punched it.  Before I did the punching I put score tape on the edge.

That way when you go to adhere the piece, all of the punched edges have adhesive on them!

 This is the outside cover all done.
For the inside cover, I used the leftover 6" of card stock and covered the spine, then I covered the inside covers with more paper.  
 Here is my cover, all done.  Now to the binding mechanism.
I am making 10 pages for this book.  This means you need five papers.  They all, when stacked create a 1/4" gusset to allow for some room to embellish and add "stuff" to your pages.
 Cut the card stock into 5 strips, 12" by 1 1/4", 1 3/4", 2 1/4", 2 3/4" and 3 1/4".  Score each piece on each side at 1/2".  This is what your page pieces will adhere to.
 Side view of the binding.
If you desire, you can angle the edges of the binding pieces so that the pages adhere a little easier, but it's not necessary.
 Once your binding piece is done, adhere it to the inside spine of your cover.

That concludes the first part.  Next time, pages to put into your book.  This is going to be fun!

Stay Crafty, My friends!


Saturday, February 9, 2013

February Blog Hop Time!

Welcome, Welcome, WELCOME!!!  It's time for the Just a Few Friends group to have our blog hop showcasing our awesome, wonderful, and PURRFECT Valentine's Day Gift Bags!!!

You should have pounced on over to me from RJ's blog.  If you found me while prowling around the internet, please start with Elsa's blog and follow the links to jump from den to den to see what we have created for your viewing pleasure.   I have a full list of my "den siblings" at the end of the post as well.  

Please say "Hello" to our newest Cub, Carrie!!!  She is joining us for the first time this month!  

Our challenge:  Create a gift bag, and decorate it for use with a Valentine gift.  We could use the colors pink, red, brown and/or black.   The rest, well that was up to us!  I came up with a little project to contain a present for my awesome and wonderful husband, DJ, the King of my Jungle!  I know he is going to see this post, so I am not showing the present on the inside, but he can get a sneak peek at the outside!

 I found this awesome paper line by Authentique and I knew it would be PURRFECT for my project.   It was a 6x6" paper pad kit, with all kinds of card making stuff that came with it.   I made the gift bag, and then made a card to go with it.
 I used a Martha Stewart edging punch on the black card stock, then layered the patterned paper over it.  I created a pocket with some more paper, and made the "tickets" to go in it.  There is a little paper key in the ribbon in the bottom.  Above, I put a large metal key with the sentiment, "You hold the key to my heart."
 These "tickets" came in the paper collection.  I matted them with red card stock.  I am going to wait to show the inside of the card...I don't want to spoil DJ's surprise!!!

Other supplies used:  Tim Holtz distressing ink, Prima Flowers, Recollections rhinestones, ribbon.  I also covered the back side of the gift bag with the same punched black card stock and key patterned paper.  I wanted the bag to be sort of symmetrical.

I hope you enjoyed your stay here!  Please let me know what you think of my offering for this month, and then go stalk Sherain and see what she came up with!!!

Have a wonderful Valentine's day, and remember...Show the ones you love how much you love them every day.  It doesn't have to involve gifts, just show them and tell them!  Valentine's Day can be everyday!


Tuesday, February 5, 2013

Just some updates...

Hey everybody!  I just wanted to let you all know a couple of things, then show you a little bit of my organizer that I shared with you in this post on December 29th, 2012.

JUST A FEW FRIENDS NEWS:

First, we have a new cub in the group!  Carrie, welcome to our crafty den!!!  I know you all are going to love what she brings to the world of glitter and glue!!!

Second, we are having our Valentine's Day blog hop THIS SATURDAY!!!  Please come by and check it out!!  It's going to be fun!

Tutorials coming!

I plan on starting the tutorials for my Tall Skinny Mini, on February 16th.  My plan is to have a tutorial here and on YouTube.  Hopefully the video recordings will cooperate with me.  The last one I did had me exasperated!  But, I will try!

So, now to my planner update.  I am a paper geek and I love planners and lists and writing things.  I also want to be creative.  I made my planner because other planners just don't serve my needs.  I have a link to my planner in the first paragraph above, go check it out if you haven't already.  My planner is a work in progress.  I am constantly tweaking it, so it suits my needs.  I don't have a lot to keep under control, but what I have, I want to be ORGANIZED and FUN!

I have been surfing a lot of internet looking for ideas and such to incorporate into my planner.  This idea came something I saw on Pinterest.  It's shown in this post, here.
I found this paper at the local Office Max, and then I dug out my tissue tapes, and went to work.  I covered the holes that were prepunched in the paper with the tape on both sides of the paper.  Then I repunched with my ARC paper punch.  Taa Daa, pretty papers to work in my planner.
 

 I made a plastic sheet to store all of the sticky notes that I want to put in my book.  The 4x6" notes you see here I made myself.  They were totally easy to do!!!
Here is the plastic page turned, more notes on this side.
 Here are some of my notes from the "research" I did on the internet about organizing and planning.
Here are some of the notes I did on my "project pages" while I was trying to figure out the January Blog Hop Project.  
 Here is February's Blog Hop brainstorming notes...no peeking!
 These project pages I made to have a foldout piece for more notes...
 I was at Big Lots the other day and they had Guest Check books for CHEAPPPPPP!!!  The checks are on heavier papers, so I got them, and punched them.  I think they will make a cool addition for extra notes as I need them.  I have other notes in this pocket as well!  The "Hit-List to Get #hit Done" to do list came from here.  The "Currently" journal cards came from Creativity Prompt, here.  I also made tabbed pages from security envelopes and graph paper.
Here is the start of my planner.  Not too exciting.
Getting better, a little bit at a time...
More creative, becoming more fun.  I am adding pictures and words cut from magazines and junk mail. I added stickers and sticky notes.  (NOOOOOO, I AM NOT GIVING ANYONE THE BIRD!!!  OH MY GOSH!!!  I just noticed this...sorry!!!  I was just trying to hold the papers so you can see!!!!!
This is this weeks layout.  I had to add the smaller yellow card stock page to hold my sticky notes.  I am really loving sticky notes.  The paper I am holding is my page marker.
My blog planner that I came up with.  I am dividing each page into two, for Wednesdays and Saturdays.  It seems to be working for me pretty good!
This morning I dug out my old Franklin Covey planner purse-bag.  I have had this for about 15 years.  I haven't used it in about 12!  I am planning (PUN INTENDED) on using it to carry my planner and supplies.  It is too big to put in my purse, so nowI carry this and my purse to work.  But, it is like a little briefcase!!   I did make a sort of "satellite" book to put in my purse to catch things I need to write down and then put in my planner later.
I have a holder that I have scissors, a mini stapler, erasers, mechanical pencil leads, and a pushup crayon-pencil!
On the inside pocket I put an assortment of pens and highlighters.  You never know when you will need it.

I hope you liked the  latest version of my lovely little organizer.  If you have any questions, please let me know!!!

Stay Crafty, My Friends!!!