WELCOME!!

We are so glad you are here! We love making and sharing our projects, and we are excited to have you visiting our site. Please leave us a comment and let us know what you think!

Jackie and Michelle

Followers

Wednesday, March 27, 2013

The last of the Tall Skinny Mini

I have done a video walk-through of the mini album I love to call the "Tall Skinny Mini."  You can find the video here.  In it, I show all of the embellishments, and give out the dimensions of all of the tags and pull outs for this album.  Here are a few pictures to entice you...


Head on over to check out my video!  As always, if you have questions, please let me know!!

Stay Crafty, my friends!!

Saturday, March 23, 2013

Happy Easter!!!

Welcome to our Easter Basket Parade Blog Hop!!!

We are glad you could join us in our dens today, we are "roaring" to show you our projects!  We have been busy busy busy making creations with a basket theme, and we do hope you enjoy them!

You should have come to me by way of  Margaret's Den, here.  But if you happened upon my blog by accident, start at the beginning with Elsa in her Den here.  I left a full list of the line up at the end of my post.  We all hope you enjoy prowling around, hunting for our creations.  

Now for my creation.  I did a YouTube video that you can also check out.  I loved making this creation!


 The theme this month is to do something with a basket, in honor of Easter.  I went a little bit literal with the theme, but decided to create a door "wreath" with the idea!  I used Bazzill card stock and wove a front to the basket, after inking the paper strips with Tim Holtz Distress Ink.  I then attached it to the front of a 1" wide box I created to hold all of the goodies.
 The box that I used is the height and width (at the bottom) of the basket front, and 1" wide.  I used extra pieces of the woven paper to create the handle.  
 I bought the cute bunny and chick, but created the eggs and the flowers.  The eggs and the chocolate bunny are cut from my "Easter 2010" Cricut cartridge.  (Did you see the bunny already has a bite out of it's ear?)  I made doubles of everything, then stuck skewers in-between the "sandwich" of the cutouts, so that I could stick them into the basket.  The grass is paper grass I bought at Hallmark.  
The lovely trim that I put on the basket was an awesome RAK from Elsa, and I was waiting for the right project to use it on...here it is!  The flowers are Recollections and Petaloo.  The bling is Recollections, the the butterfly is unknown.  The papers I used for the eggs are from K and Company.  

I sure hope you liked this project.  Please let me know what you think.  Now, please go on over to stalk Sherain and see what she has in store for you in her den!

Thanks for looking!!!  Have a wonderful Easter!!!


Saturday, March 16, 2013

Happy St. Patrick's Day

From our blog to yours...


Enjoy yourselves, have fun, and be safe while you're doing it!!  We will be seeing you next week with an Easter treat blog hop that you don't want to miss!!


Thursday, March 14, 2013

Tall Skinny Mini, Pages 9, 10 and Binding!!!


Hey everybody.  I just finished the video for the last two pages and how to bind them!!!  WOO HOO!  I have the video on YouTube, so go on over and check it out!!!  The next video will be all of the tags and goodies to put in the pages we created!!  Then will come the decorating and embellishing!  I'm so happy, this is almost finished!  Now...what do I do with the book I am making during this whole process...any ideas??

Stay Crafty, My Friends!

Saturday, March 9, 2013

Tall Skinny Mini, Video Available!

I have made the video for pages 6, 7, and 8 and it is available on my YouTube channel here!  I am so far behind on stuff and things...so I have decided to not put a picture tutorial on this blog, but rely on the video to do the tutorial.  It took soooooo much time, and there were sooooo many pictures!  I feel like the video was telling the same story in a better way, especially for this album, so I just opted to go for the video this time.  Please go on over and check it out.  As always, if you have any questions I will answer them as soon as I can!

Enjoy the tutorial and have a crafty day!!!

Sunday, March 3, 2013

Tall Skinny Mini #3

Here we are, back with another tutorial.  We are doing pages 3, 4, and 5.   I also have the video for these pages up on YouTube .

I had a question about the assembly of this book.  I made the base pages (that we are doing here) first.  Then I will show you how to bind them.  Then we will decorate.  I find it easier whenever I construct my pages to do it in this way.  When I decorate, having them bound in the book first helps me to see the colors and plan my use of embellishments, etc.  I hope that you like this way too.  So, make the pages, but don't bind them yet.  You don't have to place them in the order that we are making them.  Do what is visually pleasing to you.  After all the pages are bound, then we'll decorate!  :)

This is going to be very picture heavy.  Sorry.
First, score your 12x12" card stock at 2", 6" and 10"
 Cut 6 1/4" up on the left side, and down on the right side, as shown on the red lines.
 Score the 2" sides as shown.   They are reverse of each other, so that one mini pocket is on the top, and one is on the bottom.  You could, however, reverse them, or make them both top or bottom pockets.  The choice is yours.
 For each side, fold the 2" side in...
 Fold the flap down, and the 1/2" tab under, this creates your pocket.  You just have to glue the outer edge and the tab.


 This shows the page folded and glued.
 First side of the page...the mini pocket and the first 4" page...
 ..turned over here is the second 4" page and the other mini pocket.
 Another view.
 Using card stock here...cover the card stock with papers to make it pretty.  This shows the left mini pocket not glued down, and the right pocket glued together.
 It is important to remember to fold the pocket piece flap to the back of the project when using card stock, so that your pocket doesn't compete with the score lines on the page it attaches to.


 If you are using straight patterned paper without card stock, you have to fold the pocket flaps OPPOSITE so that you can utilize the reverse pattern on the paper.  To make it fit nicely, and not compete with the score, cut out a SLIVER of paper on the side of the pocket.  Then the pocket will fold nicely into the score line.

 There it is...page 3 done.  Now lets look at page 4.
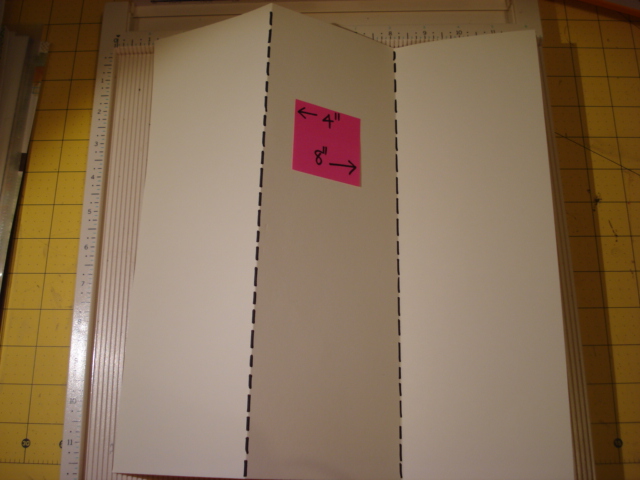
 This is a simple trifold.  Score at 4" and 8".  Fold as shown.
The space between the first 4" section and the second section will create the binding edge and the tall skinny pocket.  The third section is a separate page in this assembly.
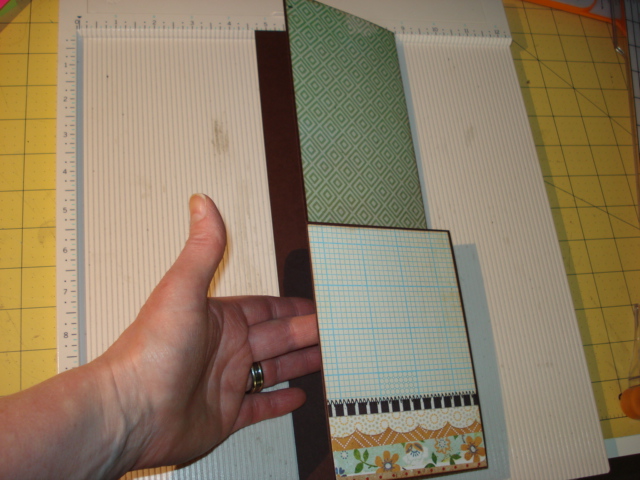
 Here it is using card stock covered with patterned paper.
 Top view...
 What it will look like inside the book, this with be the 2nd and 3rd sections of this page assembly.
And the 4th section.
Just using patterned paper.  The first three sections will be the same paper, but the 4th will be the contrasting side.

Now page 5.
 Score as shown.  Can you see where this one is going?  This is going to create a pocket page, but one bigger pocket on one side.
 Cut on the red line as shown.
 Fold and glue, and there it is.  Simple.


 Here it is, made with the card stock and patterned paper.
 My hand is in the binding side.
 If you are using patterned paper only, remember to cut a sliver off of the paper on the pocket flap side so that when you fold it in it fits nicely into the score.
 Here it is, finished.
 I am loving how this is turning out.
 That's that for now.  Stay tuned.  More pages to come.

Stay crafty, my friends!!!