*See May 11th posting for part 1 of series
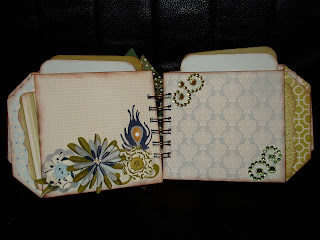
Now you should have all of your pages covered and inked, the binding done, and the tags made and inked. This is a view of my pages. You will see that I was running out of paper, so some of the tags are "pieced" together (see the one on the right of the picture). I think it gave it a cool look. And, I didn't waste any paper!
Just another view of the tags.
Various ribbons in greens were tied to the binding...see how pretty it looks when you use the O-wires! The "C" and "K" are chipboard from K-Ology. The butterfly is a punch that I have, from Paper Shapers. I cut out three for each butterfly, layered two (adhering only the "body" of the butterfly), lifting the top butterflies wings to give dimension, and the third punch I cut off the wings, using the body in a contrasting color. I added rhinestones to the body. The flower, leaves, and flourish are cut from my Cricut. I used the cartridges Gypsy Wanderings, Sentimentals, Storybook, and Tie the Knot for my embellishments and tags. I used a lot of Smootch Spritz in silver also for added sparkle!
Another page, I have another flourish punch I used behind the blue flower, and stamen stems from Michael's. I had flowers from Making Memories that matched the paper line on the right page, with buttons as well. The peacock feather and leaves, and the blue flower were cut from the Cricut cartridges.
I had bling, sorry, I didn't have the package!, more flourishes from the Cricut. The lower right corner are felt flowers with rhinestone centers.
The flowers were from another punch, from Fiskars. Another butterfly. I enhanced the wings with a glitter pen.
Some more flowers and feathers and bling!
Pretty, huh? I tried to leave a little space for some small pictures. I didn't decorate the tags at all, because of bulk. Bigger pictures and journaling will go on the tags.
The back of the book. It had to be decorated too!
I sure hope that you liked the book and the tutorial. PLEASE...if you use my tutorial to make one for yourself, won't you please let me know. I would love to see the results of your fantastic creativity!!
Stay crafty, my friends,
Michelle
Subscribe to:
Post Comments (Atom)


I saw this project on "one Pretty Thing". It's a beautiful book. Great job!
ReplyDeleteThat is just amazing! You are so creative and I love the recycling.
ReplyDeleteWow, this goes right to my "things I absolutely have to try" bookmarks :)
ReplyDeleteThanks for the great inspiration!
What a great album!! I like how the envelopes are up-cycled!! We don't get a lot of envelopes this size in the mail...but maybe I can check around the office...hmmmm...recycle bin diving....LOL
ReplyDelete