Hi all! Here is the next installment of the Tall Skinny Mini tutorial series. The original book is
here. The first tutorial on the cover and binding is
here. I hope you all like it. Today I am going to focus on the first two page assemblies for the book. I have also done a video tutorial on
YouTube that you can check out! It might make it easier to understand.
Here is how I want to do this...I am showing you how to create the pages on white paper (for demo purposes), then using the card stock that will have to be covered with patterned paper, then how to do it with patterned paper only. I am trying to make this super easy to follow, but if you have questions, please don't hesitate to let me know!
We are going to make the pages first, then, when all of the pages are made, we will bind them into the book. The last step is to decorate!
For page #1: Take the 12x12" card stock, and score it at 2", 6" and 10". Fold the 2" as a valley fold, the 6" as a mountain fold, and the 10" as a valley fold.
The red lines indicate where to put WET glue.
Please don't do it yet, read the whole post first!!!
When you get it all folded and glued, there will be a pocket on each side of the page. The open end of the page is where the binding edge will be. This is how we will adhere it to the book.
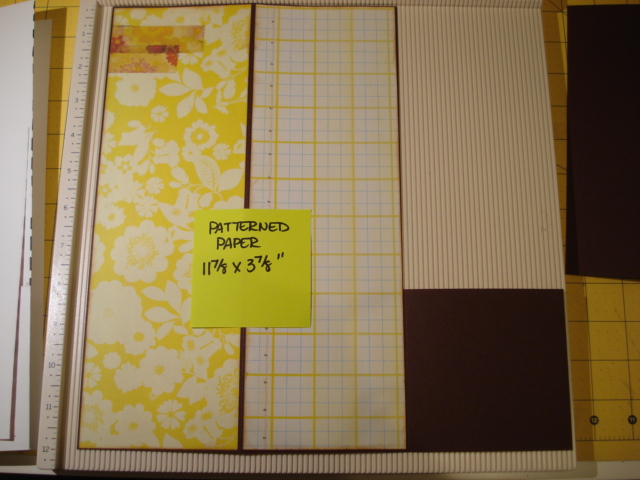
Now that you saw the "tutorial" piece, this is how a card stock piece will look. After scoring and folding, but BEFORE GLUING, adhere patterned paper as desired.
I cut mine at 11 7/8" x 3 7/8". I also distressed edges with distress inks.
After adding the papers, I folded the 2" sides over and glued in place with wet glue. Pockets created.
The open edge will stay open at the top for a pocket, the side is how the page binds to the book, and the bottom will be glued AT THE BINDING TIME to close the "inner tall pocket".
You can do the same thing with patterned paper.
You can skip the card stock and just make the pages out of double sided patterned paper. It will save some time. The pages will be "thinner" but will be just as pretty. This shows the folding of the pages, and how the side pockets will look.
And now for page #2.
Take the card stock (or patterned paper) and score at 4" and 8". Then, on the 8" score, cut down to the 4" mark, then cut across...
Remove this piece and save it for tags or embellishing later. The bottom 4x4" piece creates a pocket. The red lines indicate where to put the wet glue on the lower 4x4" pocket piece.
It folds over and, Taa Daa...you can, if you want, reverse the cutting to the other side and have the pocket on the other side if you want.
Here it is, with card stock.
Add the patterned paper BEFORE YOU GLUE THE 4x4" POCKET DOWN, if desired.
Fold the 4x4" piece over, and your page is done.
Here it is, using patterned paper.
When all finished, this is the "front" of the page. The top will stay open for tags, the side is the binding edge, and the bottom will be wet glued to close the "inner tall pocket".
Once all adhered inside the book, when you turn the page, this is the pocket you will get.
Two pages down, 8 more to go, plus a few more goodies too! Thanks for looking, and I hope you have fun with this. I will be back soon to do a couple more pages!
Stay crafty, my friends!!


Love this album! It will be perfect for patterned paper with tall narrow images. I always hate cutting them down to fit an album.
ReplyDeleteAs always a terrific "tall" mini and a great tutorial!
ReplyDeleteI've missed you and wanted to drop in to say hello!
I'll be back soon.