How's that for a title?! I found some huge 12" x 15 1/2" envelopes at the local thrift store, I snapped up 6 for $0.99, the whole time thinking I could do something with these. I came up with this. Now, please forgive the lack of embellishments...I was doing this as a first model, working out some bugs. I am going to do another one soon.
Front Cover...
Back cover...
Top View...The closure is a simple ribbon closure.
First and Second Page...Hard to see but page one has two pockets and page two has two, one tall skinny one and one shorter side pocket.
Third Page and the Flap...This page has two pockets, one tall and one small and short.
Flap Opened...Page Four revealed with two pockets, one large and one small on the bottom. The inside of the flap created two pockets for two smaller tags.
And another pocket. The black cardstocks are showing the pockets, they are going to be tags. The envelope was never closed so that one more large tag can be place in there.
Here's how I did it...
I put the envelope so that the flap is on the right. Scored it at 5", 7 3/4" and 10 1/2". Then turn so that the flap is on the top and score at 8".
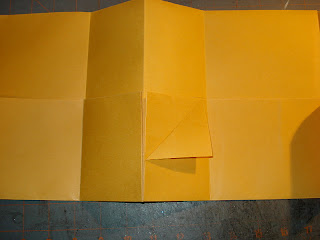
Turn it back onto its side, fold the bottom up, and the middle in, as shown. This is the base of the book.
On the first left handed bottom piece, cut a slit in the envelope only to the first score line to open up the pocket as shown above. I put a piece of paper on the main body of the book, a smaller piece of paper inside the pocket, in between the main body and pocket sizes, adhered it only on the two sides to create another pocket. You totally don't have to do that.
Cut the middle score line to the score, on the pocket part only. I glued the pocket piece only on the right side of page two, the side is split open, giving that side pocket.
Cut the next side only to the score as shown to open up that piece of the pocket. I glued the left side of the pocket piece on page three, giving the tall pocket, and the front piece folds down to give the other pocket.
Cut the envelope flap only to the score line. I used the top part of the envelope flap to attach papers to make the almost full size page flap. The envelope remains open on the right side, for another large tag. The bottom piece folds to the front of the pocket, making the piece I used to create the small pocket on page four.
Fold the pocket piece down, as shown.
Turn the book over, apply glue to the inner portion of the half pages, and glue together.
It holds 11 tags in all!
I hope that this made sense. I will make another model so that you all can see another version. If you make one of these, a little hint, use thinner papers! Thick papers that are double sided are not recommended. The nature of this book is that very thin embellishments will be used as there isn't a lot of gusset space.
Stay Crafty, My Friends!
Monday, October 10, 2011
Subscribe to:
Post Comments (Atom)


What a cute and fun mini!!! I'm laughing at your title... lol! For sure, it catches your attention!!! LOL!
ReplyDelete