WELCOME!!

We are so glad you are here! We love making and sharing our projects, and we are excited to have you visiting our site. Please leave us a comment and let us know what you think!

Jackie and Michelle

Followers

Wednesday, December 25, 2013

Merry Christmas

Wishing you all the very
Merriest,
Brightest,
Most Wonderful
Christmas Ever!
Happy Holidays and a Joyous New Year!

Jackie and Michelle


Wednesday, December 18, 2013

Nikki and Noel...Just a Few Designs New Additions!!

Good morning!  I'm representing the Sassy 6, for Elsa from Just a Few Designs, and she has come up with more stamping goodness for you!

On the left is Nikki...isn't she lovely?  She is available as a digi stamp and she is so fun to color!  I used her to create this Christmas card.  The papers are from DCWV.  The holly brads are by Dear Lizzy.  I created the sentiment on my computer.  Using a corner rounder, I added a little different shape to the card.

Noel is on the right...such an angelic image!  She is so pretty!  She is available as a clear stamp!  Elsa has three other images available as clear stamps also, so please go and check out her images on her site, Just a Few Designs!  I used the same papers for her, but added bling from ZVA creative to give a little more sparkle, along with the gold ribbon.

I colored both with Touch markers...I'll leave a list of the colors I used below.

Elsa is so talented, and her stamps are awesome.  The images stamp perfectly, and the details are incredible!  Please, go and check out her site and order yours today!


Pens Used are Touch unless otherwise listed.

BR 109 pearl White
YR 23 Orange
Y 34 Yellow
R11 Carmine
G 54 Veridian
G 46 Vivid Green
BR 103 Potato Brown
BR 94 Brick Brown
GY 48 Yellow Green
R 131 Skin White

Gelly Roll Clear Star
Atyou Spica 21 Lipstick

Sunday, December 15, 2013

Arc Planner Paper Storage Idea

Hello everyone, and happy Sunday to you!  I wanted to give you all a peek at my new storage set up for my Arc Planner supplies.  I had them in several different places, and I decided to consolidate them into one place that was easy to get to and could hold everything.  This is what I came up with.
This is a view of under my work table.  This is where I put the new Sterilite drawers that I bought to put my Arc Planner papers and supplies in.  On the other side of the chair that you can barely see, to the left, is where my desk is.  The drawers are perfectly places so that no matter where I am working on my planner, I can get to it without problem.  
 On top of my drawers is this 12x12 project box, where I keep all of the stickers that I have collected to use with my planner.
 The first drawer, some 8 1/2 x 5 1/2" papers that I have created myself, and from other companies like Uncalendar.
 In the second drawer, are all of my journaling cards and my "Scrappy Tape" that I use with my planner.
 In the third drawer, all of my Arc paper inserts and refills.
 The fourth drawer has all of my collected "odd" sized pieces from Arc, Martha Stewart, Levenger, and Rolodex.
 The fifth drawer is all of my Levenger 8 1/2 x 5 1/2" papers and inserts.
And finally the sixth drawer is for my 8 1/2 x 11" papers that I use for my project planner and my blog planner.

I hope you like this post, and can use it for your own storage needs.  The entire thing cost me $25 (on sale), and it organized my stuff beautifully.  

Stay crafty, and organized, my friends!

Wednesday, December 11, 2013

December Daily 2013

This is going to be a long post, full of pictures, but I wanted to let you know that as of right now, I am up-to-date on my December Daily album!!!  WOO HOO!!  I just wanted to share with you what my pages look like right now.  I have done some decoration, and plan on adding more once all of the pages are done.  I think that it will all depend on how thick this book gets, on how many more decorations I add once the month is done.

OK, here it goes...
 Day 1 is a fold out page...
 ...showing our painting project.  This style pages is good for a day full of photos.

 I love how this is turning out!
 I like to add recipes that I try during the month of December.  I just bought inexpensive recipe cards at Michael's for this.


This fold out tag page is also a pocket.  Behind it are more pictures of my gift-wrapped furnishings.

 The 5th was a big day...I created a pocket page in one of the fold out pages to put the lottery tickets and other fun stuff in.  No, unfortunately we didn't win a thing.

 These recipes were big, so I just decided to make a huge tag page for them.
 The back of this picture is the Santa Mug make-and-take that I did last November at CKC.  It was perfect to add to this book.


 Day 10 is on a large tag page that I created.
 How do you like my Zeke?  I love how his eyes are glowing!  The silver page is made from the shopping bag.  I liked the snowflakes on it, so make it part of the book.
Well, that's it so far.  I'll show you more as I get it done!

Stay Crafty, My Friends!

Sunday, December 8, 2013

Playful Pocket Flip Mini Album

I ran across this cool video on YouTube, by CHIBICHIBIANDMILO, and I just HAD to make this Playful Pocket Flip Mini Album!  I just love mini albums, and this one is spectacular.  It has all kinds of pockets and flips and it is ADORABLE!  It is made with 4 sheets of card stock, that's all, and it is awesome.  Please go check out the tutorial and make one for yourself!
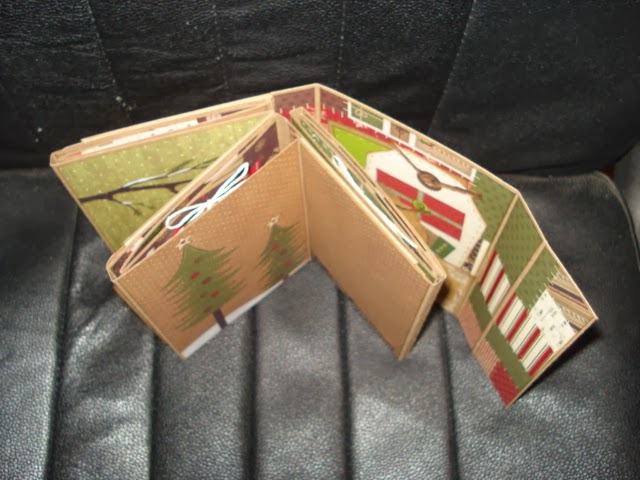
Here is my version of her mini.  I made a belly band closure for it.  The papers are by DCWV.  It measures 4x6", and is 1" wide.  
 Belly band off, right flap still closed...
 ...flap opened to reveal the first pocket.
 The page turns, and you get this.  The page assembly is on the left, another pocket on the right.
 The left side opens again toward the left...
 ...then the middle section opens toward the right...
 ...then to the right again!  Amazing isn't it?
 But wait, there's more.  Two more page assemblies, and lots more room to add pictures and journaling.
 I added this tag on the left, adhering it on two sides to create another pocket to put my journaling tag.
 The last page assembly.  I added a pocket on the back cover as well, to put more tags.
 And, yes, I added another pocket to put another tag.
 Here is the top view, all pages closed.
Here is the top view with all of the flaps opened.  You have to check out this tutorial.  Make one.  You will love it.  I know that I am going to make others!

Stay crafty, my friends!

Wednesday, December 4, 2013

"Merry Christmas" Treat Envelope Mini Album, with a link to a pocket page tutorial!

MERRY CHRISTMAS!!!  I have a little mini album project, and a  link to my video tutorial for you today!
I was in my local Fred Meyer store shopping and ran across these cool little treat envelopes.  They are supposed to be full of candy or cookies...but I saw them as a mini album.  This is what I created with them.
 I used a line of papers from SEI for this project called "Holiday Traditions.  The chipboard letters "joy" are by Anna Griffin.  The bling I added are from Recollections.  Everything else is SEI.
 I made a video of how I put the pages together, so please check out my link here:
"Merry Christmas" Treat Envelope Mini Album.  The reason that I made the video is that it is a little complicated to explain how I did the pages.  There are two page assemblies, and each one includes 2 envelopes, a cardstock pocket page, and the binding for the book.  There are a total of 4 envelopes and two cardstock pocket pages for this book.
 Here is a quick run through of the pages.   Here are the fronts of the envelopes, I just added a little die cut embellishment.
 Here are the backs of the envelopes.  The tutorial includes how I made the mini pocket on the left (on the envelope) as well.
 Each envelope includes a mat page, two to three mini journaling tags in the mini pocket, and a booklet tag is in the cardstock pocket page.
 I'll go through a quick runthrough of the pages...

 I left it simply decorated on purpose.  I want to add big pictures to the pages.

The technique can be used on any envelope you have.  The best part, no cutting of the envelopes is required at all.  This technique can be used on envelopes that have flaps that open from the top, thus preserving the flap for use as you wish.  Head on over to my tutorial on YouTube and check it out.  If you have any questions, please let me know!

Stay Crafty, and Merry, My Friends!