WELCOME EVERYONE! Thanks for hopping along to our blog to check out what I created! You should have arrived to this site after visiting Christy at My Scrapbook Evolution. If you want to start at the beginning, go to the Counterfeit Kit Blog.
For this blog hop we were to go to our favorite company's blog and get some inspiration, then create something with it. Well, I love, love, LOVE 7 Gypsies stuff! The only problem is that my local stores don't carry much of it. So, what's a girl to do? Well, if you are doing the challenge for the blog hop you do this...
Here was my inspiration...
I loved the look of these tags from 7 Gypsies. It is from their Camden Line, and you can find it here on their blog.
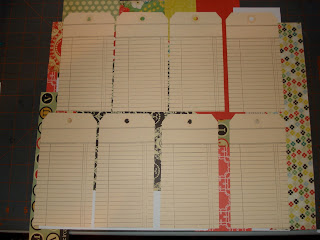
I took scraps that were leftover in my May Counterfeit Kit. (I love leftovers!) I arranged them how I liked them and adhered the collage together.
I used large manila tags (6 1/4" tall by 3 1/4" wide) and stamped journaling lines on them, then adhered them to the back of my collage.
I cut the tags out...
Made little labels...
Punched the top hole and made reinforcements to match the tags...
Taa Daa!!! My own version of 97% complete tags using my May Counterfeit Kit! I haven't decided on what to do with them...Maybe a mini recipe tag book, maybe I will use them on cards, maybe on layouts, maybe a mini album ... the possibilities are ENDLESS!
Ok, your next stop, last, but definitely NOT least...Bethany at Inspired Scrapper.
Stay Crafty My Friends!
Michelle
Friday, May 27, 2011
A Birthday Card for Mom
Just a reminder...tomorrow is the Counterfeit Kit Challenge May Blog Hop!!! Be sure to check it out! I am participating and I hope you like what I created! See you then!
Today I am sharing a card that I created for my Mother-In-Law for her birthday.
Papers: Reflections
Rhinestones and Pearls: Kaiser Kraft and Reflections
Punches: Mini Butterflies, Lattice Border: EK Success
Nestabilities: Renaissance Hearts
Sizzix: big butterfly
Stamp: Studio G
Stay Crafty, My Friends!!!
Michelle
Today I am sharing a card that I created for my Mother-In-Law for her birthday.
Rhinestones and Pearls: Kaiser Kraft and Reflections
Punches: Mini Butterflies, Lattice Border: EK Success
Nestabilities: Renaissance Hearts
Sizzix: big butterfly
Stamp: Studio G
Stay Crafty, My Friends!!!
Michelle
Wednesday, May 25, 2011
A Recipe Tag Book for my BFF!
I made this a little while ago, and wanted to share it with you. I love recycling projects, and this was a fun little thing to do. I also love recipes and cooking, so it was a perfect little thing to create.
I found a bunch of cocktail recipes that use the diet powdered drink mixes (which I love) and thought it would be a cute idea to use one of those drink mix containers to house a tag book for the recipes. So I made one for my BFF, Jackie, then I made another for myself!
I did an internet search and found as many recipes for cocktails as I could. I used a martini glass punch, which fit perfectly onto the tag. I covered the container and viola!! The papers are from DCWV.
Cheers to my crafty friends!
Monday, May 23, 2011
Creative Counterfeit Cards!
I have gotten into making some cards lately. I belong to SplitCoastStampers, and there was an OSW template here, and I just had to make it. It uses double sided papers to create even more combinations! I added the cardstock to my May Counterfeit Kit, along with the wood butterflies (from my previous Counterfeit Kit) and some bling. The stamps are from various companies.
The bottom right card formed a pocket on the front, where I made a tag to go inside, and it also opens up like a traditional card.
For the orange lace flower, I used one of those new Glubers by Cosmo Cricket. It made making the flower a piece of cake!
I also ran across this tutorial by Shannan here...and I just had to try this! I actually used (FINALLY) one of my milk cap buttons!
Stay Crafty!
Saturday, May 21, 2011
A New Mini Recipe Album!!!
I found this tutorial here, by craftymamaroo, called the "Rose Page Tutorial". I think this is a brilliant use of paper and a great way to make mini album pages! I, of course, tweaked it a little, and made a mini album of my own. Thank you for the tutorial, Cindyroo!!!
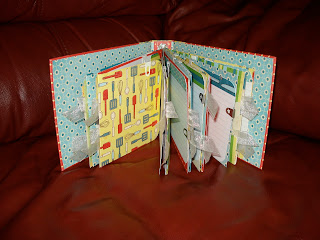
I used a paper line from TPC Studio called "So Delish". I made a recipe album (I know, surprise, surprise), but I LOVE COOKING TOO!!! I modeled it after an album my friend (Thank you, Angel!) gave me years ago, in that the recipe cards will come out of the book, they are not permanently adhered to the pages. That way, they are easy to put on your counter when you are cooking, you can slip it into your purse when you go shopping, and there will be plenty of room to put pictures of the dishes created. I use it to put recipes and pictures of family tradition meals and dishes...like that awesome custard pie recipe that my husband requests on his birthday every year!
I made 6 pocket pages.
Each pocket has two recipe cards that are from the paper collection.
On the back of the pocket there is a flap that opens up. I used 4x6" index cards, used scraps to dress them up, and added them to the pages with the little clips by Memory Makers. I have had these for a billion years, and finally had an opportunity to put them to good use!
In her tutorial she includes an "insert" to put into the pockets created. But, since I had the recipe cards, I just used the "inserts" as extra pages in-between the pocket pages. More index cards fit on these pages.
Thanks for looking, and please head on over and watch the video. She also has a link to her blog where she has a cutting diagram.
Stay Crafty My Friends!
Wednesday, May 18, 2011
Altered Recipe File
I made this a little while ago...
I love recycling projects! I bought this book for another project, but it was too big...so what to do?
I ran across this on The Art of Book Folding. At first, the Halloween theme really caught my eye, but then, I had another idea.
I got out my stuff and made this recipe file. I LOVE IT! I put some of my most commonly used recipes in it and it can sit on my shelf and look beautiful and store my families favorite eats!
The hardest part was the folding, but it is too worth it. What kind of something can you think of? A "rolodex" type of file...table top picture file, hummm...let me know what you think!
Stay crafty!!!
Monday, May 16, 2011
Mini Album and Challenge Cards with my Counterfeit Kit
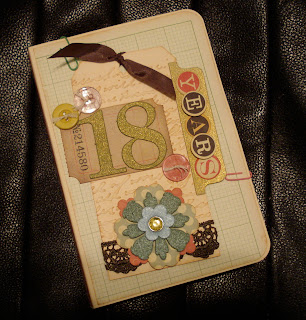
Here it is...the album reveal. I used my May Counterfeit kit, with few additions to it.
I chose the title "18 Years" because I used portraits of my son from the first one at 3 months old to the last one, at Graduation, at age 18. I got this idea on Mother's day...It is amazing to look at these pictures, and at how much he has grown and changed.
I used some of the pictures as "pockets" to house a tag from my kit.
I made one flap out of my large tag from my kit to enable me to put two pictures on one page.
I didn't show all of the pictures/pages. But you get the idea!
I also did some cards using the sketch challenge from Sketch Support that Counterfeit Kit Challenge posted for a mini challenge using the May Kit. Here are a couple of cards I did with my kit.
All I added to this one was the ruler ribbon bow and the plastic needle. This one is the regular size 4 1/4 x 5 1/2".
This is the inside of the card. I added the pearls.
This is going to be for my husband for Father's day. SHHHHH! Don't tell him!!! I made the buttons with my Epiphany Button Maker. I also used my Sew Easy on this card and hand sewed the stitching. This one is 5x7".
For the inside I used another tag to write my message on.
Stay Crafty!
Friday, May 13, 2011
Just a Sneak Peek!
I am working with my May Counterfeit Kit, and I just thought, even though I am not finished, that I would show a little peek of my newest mini album. This is the cover. I used the file folder mini that I included in my kit, and actually added a cover to it to make enough pages for my idea.
I added chipboard numbers and the file tab on the front. I used Glimmer mist to color them. I embossed the large tag. I punched shaped out of my kit papers, and made two of the buttons with the Epiphany Button Maker that I just got. So...when I get this finished, I will show you the inside.
Happy Friday, Stay Crafty!
Wednesday, May 11, 2011
Gatefold Card with Diagonal Pocket Tutorial
I recently finished a card swap on SplitCoastStampers where we were making fancy fold cards. I was playing with a piece of paper, and came up with a cool fold for a gatefold card that created a diagonal shaped pocket on the inside. I wanted to share it with you all.
Here is the front of the card. It looks like a regular gatefold card.
Open, here is the diagonal pocket created with the folding.
The tag out of the pocket
Take your solid cardstock, score on 3", 6" and 9" lines.
Rotate and score at 6".
Fold in half, and ON ONE END ONLY, use your envelope guide and score at 2 1/8". You should be smack dab in the middle of the end of the paper and it will line up with the first score line.
Rotate and do it again. This will give you a triangle on one end.
Turn the piece over, and on the same end, rescore the lines to reinforce since it is a double thickness.
Open the piece of paper, you should have two triangles in the top. Cut the 6" score line to this set of scores only. You want the 3" piece attached above the arrow on the post it note.
Fold your paper in half again, then fold the cut ends out. This will give you a "pocket" piece.
Carefully ease the bottom angled scores to create the upside down triangle shaped pocket.
Fold the top scores under, creating the sort-of 3D diamond shape.
Open, here is the diagonal pocket created with the folding.
The tag out of the pocket
And this is Ace, my almost 7 year old Dachshund. He is the reason the pictures are a little blurry. He was helping his Mommy.
Rotate and score at 6".
Fold in half, and ON ONE END ONLY, use your envelope guide and score at 2 1/8". You should be smack dab in the middle of the end of the paper and it will line up with the first score line.
Rotate and do it again. This will give you a triangle on one end.
Turn the piece over, and on the same end, rescore the lines to reinforce since it is a double thickness.
Open the piece of paper, you should have two triangles in the top. Cut the 6" score line to this set of scores only. You want the 3" piece attached above the arrow on the post it note.
Fold your paper in half again, then fold the cut ends out. This will give you a "pocket" piece.
Carefully ease the bottom angled scores to create the upside down triangle shaped pocket.
Fold the top scores under, creating the sort-of 3D diamond shape.
This is the back side the diamond shape you just made. I adhered this "tab" down. You could cut it off if you chose, but I liked the sturdiness it gave.
To fix the back so that it is not split, cut a 6x6" square of cardstock of the same color, and adhere the middle section of the card to it. That will create a sturdy "back" for the card.
TO DECORATE:
You will need a total of 6 panels of 2 7/8" by 5 7/8" patterned paper to cover the panels. COVER THE INNER PANELS (the red and white dotted paper) FIRST!!! Then adhere the diamond down ontop of that panel to secure the pocket. Cut a square of patterned paper to fit the diamond shape and to fit into the pocket (this also gives sturdiness to the card since the back of the pocket is "split") and a patterned paper triangle to cover the outer pocket. Create a tag to fit into the pocket. I used a matted white cardstock so I could write on it. Create the card front. Decorate and you are done!
I hope you liked this tutorial! Stay Crafty!
Subscribe to:
Comments (Atom)


