WELCOME!!

We are so glad you are here! We love making and sharing our projects, and we are excited to have you visiting our site. Please leave us a comment and let us know what you think!

Jackie and Michelle

Followers

Showing posts with label Halloween Mini Album. Show all posts

Monday, May 11, 2026

I made a Waterfall Card into an ALBUM!


Happy Halfway to Halloween!


I'm doing this as part of my May #paperstashsmash projects. 


I turned a Waterfall Card into a full on album.


This features three Waterfalls that open with the lifting of a flap, 


and three pocket areas.


I have filled it with spooktacular fun!


This is Halloween Junque by Photo Play, and I love love LOVE it!


The album is 7 3/4 x 6 inches. 


I have a share video if you'd like to see it!


Thanks for stopping by, and remember to stay crafty!

Michelle💕

My social sites, won't you come and like and subscribe?🌺

YouTube

This video was made with iMovie for iPhone and music used is original music, "Strolling" by DJ Allen, 2026
🌺Canva used for thumbnail, dividers and end screen creation.


Wednesday, October 29, 2025

Binder Album Walk Through featuring Country Craft Creations Happy Honk-oween! Come See!


 You are going to love this...Come see this walk through and I'll be back soon with a tutorial.  

In the tutorial I'll be using Gingerbread Village, another new Country Craft Creations paper collection.  

Thanks for stopping by, stay crafty my friends!

Wednesday, October 1, 2025

What I smashed in September and what I will smash in October, #paperstashsmash


I'm baaaaack! Welcome to the September project wrap up and share and what I am planning on using in October. Below is a list of the tutorials I mention in this video. Please check them out and give the creators some love. Also below, a list of the phenomenal creators in this collaboration, so please check them out and have FUN! Stay Crafty, my friends! ❤️COLLABORATOR’S VIDEOS: ✦ Angela (AngelaPaperCrafts50) ✦ Candy (Apieceofme62) ✦ Carly Rose (madebycarlyrose) ✦ Co-Host: Karolina (KarolinasKrafts) ✦ Heather (coveredbygracecreations9586) ✦ Michelle (EastBayStampChickMichelleHale) ✦ Michelle (michelleallenacreativeoper6112) ✦ Co-Host: Debbie (Project39MiniAlbums) ✦ Letty (PartyPlannerPaperie)

❤️TUTORIALS MENTIONED: Shabbydabbydoodah's video, Let's Make a Folio Let's Get Scrappy, Doodlebug Fun Cardstock Folio Wallet Tutorial Pink Strawberryz, Christmas French Door Flip Book My Loaded Tag Tutorial My original video the Loaded Tag was introduced in If I missed one, please let me know. Thanks so much for watching!!! 🌺My social sites: Instagram Facebook Pinterest Blog This video was made with iMovie for iPhone and music used was provided by the iMovie app. Canva used for thumbnail, dividers and end screen creation.

Wednesday, August 6, 2025

Want to see a 6X6 Version of My Trifold Folio Album???


☀️Good morning! I have a walk through/talk through tutorial on a 6x6 version of my recent Nature’s Haven Trifold Folio Album❤️

📖The only difference in making this album are measurements and the waterfall has fewer pages. It is made/constructed exactly as the original 6x8 version, so please see the original tutorial for construction. The measurements are discussed in the video and in a cut guide in the video’s description

💕All links for the original album are in this version’s video description.

👻I used “Luna” by Prima👻…I had purchased this from Country Craft Creations a couple years ago. Since it was out (as I had used some for Kim’s file box tutorial from the 🤠Rodeo Roundup) I thought I’d smash it, and I did! This would look amazing with any collection!

Country Craft Creations Design Team Project 6x6 Version Trifold Folio Album, Walk Through & Tutorial

Have fun and stay crafty!!!

Saturday, October 12, 2024

Flip Flop Journal Tutorial, a project with the #trickortreattreasureteamcollab


Hey all! I’m baaaack! How about a fun junk journal project?!?! This only takes theee sheets of patterned paper and whatever other fun goodies you want to add for pages. Coffee dyed or plain paper, grab up a bunch and lets have some fun!  


#TrickorTreatTreasureTeamCollab We are hoping to inspire you to get out your Halloween (or halloween colors if Halloween is not your thing) and craft along with us. We may share projects, we may show you the process, or we might even give you a tutorial, whatever we do it is sure to help get those creative juices flowing. Each week at 1:00pm eastern, we will share our projects. We would love if you liked the videos, and if you haven’t already, subscribe to our channels. And go check out the crafty friends we list below. If you want to share your projects after we have inspired, use the hashtag: #TrickorTreatTreasure Super bonus: We have an entire playlist where we will add our videos as they go live. All of this crafty goodness in one playlist! It doesn’t get any better than that! Here's the line up of our paper crafting wizards in this collaboration. Thanks so much for watching.


Wednesday, October 9, 2024

Curiosities! Carta Bella Paper Meet a Uniquely Creative Folio!


 You have to see what I did!  This is a fantastic folio I made using a paper collection I have been hoarding in my stash since 2012!  

I purchased the folio and dies from my local scrapbook store, Cobblestone Creek Studios, and I know that you will love this!  Thanks in advance for watching!

Stay crafty and stay scary, my friends!

Saturday, October 5, 2024

Fold Up Folio Tutorial, a project with the #trickortreattreasureteamcollab


Hi all! Welcome back to my laboratory! I hope you enjoy this weeks project. I have a tutorial for a "Fold Up Folio" that I think you will love. It's quick and easy and has so many possibilities.


We are hoping to inspire you to get out your Halloween (or halloween colors if Halloween is not your thing) and craft along with us. We may share projects, we may show you the process, or we might even give you a tutorial, whatever we do it is sure to help get those creative juices flowing. Each week at 1:00pm eastern, we will share our projects. We would love if you liked the videos, and if you haven’t already, subscribe to our channels. And go check out the crafty friends we list below. If you want to share your projects after we have inspired, use the hashtag: #TrickorTreatTreasure #TrickorTreatTreasureTeamCollab


This is our second week, and we are featuring albums or folios. Please check out all who are involved in our collaboration, the list is below. Have fun, and stay scary! Bwahahaha! Super bonus: We have an entire playlist where we will add our videos as they go live. All of this crafty goodness in one playlist! It doesn’t get any better than that!


Here's the line up of our paper crafting wizards in this collaboration. Thanks so much for watching. Your Hostess Debbie Amy Angela Carly Rose Dawne Heather Letty Michelle Michelle This is me! Nicole Linh


This is a simple folio, and I've included the following for you.

CUT LIST: A: 1 - 6 x 8 B: 2 - 7 3/4 x 8 C: 1 - 7 x 7 1/2 D: 6 1/4 x 7 E: 5 1/2 x 6 1/2 F: 1 - 4 3/4 x 6 G: 2 - 4 3/4 x 6


The paper I used in the tutorial is Aged Parchment Artisan Cardstock 


The video can be viewed here.  


I hope you enjoy it.  Happy Halloween!  


Tuesday, August 27, 2024

Halloween Themed Mini Junk Journals


I followed a tutorial by Lyric Lover Crafts,
   • Craft Fair Idea #4: Simple Mini Junk ... 

She did this as part of her craft fair series. I was super intrigued by these and had to make one.

Then I made a bigger sized one. Then I made a do-si-do version. I really hope you like these! I was able to smash the rest of my Photo Play "Fright Night" paper collection. I had used it for a prototype project, and had some left over that I used up for these. Thanks so much for watching. Please check out her tutorial, the binding is fantastic. I hadn't seen that before! If you want to make the bigger size one like I did, here are the measurements and scoring... For each journal the large pages were 12 x 7 1/2, score on the 12 at 5 1/2, 6, 6 1/2. Make two For the mini page, it was 12 x 4 1/2, score the same as the large page For the pocket page, 11 x 9 1/2. Score on the 11 at 5 1/2, score on the 9 1/2 at 2 (on the bottom) The spine is 2 x 7 1/2 The tag I cut at 4 1/2 x 7 1/4 Then I just went to town decorating! Stay crafty, my friends

Saturday, July 27, 2024

Two Fun, Quick and Easy TUTORIALS!

 I did two tutorials recently and I think you will love them.

They are super quick and easy, and best of all, you can use up scraps to make them (which is what I did).

This first one is a card tutorial that I revamped from tutorials I have seen, changed things to inches from centimeters, and added my hints and tips to make them successful for you do do.  And, I made another Christmas card, so YAY, CHRISTMAS IN JULY PROJECT!


In the second tutorial I did a pop up album that I have seen in multiple places, but again added a little spin on the cover, and used my scrap Doodlebug Halloween papers to make it.  I think it turned out amazing, and I think you will love how easy it is.


Thanks so much for checking these out and I hope you have fun trying them out.  I loved them so much, and plan to make more!

Stay crafty, my friends!!!

Friday, March 22, 2024

Halloween Mini Album Share


I made this mini as a prototype for the little mini I made for my Country Craft Creations design team project using Graphic 45. It turned out so sweet and cute that I just had to share this. I bought this Prima paper (“Luna”) from Country Craft Creations a couple of years ago. I bought so much I just keep using it! I love it!

I can see this being a fun gift or even a brag book. It is a great stash/scrap buster as well. The tutorial for this beautiful little mini is in this tutorial. Grow With Love Explosion box Tutorial Part 2, a Country Craft Creations Design Team Project. This is part 2 of a three part tutorial. 
I hope you like it! Thanks so much for watching!

Monday, September 18, 2023

Little Monsters Banner Album, a Tutorial for Country Craft Creations

 Welcome! I have this fun little album for you today. I'm making this fun banner shaped album, based on an idea I had back in 2021 with my Midnight Kiss Exchangeable Banner Tutorial. That tutorial can be found here: https://youtu.be/wTjEJlYuPqE

This is fun and easy. I will show you how to make the template for the pages and for the mats. There are also fun interactions that I came up with. I hope you like the walk through at the beginning and the tutorial that directly follows. Cut List:


Welcome! I have this fun little album for you today. I'm making this fun banner shaped album, based on an idea I had back in 2021 with my Midnight Kiss Exchangeable Banner Tutorial. That tutorial can be found here: https://youtu.be/wTjEJlYuPqE This is fun and easy. I will show you how to make the template for the pages and for the mats. There are also fun interactions that I came up with. I hope you like the walk through at the beginning and the tutorial that directly follows. Cut List:

Pages: 4 - 6 x 12 Waterfall with cover: 1 - 7 1/2 x 3 1 - 6 1/2 x 3 1 - 3 5/8 x 4 1/2 Up/Down Waterfall: 2 - 8 x 3 1 - 7 x 3 Accordion: 1 - 4 x 12 Extra booklets: (As desired to put into pockets) Tag Booklet, 1 - 3 x 10 Booklet, 4 x 6 Supplies from Country Craft Creations: (I'm sorry, but the charms I used are no longer available) Little Monsters https://www.countrycraftcreations.com/search?type=product&q=little%20monsters* Artisan Cardstock https://www.countrycraftcreations.com/collections/artisan-cardstock Seam Binding https://www.countrycraftcreations.com/collections/seam-binding buttons https://www.countrycraftcreations.com/search?type=product&q=buttons* Stash supplies include: chain and jump rings for charm, book rings, cupcake wrappers, gem dots, shaped brads, twine, flowers

Monday, August 14, 2023

Pumpkin Explosion Box Tutorial

The above video is a walk through of the project and the video below is the tutorial.  It is so fun!

It was requested by one of my scrappy friends, Dawn.  She wanted a pumpkin shaped explosion box and this is what I came up with.  I hope you like it.

Stay crafty, my friends!


Midnight Potions, A Spooky Junk Journal/Spell Book using a Classification File Folder


 You all have to see this...I made this junk journal as a project using Country Craft Creations "Midnight Potions" papers and it is amazing.  This is a tutorial and I'll show you how I used a classification file folder and how I sewed in the pages.  It turned out so amazing!  I absolutely love this one and I think you will too.  Thanks so much for watching.  Stay Crafty!

Sunday, October 23, 2022

Altered Photo Album

 I made this project, an altered Pottery Barn Photo Album I found at Goodwill for $4!  


The cover was made from a tutorial here, by Kim of Kim Can’t Stop Krafting.  

I absolutely love this idea of using Foam Core!!!  You have to check it out and see how my altered album came out!

Stay crafty, my friends,
Michelle

Wednesday, September 14, 2022

Hocus Pocus Folio Tutorial, a Country Craft Creations Design Team Project

 Hi all, and welcome back to my Haunted Craft Room!

Today I have tutorial #3 using Carta Bella's "Hocus Pocus" paper collection.  This is a design team project for Country Craft Creations, https://countrycraftcreations.com.  I made this fun folio that features a tuck tab closure and three ways to use your Sizzix Essential Mini Album Die set by Lori Whitlock https://www.countrycraftcreations.com/products/sizzix-thinlits-dies  

I hope you enjoy this tutorial.  From the scraps I have leftover I have another surprise...but you have to wait until my next video!  

Below are the cutting guides and the links for the products I used.  I used some cardstock that coordinates with the paper collection for the album die pages, and the patterned paper as well.  The cardstock listed below is Artisan Cardstock from Country Craft Creations, https://www.countrycraftcreations.com/collections/artisan-cardstock.  I used light weight chipboard for the cover, https://www.countrycraftcreations.com/products/chipboard-light-weight-12x12-sheet.  

The paper collection, Hocus Pocus by Carta Bella is here, https://www.countrycraftcreations.com/products/chipboard-light-weight-12x12-sheet#/cd9f1be9-5b7d-494c-9001-d53b43632e20/fullscreen/autofilters=true&filter[brand][]=Carta+Bella&page=1&query=hocus+pocus&query_name=match_and&rpp=20

Art Glitter Glue and score tape can also be found on the website, 

https://www.countrycraftcreations.com/collections/art-glue

https://www.countrycraftcreations.com/collections/scor-tape

You will also need seam binding to complete the albums included in this book.  

https://www.countrycraftcreations.com/collections/seam-binding

Thanks so much for your support!  I appreciate it so much!

COVER

light weight chipboard

2 - 5 7/8 x 6 7/8

1 - 1 3/8 x 6 7/8

Cardstock

2 - 8 1/2 x 9

1 3 1/2 x 6 7/8

Inside front and back cover accordion pockets

2 - 8 7/8 x 9

Closure tab

1 - 2 x 8

Middle page

1 - 6 1/4 x 6 1/2

Wednesday, August 31, 2022

Midnight Manor Disk Bound October Daily Junk Journal Tutorial, a Country Craft Creations Design Team Project


 Hi all, and welcome back! Today I have a fun project for my fellow Halloween Junkies. I wanted to make a sort of October Daily/Junk Journal and I'm using the magnificent collection by Country Craft Creations called "Midnight Manor". This collection is so beautiful, and made a great project. The best part is that this is so adaptable that you can make this project for any type of journal or notebook. Country Craft Creations has many different collections that would also work. So if you aren't a Halloween Junkie, and would like to make one for Fall, or Christmas, or whatever...check it out Country Craft Creations.

I used the "Lay Flat Method" for making the cover of the book. If you haven't seen this method, check out this tutorial I did here. I use 5 Happy Planner Disks, in black, that are approximately 1 1/4" in diameter. Any disk for this type of notebook will work. I also used the We R Memory Keepers Disk Punch. Below is a cut guide for the cardstock and chipboard needed for the project. I cut the patterned paper for inside the journal/on the pockets at 1/8" smaller. For specialty cuts, I include directions in the video. Thanks so much for watching, and I'll see you soon with another tutorial. COVER Chipboard 2 - 7 x 9 1 - 2 x 9 Cardstock 2 - 9 x 11 1 - 5 x 11 1 - 6 x 8 7/8 MATTING FOR THE COVERS The covers are 7 x 9. I triple matted the patterned paper for the front and back covers, but only single matted for the spine. Silver Mirror 2 - 6 3/4 x 8 3/4 1 - 1 3/4 x 8 3/4 Antique Winter Gray, 2 - 6 1/2 x 8 1/2 Burgundy, 2 - 6 1/4 x 8 1/4 (Note, this paper is available but won't be for long, so if you need it you should order.) Patterned Paper 2 - 6 x 8 1 - 1 1/2 x 8 1/2 INSIDE COVER POCKETS (Note: these are the same size but are scored and trimmed differently) 2 - 7 7/8 x 12 BINDING MECHANISM FOR DISKS 1 - 4 1/2 x 8 1/2 1 - 1 x 8 1/2 POCKETS #1 1 - 11 x 12 #2 1 - 8 1/2 x 12 #3 1 - 10 x 12 That's it! The remaining inserts for this junk journal are up to your individual style! I did size this project to hold 5 1/2 x 8 1/2 papers, so one sheet of copy paper will make two pages for your journal.

The patterned papers, artisan cardstock, seambinding are all available at Country Craft Creations... Please check them out! Have fun, and let me know if you have any questions. Thanks for watching!!

Friday, October 1, 2021

 Hello! Here’s a quick, easy and fun project to do that would make a great present with a little wow factor included. It's a blast from the scrapbooking past.


Tammy of Country Craft Creations challenged the designers to find a past project that we have either never done a tutorial on or a project that we did to a tutorial on in the past but wanted to resurrect and/or revamp it. So…I am resurrecting and revamping this explosion album I did in 2011. The link to my original blog post is here, and the other album I made
is here. It is a fun project that I did two different ways in the past. I combined them into a new and revamped project. I am using Christmas Dreams and Midnight Ride to show you different looks (and because this is the third attempt to do this tutorial!), both collections are exclusive to Country Craft Creations at http://countrycraftcreations.com. Below is a cut list. It took about 11 sheets of cardstock in your base color, and 2-3 sheets of cardstock for photo mats. I used almost an entire pack of 8x8 paper (Christmas Dreams) and about 14 sheets of 12x12 patterned paper (Midnight Ride). Thanks for watching, and have fun with this tutorial! Outer Layer Base: 5 - 8 x 8 Outer Layer Gatefold: 2 - 5 x 8 Inner Layer Base: 5 - 7 x 7 Inner Layer Gatefold: 2 - 4 1/8 x 7 Page Flip: 1 - 12 x 7 I also used 4 pieces of seam binding at 12" each for closures.

Monday, September 13, 2021

4 in 1 Mini Album Tutorial

 Here it is...the cute, quick, easy and versatile mini album that I think you will love!

This is a design team project for Country Craft Creations...and I was able to showcase 5 different collections with this design.  

*Autumn Orchard


*Midnight Ride


*Bountiful Blessings


*Christmas Cheer


*Sweet Southern Mess


These paper collections are exclusive to Country Craft Creations.  In the albums, from the store, I also used Artisan Cardstock, seambinding and Art Glitter Glue.  Check out the store for lots of excellent paper crafting supplies.

The possibilities are endless with this album, and it would make a great Christmas gift!

Thanks for visiting and thanks for checking out the tutorial and stay crafty!!!

Michelle


Friday, September 10, 2021

Bewitching Hour Configuration Album Tutorial

I have my tutorial uploaded to YouTube. This is my second project using “Bewitching Hour”, an exclusive to Country Craft Creations paper collection. 


This album was designed by request, and although I used Artisan 12x12 cardstock, you could use 8 1/2” x 11. This is another configuration album, each page is scored  the same, but one different cut can give many looks. Have fun!  

Country Craft Creations 
Http://countrycraftcreations.com 

Thursday, September 9, 2021

A Halloween Box Decor Piece using Graphic 45's Rare Oddities

I finally finished it!!!  I'm so happy!!!
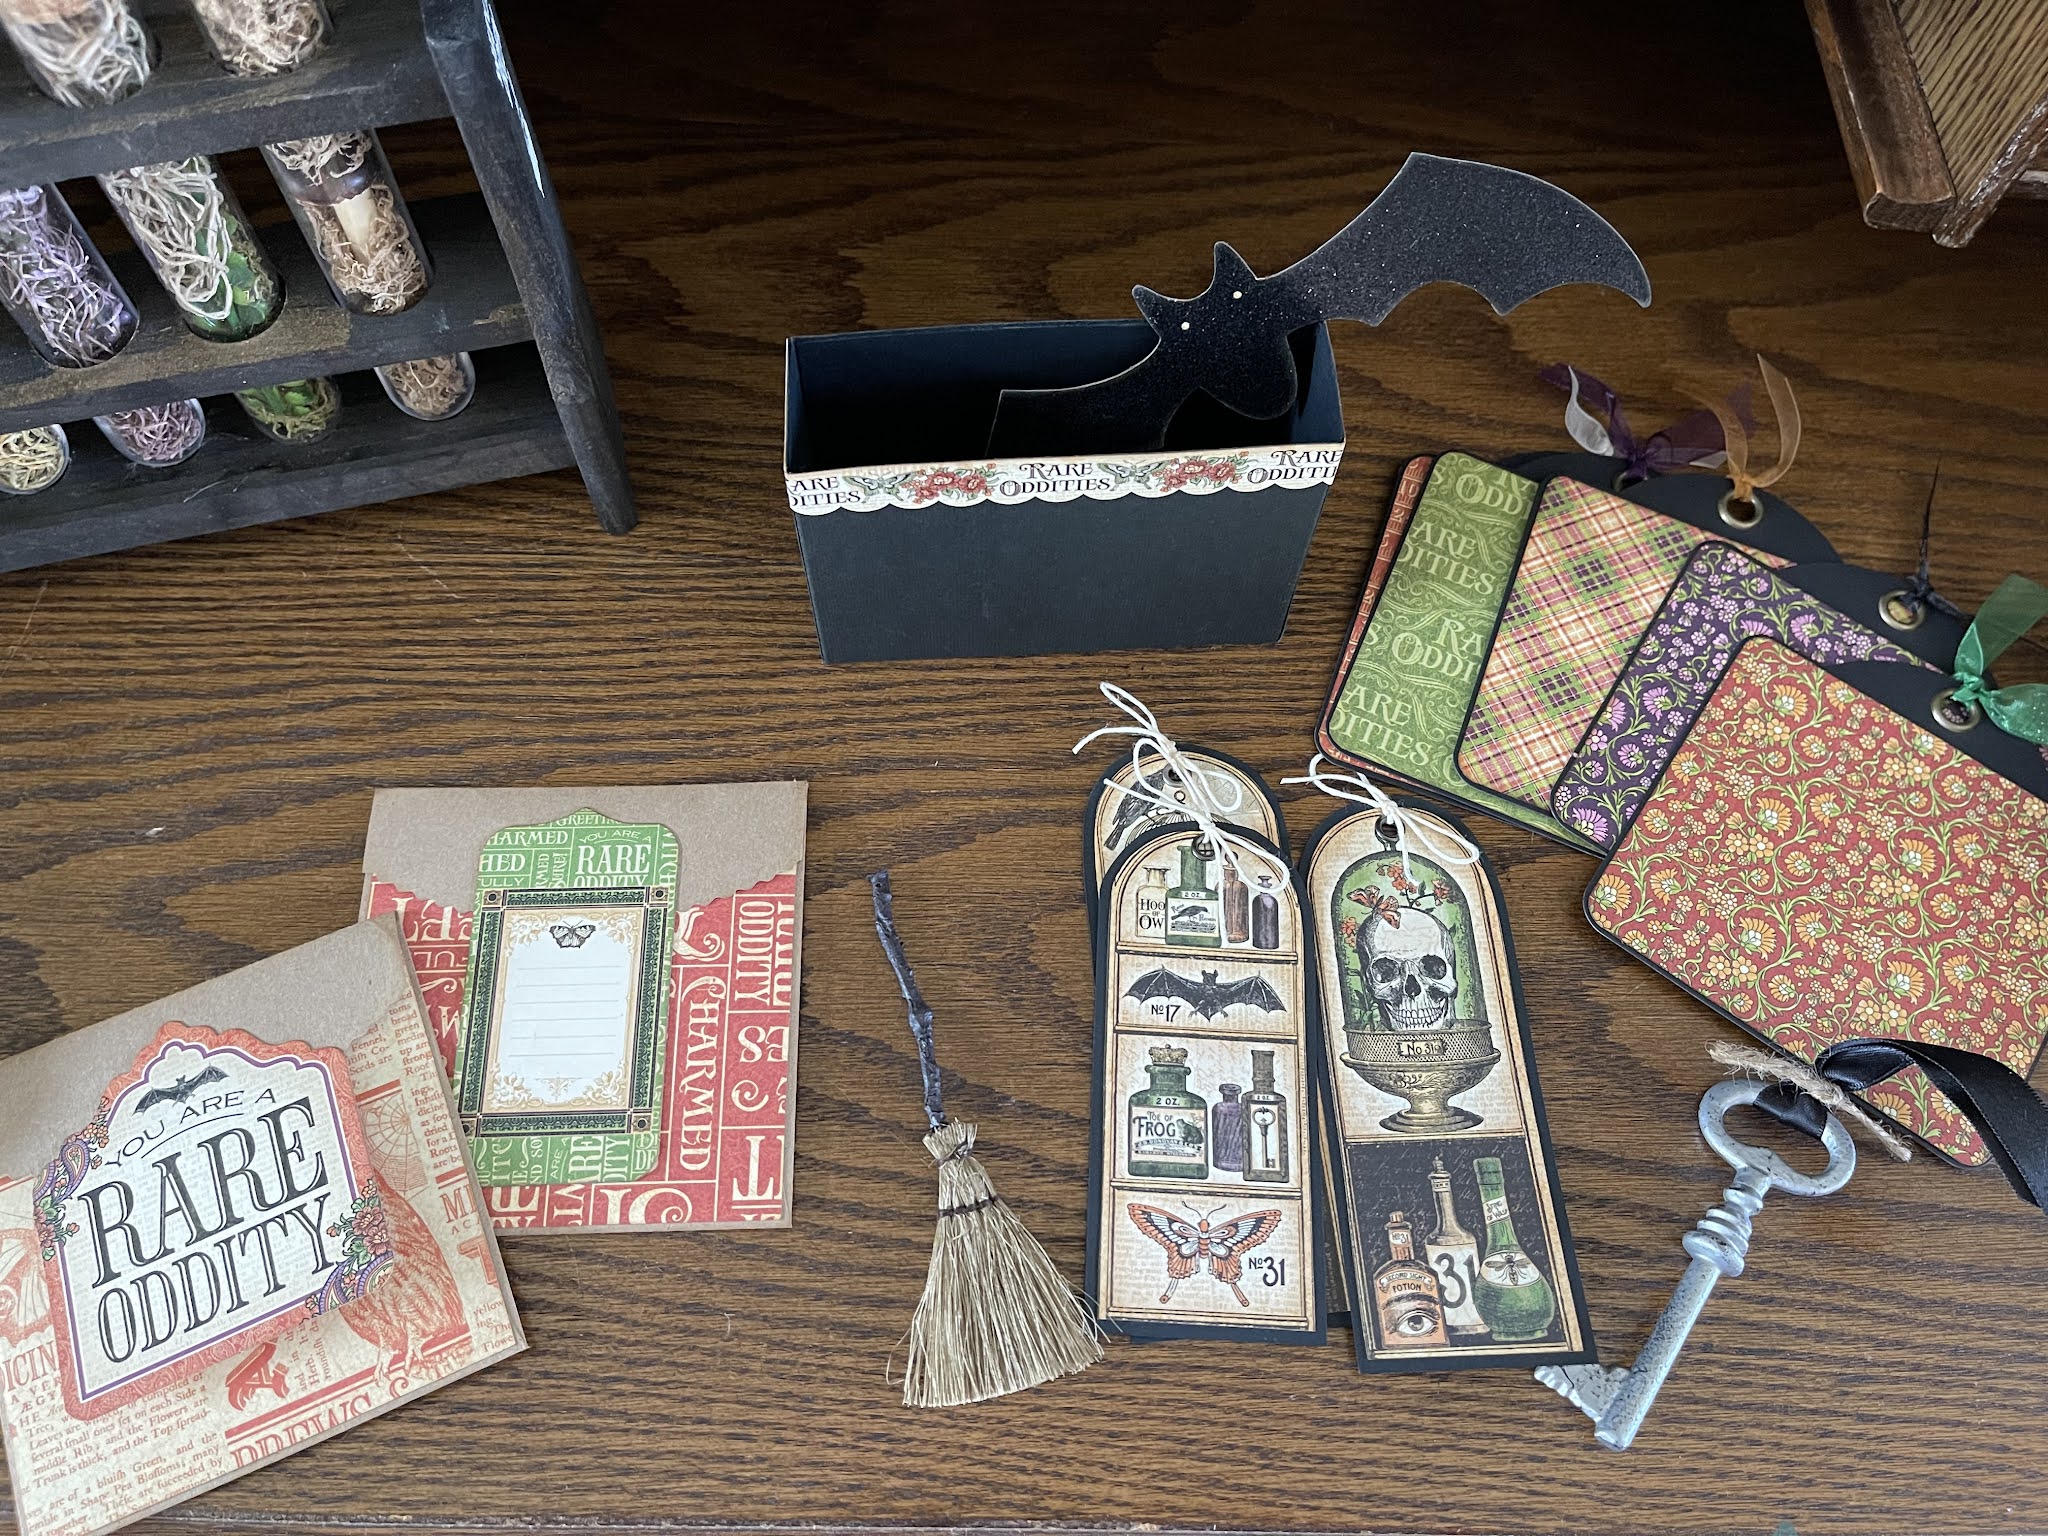
I made this amazing box full of goodies with a Graphic 45 collection from 2015!!!  
This is the Rare Oddities collection!
I started this project in 2015 when this collection came out.  I worked on it for a while, then for some reason I can't remember, I put it away unfinished.  I dug it out and finally finished it.
This piece is amazing and fun and full of great things.  I love how it turned out.
This is going to be a great addition to my Halloween decor.  
I made this little album, that was made with envelopes.  Please don't ask where I got it...I really don't remember...remember I put this away for a long time.
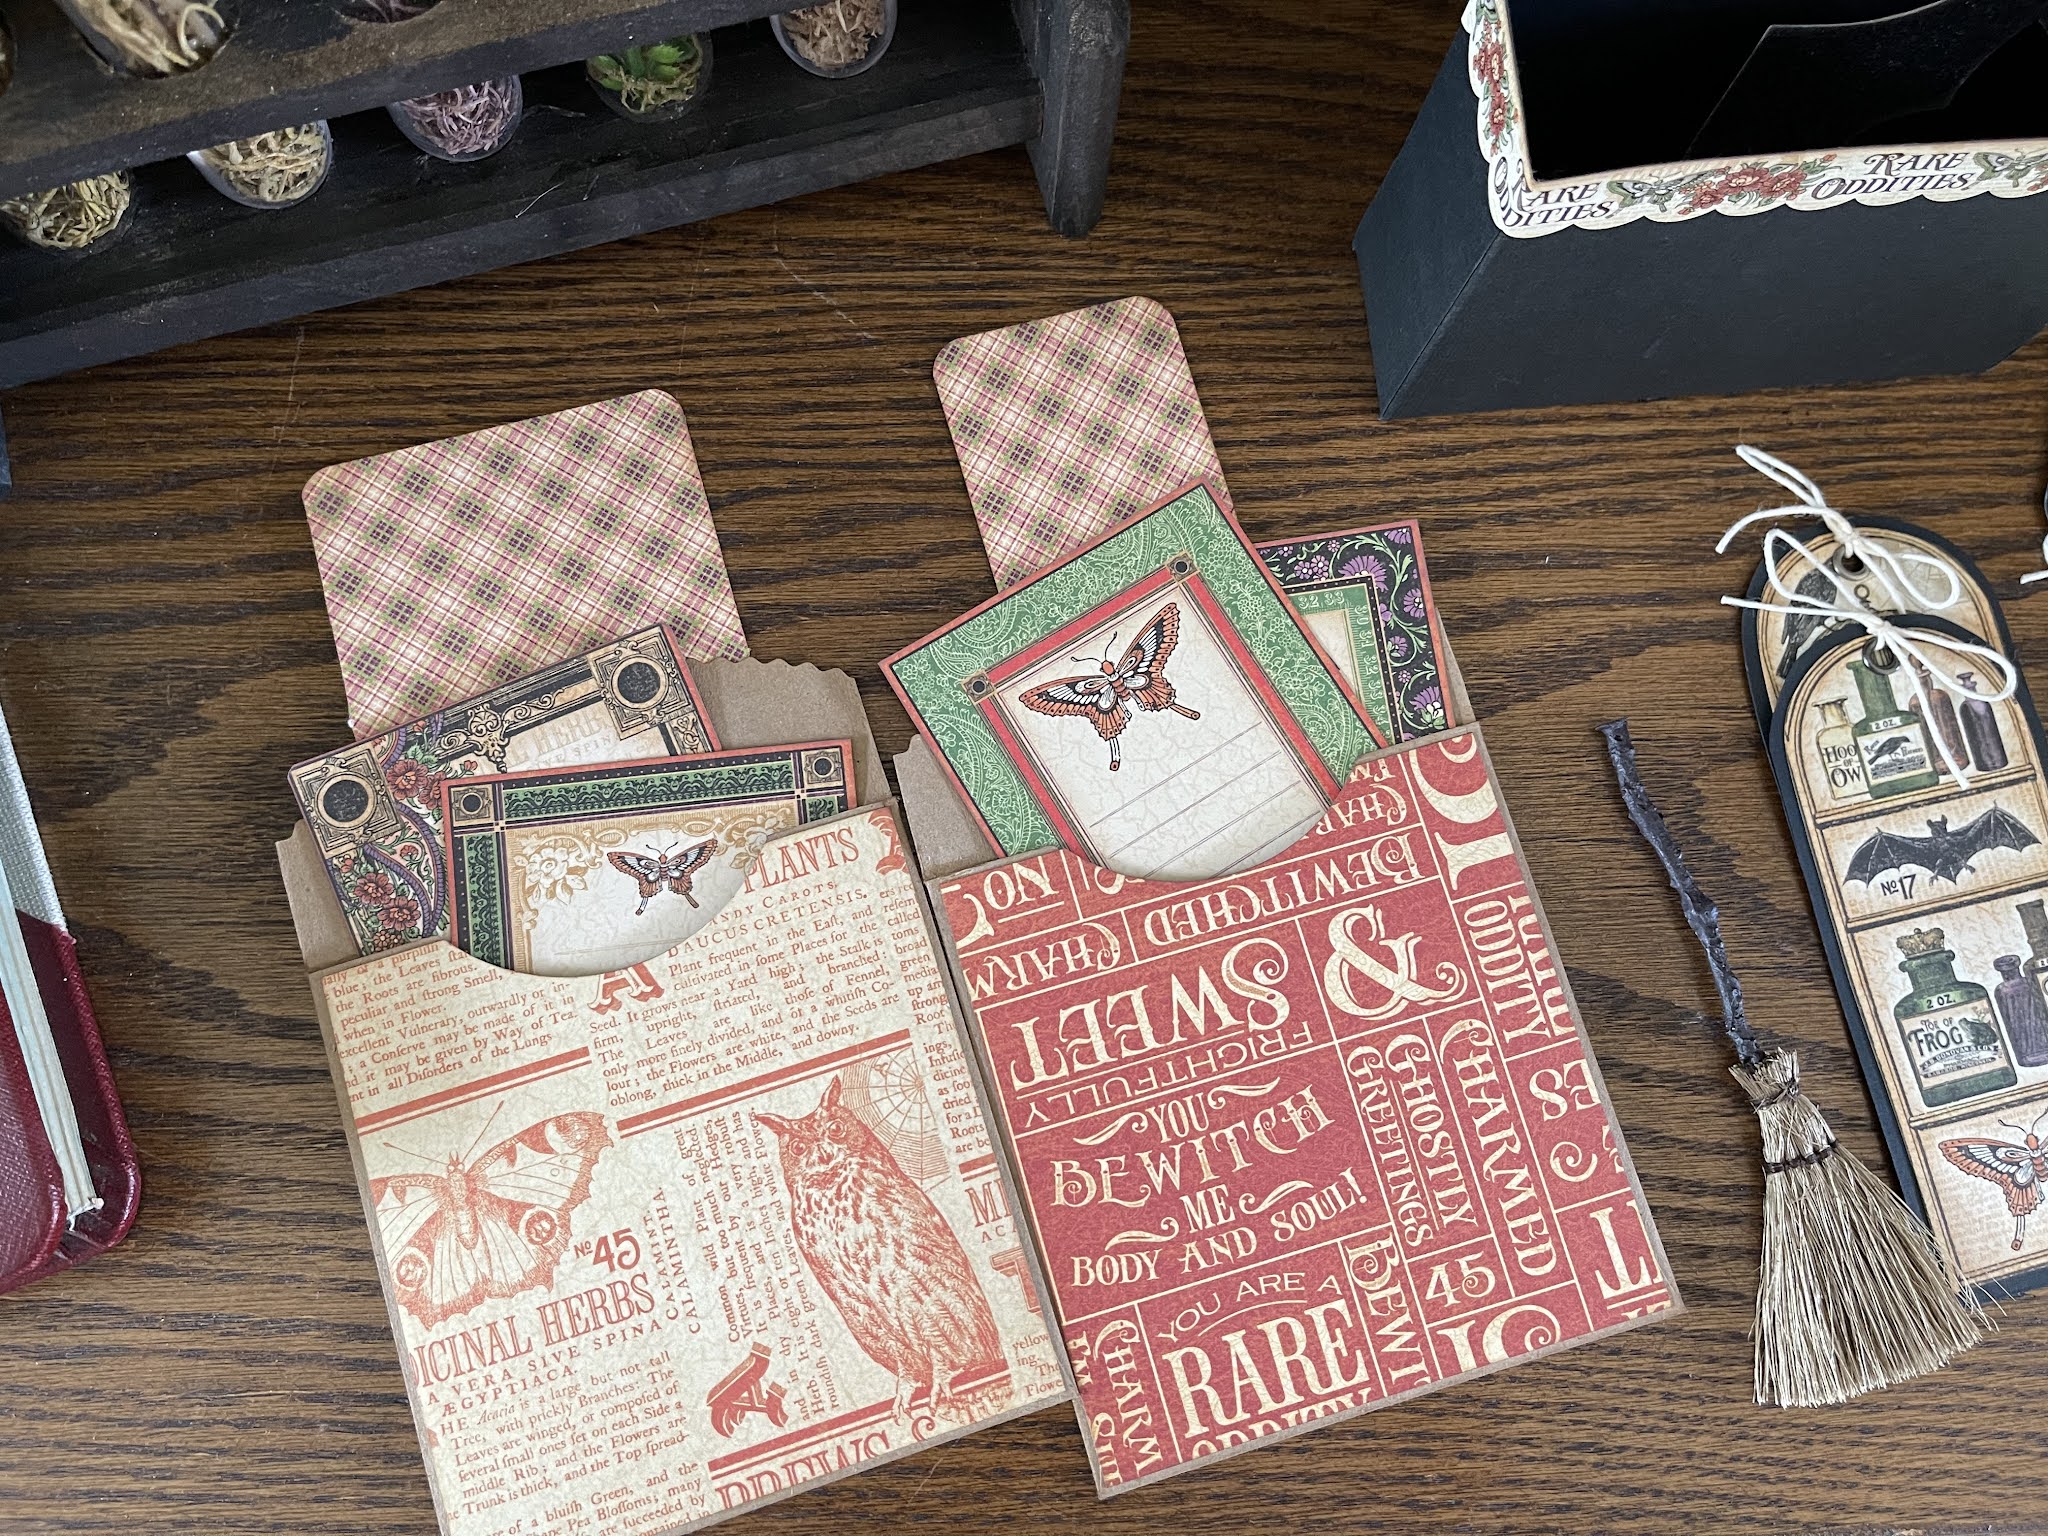
It is decorated with the patterned papers and the embellishments that came with the collection.  
Each envelope has a tag.
I made file folders and filled them with journaling cards.

I created a box to go in the box and filled it with all sorts of goodies.
I took some paper bags and decorated them.  I added a witches broom, made bookmarks, and added a skeleton key.  I also covered some tags with the patterned papers.  In the box you will see a bat, I backed him with some of the papers as well.
In the paper bags I added more cards.
I have test tubes full of fun, and made my fairy skeleton.
I have a bottle of Raven feathers and a box...
In the box a secret letter, skull, flower and another bottle.  
The feathers were made with a die that I have.
I found this cute notebook that I added to the mix, and used some stickers in it.  I also found this cute cutting board that I turned into a clipboard and added more journaling cards.

I am very pleased with this project.  Even though it took so long to complete, it will be a treasured Halloween decor piece for years to come.

Stay crafty and scary, my friends!

Michelle