WELCOME!!

We are so glad you are here! We love making and sharing our projects, and we are excited to have you visiting our site. Please leave us a comment and let us know what you think!

Jackie and Michelle

Followers

Showing posts with label easel album. Show all posts

Wednesday, September 11, 2024

Calendar Box Tutorial and Hanging Calendar Version, A Bonus Country Craft Creations Design Team Project


Hi all! There is a story to this tutorial... This all started with making the Quilt Calendar Square designed originally by Angela Beavers. This was taught by Tamra, owner of Country Craft Creations in a live on the Scrapbookers of Country Craft Creations Facebook Group back in 2018 with Angela's blessing and permission. I have always wanted to make one, so when I saw this project come up again as a member had made one recently, I discovered the tutorial and I made one. I wanted to make myself a hanging calendar, so that was the direction I was going in.


Then I was asked by a fellow CCC member, Jenny, to come up with a box to put calendars in, with an easel of some sort, specifically for a 6 x 6 calendar. The calendar size taught is 8 x 8. So my creativity kicked in, and I made a box for an 8 x 8 AND a 6 x 6 version. This tutorial will show you ALL of these options...two box sizes and how I made it into a hanging calendar.


I can not teach the actual Quilt Calendar tutorial. For that, you must be a member of the Country Craft Creations Facebook group to access that video. So please check it out, the information and link is below. Country Craft Creations is an amazing online community. Visit the store here. We have an amazing Facebook Community as well, so please check it out... I also have a printable for the 2025 calendar that I designed for myself. You can access this in the link below. PLEASE BE AWARE...This printable worked for my computer and my printers (I tried it on two of the printers I have) and how I describe to cut them in the tutorial worked for me. Please test and check your printable to make sure the measurements and cutting is accurate. I had to ensure I printed at 100%. Please Check your settings. Make a practice page by only printing one page to start. I also recommend that you download the PDF file and then try to print, as it did not work correctly just printing from Google Drive. I used a total of 14 different Country Craft Creations exclusive papers to make these calendars and will name them all in the video. I was able to make them all with scraps leftover from previous projects. The link for all of the papers is here, and you can find them here. If they are sold out they will be reprinted, so please check back. Artisan cardstock, 100 lb, is what I used for the boxes, it and all of the other colors of Artisan can be found here.

Here is the cardstock cutting list. The scoring and measurements for patterned paper is in the video. Box for 8 x 8 Calendars: Easel/Tray 1 - 11 x 8 1 - 3 x 6 Box 2 - 12 x 9 Box for 6 x 6 Calendars: Easel/Tray 1 - 11 x 8 Box 2 - 10 7/8 x 7 Hanging Version of an 8 x 8 Calendar Tab Dies from Scrap Diva measured approximately 2 3/8 x 2 before folded, I made 13 total Backing cardstock measured 7 7/8 x 7 7/8, I used a total of 13 of these Photo Corners, 24 pieces of cardstock at 1 1/2 x 1 1/2 Calendar printouts cut at 7 3/4 x 7 3/4 I know this is a lot of information. I hope that you join our group and create a calendar for your own. They are so much fun and so beautiful! Stay crafty, my friends!

Sunday, July 21, 2024

Cowboys Disc Easel Flip Album, A Country Craft Creations Design Team Project


 Hey all!  I have this fun and quick project to share with you!  Dig out your Cowboys paper by Carta Bella and some Happy Planner Discs and make a great little project with your scraps!

All of the information is in the video.  I hope you like it!!

Stay crafty, my friends!

Monday, January 2, 2023

Easel Style Tag Calendar, A Country Craft Creations Design Team Project


Welcome back to my channel. I have a very simple desk calendar idea that is so quick to put together and a stash buster at the same time. It has a simple easel and uses the die cut tags from Heartfelt Creations "Album Tags and Accents" die set. These are available at Country Craft Creations. I used the exclusive paper collection "Remember the Time" from Country Craft Creations. I also used cardstock, and chipboard. I will talk about the calendars in the tutorial and where to get them. But you can also check out this site, https://print-a-calendar.com/make-a-calendar. This link will take you to where you can customize a printable calendar. For easel: Cardstock 1 - 10 x 4 1 - 4 x 4 1 - tag die cut Light Weight Chipboard, (covered with cardstock on one side only) 2 - 3 7/8 x 3 7/8 For the calendar, I used 6 die cut tags, and mini calendars matted with cardstock. I used 12 die cut mats for the tags in the calendar papers. Please note that your mini calendars may vary in size so please check yours, measure and mat accordingly. Thanks for watching!!

Wednesday, May 27, 2020

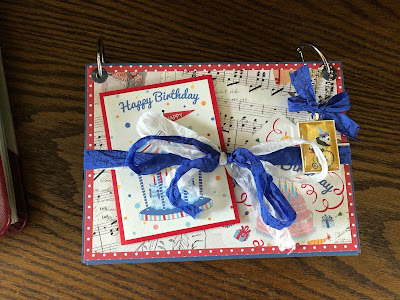
Hooray Easel Album Tutorial

HELLO!!!

Today I have the tutorial for my Hooray Easel Album! This is my 3rd design team project for Country Craft Creations using Authentique's adorable "Hooray" paper collection! I was also given Carta Bella's "Dots" papers, which matched PERFECTLY with the papers. This album was designed with the thought of documenting the first 10 birthdays in a child's life, but there are so many other things you can do with this album!! I give a list of ideas in the video.


Along with the papers mentioned above, I used 9 sheets of denim Artisan Cardstock, 3 Ivory Artisan Cardstock, and a lot of the patterned paper scraps. I estimate that if you were to use patterned paper for the entire project instead of utilizing scraps you would need about 6-7 sheets. You will also need book rings (at least 1 1/4"), eyelets (optional), seam binding for the closure, and Art Glitter Glue. You can get the papers, glue and seam binding at Country Craft Creations.


Below is a cutting list for the cardstock and the mats with the papers needed, if you do choose to do the pages as I did in the video.


Thanks for watching. Let me know if you have any questions. Stay safe and stay crafty!


Chipboard: 2 at 7 1/2 x 5 1/2

Denim Cardstock:
To cover chipboard, 2 at 9 1/2 x 7 1/2 and 2 at 7 3/8 x 5 3/8
Easel Stand mechanism, 1 at 7 1/2 x 3 1/2, and 1 at 7 1/2 x 3
Pages, 5 at 8 x 11 1/2
Front Cover, 1 at 7 1/2 x 5 1/2

Below are specific cuts for the pages, making the mats and patchwork pieces of patterned papers as I did in the video. This is optional, and you can do the pages however you wish.

Photomats are cut from Ivory cardstock.
Pages 1 and 6
cardstock 2 at 4 1/4 x 6 1/4
patterned paper 2 at 1 x 4 1/4 and 2 at 1 x 7 3/8

Pages 2 and 7
cardstock, 2 at 3 5/8 x 5 5/8
patterned paper, 2 at 3 5/8 5 5/8

Pages 3 and 8
cardstock, 2 at 4 1/4 x 6 1/4
patterned paper, 2 at 5 3/8 x 7 3/8

Pages 4 and 9
cardstock, 4 at 3 1/4 x 4 1/4
patterned paper, 2 at 1 x 3 1/4 and 2 at 5/8 x 5 3/8

Pages 5 and 10
cardstock, 2 at 5 3/8 x 5 3/8
patterned paper, 2 at 1 3/4 x 5 3/8