WELCOME!!

We are so glad you are here! We love making and sharing our projects, and we are excited to have you visiting our site. Please leave us a comment and let us know what you think!

Jackie and Michelle

Followers

Showing posts with label Just a Few Friends. Show all posts

Wednesday, May 14, 2014

Tag Swap with "Sassy and We Know It" (and a YouTube Tutorial Link)

 My crafty sisters from "Sassy and We Know It" decided to do a tag swap amongst ourselves…and this is what I came up with.  It was to be a "Spring" theme, and we were cutting our tags 6" x 3".
I used papers by K and Company, along with their embellishments that came with the paper line.  I added ribbons, bling and flowers from Recollections.  I used the lace from my stash, and some pearl "ribbon" to decorate it as well.   I made the butterflies with a Martha Stewart layering punch, and added Stickles to create the body of the butterfly.  The Tim Holtz paper clip is there because my tags open up…
I added flowers to the bottom of the tag, but they are adhered so that if the ladies want to place a picture in the tag, they can tuck it under the flowers.  The other tag shows the back.

I also wanted to share with you a link to the tutorial on how I made the pages in my "Bohemian Bazaar" mini album.
The video can be found here, so please go and check it out!!

Thanks for looking, and remember to stay crafty!!

Saturday, June 8, 2013

Happy Father's Day!!!!!!!!

Welcome to the 2013 Father's Day Blog Hop!!!  All of us in the Pride have been feverishly scratching and clawing in our dens, coming up with  the perfect card projects for the special Dad's in our lives!  We are so excited you are here, and we hope you love the creations that we have to share with you!

You should have prowled on over to me from RJ's Den.  The beginning of this hop is with our
Den Momma, Elsa!  I have the full list of all of the Pride members in this hop at the bottom of this post.  Now...let's get started!

Our mission was to create the purrrrrfect Father's Day card.  This is what I came up with for my awesome, wonderful, caring, loving Husband.
 I used the DCWV line called "The District Stack".  I loved this line, because it looked so regal.  I had this stamp in my stash.  I put three keys on the card  because we have three children.   The candy dots are by My Mind's Eye.  I used a variety of punches as well.
Here is the inside of the card.

Then, you know me, I just couldn't stop.  I made him an album as well.

 I wanted to match the album to the card.  I modeled it after a brochure fold called a "Stepped Double Parallel" fold. I will do a tutorial on how I made it in a few weeks.
 It closes with a simple ribbon closure that I threaded through the "spine" of the book.
 I didn't put the pictures for this post, because I didn't have permission from our kids...but the pictures are all of my husband with our kids at various times through the last several years.  I also did sentiments that I will put on the pages after I put the pictures in.  This picture above is the first opening...
 Then it folds out like this.
 Here is the other side.
The "spine".  He can put it on the shelf and look at it whenever he wants, or he can open it and display it.  I think he will love it!

I would usually direct you to a link on my YouTube channel for a video to show this project off.  I actually did make a video.  But, being the brilliant person I am, I deleted it off of my phone thinking I had already uploaded it to the computer.  NOT SO! Sorry about that.  Note to self for next time, MAKE SURE IT'S ON THE COMPUTER FIRST!

Thanks for stopping by and checking out this project.  Happy Father's Day to all of the guys out there!!  Now, please pounce on over to Sherain's Den and see what wonderful project she came up with!


Saturday, May 4, 2013

A Box for Mommy

Welcome to the Just a Few Friends Mother's Day Blog Hop!!!  
We are soooooooo glad that you prowled on over to see our purrfectly created projects!  We have all been tearing up our dens in the creation of our box themed goodies, and we hope that you like them!  If you have not started from the beginning, please start with Elsa's Den.  If you have been  pouncing along the blog hop, you should have come to my den from RJ's Den.  I have a list of all of our participants at the end of the post.  Now, on to the fun I have created for your viewing pleasure.

I have a video on YouTube also, please go and check it out!

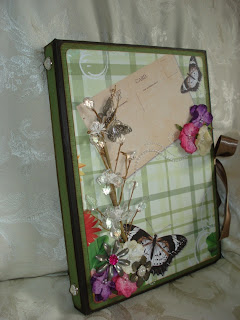
 This project was made using a Tim Holtz Configurations Book that I bought at the last Creating Keepsakes convention I went to. I bought this paper collection at Tuesday Morning, and it is called the "Social Butterfly Stack".  I am really not sure who put this collection out, but it is beautiful!
 I used Petaloo flowers.  The metal flowers and the metal butterfly were from a bulk bin at the craft store.  My BFF, Jackie, gave me the spray in  a grab bag of flowers and ribbons.  The brads on the spine and in the metal flowers are by The Girls Paperie.
 I painted the box and the inside boxes with brown paint.  Then I adhered the papers in the back of the boxes.  I remmed one section to make a space to house a mini album.  I used the "Never Ending" book style that I have done several times in the past, and used a simple ribbon "belly band" for the closure.

I added a few embellishments in the boxes, but didn't want to over fill them because I thought the paper was so pretty, I didn't want to cover it up.  I added a glitter filled bottle, a flower, a key and wooden butterfly, a metal bird and quote, and some lace that looked to me like a doily on a shelf.
 A top view of the mini album and its pages.
 This is the first cover page opened...
 ...Then the right page opened again.  I used some leftover card stock to create a pocket for tags.
 The "back" page opens to reveal a belly band type holder that I created to hold a trifold mini pull out.
 Each side has 4x6 mats to hold more pictures.
 When you open the page with the mini pullout, you get this layout.  I added a flap that I punched with a Martha Stewart Edge punch.  The pink paper behind it shows off the pattern.

This is the "middle section of the mini album.  I made a slit type pocket to house two more tags.  

I sure hope you liked my project.  It was so much fun to put together.  Now please pounce on over to Sherain's Den and see what she has come up with, I know you are going to like it!


Saturday, March 23, 2013

Happy Easter!!!

Welcome to our Easter Basket Parade Blog Hop!!!

We are glad you could join us in our dens today, we are "roaring" to show you our projects!  We have been busy busy busy making creations with a basket theme, and we do hope you enjoy them!

You should have come to me by way of  Margaret's Den, here.  But if you happened upon my blog by accident, start at the beginning with Elsa in her Den here.  I left a full list of the line up at the end of my post.  We all hope you enjoy prowling around, hunting for our creations.  

Now for my creation.  I did a YouTube video that you can also check out.  I loved making this creation!


 The theme this month is to do something with a basket, in honor of Easter.  I went a little bit literal with the theme, but decided to create a door "wreath" with the idea!  I used Bazzill card stock and wove a front to the basket, after inking the paper strips with Tim Holtz Distress Ink.  I then attached it to the front of a 1" wide box I created to hold all of the goodies.
 The box that I used is the height and width (at the bottom) of the basket front, and 1" wide.  I used extra pieces of the woven paper to create the handle.  
 I bought the cute bunny and chick, but created the eggs and the flowers.  The eggs and the chocolate bunny are cut from my "Easter 2010" Cricut cartridge.  (Did you see the bunny already has a bite out of it's ear?)  I made doubles of everything, then stuck skewers in-between the "sandwich" of the cutouts, so that I could stick them into the basket.  The grass is paper grass I bought at Hallmark.  
The lovely trim that I put on the basket was an awesome RAK from Elsa, and I was waiting for the right project to use it on...here it is!  The flowers are Recollections and Petaloo.  The bling is Recollections, the the butterfly is unknown.  The papers I used for the eggs are from K and Company.  

I sure hope you liked this project.  Please let me know what you think.  Now, please go on over to stalk Sherain and see what she has in store for you in her den!

Thanks for looking!!!  Have a wonderful Easter!!!


Saturday, March 16, 2013

Happy St. Patrick's Day

From our blog to yours...


Enjoy yourselves, have fun, and be safe while you're doing it!!  We will be seeing you next week with an Easter treat blog hop that you don't want to miss!!


Saturday, February 9, 2013

February Blog Hop Time!

Welcome, Welcome, WELCOME!!!  It's time for the Just a Few Friends group to have our blog hop showcasing our awesome, wonderful, and PURRFECT Valentine's Day Gift Bags!!!

You should have pounced on over to me from RJ's blog.  If you found me while prowling around the internet, please start with Elsa's blog and follow the links to jump from den to den to see what we have created for your viewing pleasure.   I have a full list of my "den siblings" at the end of the post as well.  

Please say "Hello" to our newest Cub, Carrie!!!  She is joining us for the first time this month!  

Our challenge:  Create a gift bag, and decorate it for use with a Valentine gift.  We could use the colors pink, red, brown and/or black.   The rest, well that was up to us!  I came up with a little project to contain a present for my awesome and wonderful husband, DJ, the King of my Jungle!  I know he is going to see this post, so I am not showing the present on the inside, but he can get a sneak peek at the outside!

 I found this awesome paper line by Authentique and I knew it would be PURRFECT for my project.   It was a 6x6" paper pad kit, with all kinds of card making stuff that came with it.   I made the gift bag, and then made a card to go with it.
 I used a Martha Stewart edging punch on the black card stock, then layered the patterned paper over it.  I created a pocket with some more paper, and made the "tickets" to go in it.  There is a little paper key in the ribbon in the bottom.  Above, I put a large metal key with the sentiment, "You hold the key to my heart."
 These "tickets" came in the paper collection.  I matted them with red card stock.  I am going to wait to show the inside of the card...I don't want to spoil DJ's surprise!!!

Other supplies used:  Tim Holtz distressing ink, Prima Flowers, Recollections rhinestones, ribbon.  I also covered the back side of the gift bag with the same punched black card stock and key patterned paper.  I wanted the bag to be sort of symmetrical.

I hope you enjoyed your stay here!  Please let me know what you think of my offering for this month, and then go stalk Sherain and see what she came up with!!!

Have a wonderful Valentine's day, and remember...Show the ones you love how much you love them every day.  It doesn't have to involve gifts, just show them and tell them!  Valentine's Day can be everyday!


Saturday, January 26, 2013

"SAVE THE DATE!!!"


Welcome everybody!!  This is the Just a Few Friends January Blog Hop!!!  I am sooooo glad that you all came over to check out what I have be up to in my Den!  We have all been super busy coming up with  purrfectly awesome projects to share.  By now, you have seen several of my Cub family's projects!  You should have come to by from RJ's den, here.  Elsa, our incredibly talented Den Momma starts the whole blog hop, and if you found me whilst you were prowling around the internet, please go to Elsa's blog and start pouncing along from the beginning.  I will have a list of everyone's blogs, in our Den's order, at the end of this post.

ALSO...We are announcing that we all have Fan Pages on FACEBOOK!!!
Click on this link http://justafewfriendz.blogspot.com/ and it will take you the PRIDES page where you will find everyones FAN PAGE address (See the sidebar on the left) so you can come and LIKE US!!! We will be posting not only PRIDE related hops but also other projects we created hoping to inspire you to create! 

This month, we were challenged to come up with a calendar in honor of the new year.  I have just finished my planner, so now I wanted to concentrate on a type of perpetual calendar.  I had inspiration from these sources I found on Pinterest.  Have I told you how much I love Pinterest?  I am sure you do too!  This perpetual calendar and this perpetual calendar really caught my eye!  So, that is what I based my design on.

Without further ado, here is my project...  I have a video on YouTube also, so please some check it out!

 This hangs on my craft room door.  You only have to more the "sticks" as I am calling them.  I figured out how many of them you need to make to create any month you want to create.
The month cards are double sided and interchange easily with the clips.
 Here is a closeup of the "sticks".  I love the fact that you only have to change 7 things, instead of 31 different squares for the days.  These are also double sided.  I made nine of these total.
Hee is the back view.  I made an envelope pocket to contain the extra month cards and sticks.
 This is a closeup of the embellishments I used.
I just love how it turned out!!!  The papers are Recollections (card stock) and Graphic 45.  I used Prima flowers, Recollections bling, Tim Holtz clips, Tim Holtz Distress Ink and Stickles.  The metal embellishments are also Tim Holtz.   I made the tiny black flowers ("Teeny Tiny Rose") by using the tutorial I found here, by Scrapalette.  We Are Memory Keepers made the eyelets I used to thread the ribbon through.

Now I'm going to attempt to explain how I made the "sticks".   If you want to make your own version of this you will need to make 9 of them altogether.  They are double sided.  They each have 6 squares for the numbers of the days.  Below is the  list of numbers, I'm using the * to represent a blank square.  If you look at the pictures above, it will make more sense.  The first row of numbers on one side, the second on the other and so on.   (I realize that these are horizontal and they should be vertical but I couldn't figure out how to do it...sorry!!!  If you have questions, please let me know.)

1     8     15     22     29     *   (Then, on the other side do the following numbers)
1     8     15     22     *       *   (There is no day 29 unless it's leap year.)

2     9     16     23     *       *
*     2       9     16     23     *    (This stick is for February only, as it has 28 or 29 days

2     9     16     23     30     *
*     2      9      16     23     30  (For all other months)

3     10     17     24     *      *
*      3      10     17     24    *  (Some months have no 31st)

3     10     17     24     31     *
*      3     10      17     24     31

4     11     18     25     *     *
*      4      11     18     25   *

5     12     19     26     *     *
*      5      12     19     26   *

6     13     20     27     *     *
*      6     13      20     27   *

7     14     21     28      *      *
*      7      14     21      28    * 


So, that is that!!  I hope you enjoyed your stay in my Crafty Den.  Please go on over to Sherain has in store for you in her Den.

And, as promised, here is the list of my Den Family, in order of appearance in the blog hop.


Don't forget to leave a comment and let everyone know what a ROARINGLY GOOD JOB they did!


Wednesday, December 12, 2012

Day Album: Paper Bag Tutorial

As promised, here is a quick tutorial on how I made my Day Album paper bag mini album for the December blog hop with Just a Few Friends.  It's a long post, please go to the end of it as it's the 3rd project.
The paper bag I used was large, it measured 16 1/4" x 9 3/4".  I was designing it to be sort of a "day album".  I used a simple ribbon closure, but you could do any closure you wanted..velcro, magnets, belly band, etc. You can also use any size bag you want.
 First, I folded the bottom of the bag (on the left) over, and gave it a good crease with a bone folder, then I added a 1/4" gusset to the right of that crease, giving the album a little extra wiggle room.
 Then I took the bag bottom flap, and folded it to the left, so that I created a pocket on either side of that fold.  I used wet glue to secure this fold AFTER I adhered my papers to the bag.

 This is just a picture of the 1/4" gusset I created above.
 Then I opened the bag sides, and cut on the 2nd score line on the top and the bottom.
 I put the bag sides back where the go on the left, and left the ones on the right out.  This is going to create page flaps and pockets.
 I folded the bag flaps to the inside of the book, creased well.  Then I folded the bottom of the bag over, finding where the far right flap would go, made a score, then another score at 1/4" away from that.  Again, this gives the book a little more wiggle room.
 I trimmed off the edge of the bag to give a straight edge as well.
 Next, I cut the flap we made with the sides of the bag again to finish the page flaps.  The two smaller flaps folded inside the bag again.
 I didn't use this opening in the album at all, since this was going to be part of the cover and closure of the book.  I folded these little pieces in, and adhered the piece together.  Then, when covering this piece, I wrapped paper around the whole flap for stability.
I then measured and cut two pieces of card stock to adhere to the flaps of the bag that we created, making the flip out pages.  
I covered the flaps with paper, and adhered them onto the card stock pages, one flipping up and one flipping down.  I then had created two pages with two pockets.  
 This shows the flaps closed.  On the LEFT I added a card stock page BEFORE I placed paper on the pocket created by the bottom of the bag.  Closed, it has the pink mat...
...open it has the blue mat on the page.  It was just another way to add more space to the book.  I also adhered the mats so that tags could be slipped behind them for journaling.
I used the same technique with some patterned paper on the back of this book (the red striped paper).  It opens to reveal the back page of this book (the green dotted paper).  Again, I added the page with a 1/2" tab to the back of the album before I added the green paper.
And here it is, opened up.  

I hope that this tutorial helped, and you all have fun trying this out.  You can do this with any size album, and you can get creative and add as many interesting options as you want!  

Have a great day, and remember to ROAR WITH PRIDE!
Stay Crafty, My Friends!