I am sure you all are familiar with Kathy's site, Paper Phenomenon. If you aren't, you should do check her out, she has some of the most amazing ideas. I, of course, couldn't help but to use her tutorials and make some for myself! She had a video series you can find on You Tube that went through how to make this fantastic mini album. It is made out of paper bags, and it is FABULOUS!
I used the Graphic 45 Steampunk Debutante papers. My spine is different than she did it because I couldn't get mine to work like hers. But, I think it turned out just as neat. I punched out the face and used some Crackle Accents on it. Then attached the charm to the spine with chain.
Every page has pockets and/or flaps to open. There are a ton of inserts to check out.
This is another of her paper bag creations that had a wonderful new way to put them together. I used papers from Cosmo Cricket, Circa 1934. LOVE THE COLORS!
Here are all the pockets created. Nice, huh?
I wondered how to make one of these if you didn't have paper bags, and I came up with this. I used Graphic 45, Domestic Goddess, papers.
 |
| I wrote a tutorial up for how I did this, it is at the end of this post. |
Last, but not least, she came up with this little mini book. It is less than 3" square and uses one sheet of 8 1/2" x 11" cardstock.
It rolls up on itself and then opens!
There are three pockets that hold teeny tiny tags.
Now for the tutorial...
Here's how I did it. Again, Thanks to Kathy for the inspiration!!!
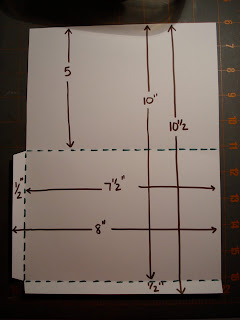
I cut a piece of paper 10 1/2" by 8". I scored as shown. I cut the edges as shown to create tabs.
Fold the tabs in...
Fold the top down...and you have your first large pocket. Adhere the tabs with a little liquid glue to the INSIDE of the pocket.
Second pocket...cut the paper to 6" x 10 1/2". Score and cut again as shown...
Fold again, adhere...you have the second pocket.
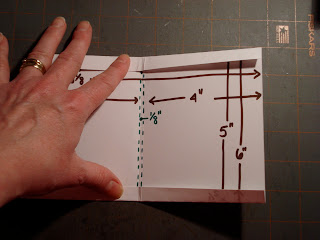
The piece that connects the two pockets you just made is done by cutting the paper to 8 1/8" x 6". Score as shown, creating the 1/8" space in the middle.
I didn't show this, but when I did the book for real, I cut out the 1/8" x 1/2" pieces (the ones by my thumb and finger) created with the scoring out so that it would fold better around the pockets.
Take the larger pocket, and adhere it to the tabs on the right side of the 1/8" space.
Take the smaller pocket and adhere it to the tabs to the left of the 1/8" space. This creates the big space without pockets for pictures.
This is the right side folded over so you can see that it will create a pocket.
This is the left side folded over to show the other pocket created on the smaller pocket you adhered. This whole thing will open in the middle to give you more space! This is your first page. Make as many as you want for your book.
This is the connector piece that connects the page you just assembled to other pages you will assemble and to the front and back covers of your album. Cut and score as shown.
Adhere a thin line of glue to the three sides, and adhere to the front of the page to create another pocket...the other side to the front cover or the previous page.
I sure hope this makes sense! I probably should have cut the connector piece so that it would have tabs just like the other pages to create pockets. Maybe next time. But, this is how I made the recipe book and I hope you enjoyed it. I hope you can use the tutorial to create your own work of art!
You could use plain cardstock, then cover with papers, I used double sided papers, but be careful of directional designs if you do that!
Thanks for coming by to see us, and please check out her site. She always has great ideas!


