WELCOME!!

We are so glad you are here! We love making and sharing our projects, and we are excited to have you visiting our site. Please leave us a comment and let us know what you think!

Jackie and Michelle

Followers

Showing posts with label Tall Skinny Mini. Show all posts

Monday, May 20, 2019

Good Vibes


Today I did a mini album share on my "Good Vibes" mini album.  This album is another variation of my page configurations album that I have done lately.


Click on this sentence to go to the YouTube Slideshow!

I used My Mind's Eye papers, "Good Vibes" along with their ephemera and stickers and also some pieces from Crate Paper's "Good Vibes" frames and ephemra.

Tutorials for the page configurations are also available.  I used 10 of the configurations on this album, one on each side of a single page attached to the spine.

The 20 page configurations are here.
The way I put them together making "page sets"  in my "Happiness is Homemade" album are here.

I have also used this style of page configurations in a totally different way in my "Tall Skinny Mini" and my "Short Chunky Mini" albums.

Thanks for stopping by.  Have a crafty day!
Michelle

Monday, May 6, 2019

Tutorial available for my "Page configurations"!

Page configurations?  You may be wondering what that is.  I did another take on my "Tall Skinny Mini Album" and my "Short Chunky Mini Album" to create yet another mini where pages range from 4 1/4" to 7 1/2" wide and are 7 1/2" tall.  My tutorial shows 20 different pages to make, just using one 12x12" piece of card stock, a scoreboard, scissors and some adhesive.

The cover to this album is 8x8", and the spine is 3" wide.

Here is a link to the slideshow I made to show the pages of a finished album using my "Page Configurations".

Here is a picture of the album itself...


Here is a link to the tutorial on YouTube.  This is the first tutorial, the next one will show exactly how I attached the 20 pages together to make the 5 "Page Sets" used in the album. The "page sets" provide a variety of pockets, flips and flaps that will make this the most interactive album ever!  I will post that link when I am able to get it done.

Happy Crafting, my Friends!
💖
Michelle


Monday, April 8, 2019

Short Chunky Mini Album with Tutorial

Good morning, everyone!  Today I am bringing you the "little sister" of my "Tall Skinny Mini" album that I did several years ago.  This album was been in the works for a long time, it was shelved for a while, but she is back and done and I can't wait to show you.

 She is 6" wide by 8 1/2" tall and has 5 page configurations.  I'll explain that in a minute.
 Her spine is 3" wide.  I used an OLD collection of a combination of Recollections "Memories Documented" and Simple Stories "Documented" for this book.  I have a bunch left over and I think I want to make another one!
The pages are made for a combination of 20 different ways to fold and/or cut (slightly) 8 1/2"x11" card stock.  I came up with the method when doing my Tall Skinny Mini album, and adapted it.

There is, however, a difference in that I combined 2-3 of the pages onto one "signature" or page configuration.  There are literally 100's of ways to combine these pages and create a truly one of a kind, interactive album.
 These are just some of the pages.  Yes, just SOME.  The pages flip and flap and have pockets and hidden spaces.
 There are clips not only holding tags on, but holding flips and flaps in place.
 I incorporated belly bands into the book.  There are mats to hold 4x6 pictures and 3x4 pictures.
I figured out how to attach different pages together to make one big interactive piece for each assembly.  
 This album just keeps going and going.  The paper collection was so pretty that I just wanted to keep using it.
I hope you like this.  If so, please check out the YouTube videos I published today.  

The picture below is the last page before the cover...but wait, there's more...
 Here it is, with a belly band holding tags...
This opens into a triple page.  I really love how it came out!

Here are some links for you:

As I said above,this is the little sister to my "Tall Skinny Mini" album that I made.  The videos for the "Tall Skinny Mini" can be found on my channel by following the link to my videos.  (Where you can also find the videos for my "Short Chunky Mini Album", three of them, just published today).
https://www.youtube.com/channel/UC7f48hi09IcydCud9YZsqNQ/videos

The tutorials on my blog for the Tall Skinny Mini album are here...
https://creativeoperation.blogspot.com/2013/01/tall-skinny-mini.html
https://creativeoperation.blogspot.com/2013/02/tall-skinny-mini-album-tutorial-1.html
https://creativeoperation.blogspot.com/2013/02/tall-skinny-mini-2.html
https://creativeoperation.blogspot.com/2013/03/the-last-of-tall-skinny-mini.html

Have a wonderful and craft filled day!

💖
Michelle

Wednesday, March 27, 2013

The last of the Tall Skinny Mini

I have done a video walk-through of the mini album I love to call the "Tall Skinny Mini."  You can find the video here.  In it, I show all of the embellishments, and give out the dimensions of all of the tags and pull outs for this album.  Here are a few pictures to entice you...


Head on over to check out my video!  As always, if you have questions, please let me know!!

Stay Crafty, my friends!!

Thursday, March 14, 2013

Tall Skinny Mini, Pages 9, 10 and Binding!!!


Hey everybody.  I just finished the video for the last two pages and how to bind them!!!  WOO HOO!  I have the video on YouTube, so go on over and check it out!!!  The next video will be all of the tags and goodies to put in the pages we created!!  Then will come the decorating and embellishing!  I'm so happy, this is almost finished!  Now...what do I do with the book I am making during this whole process...any ideas??

Stay Crafty, My Friends!

Saturday, March 9, 2013

Tall Skinny Mini, Video Available!

I have made the video for pages 6, 7, and 8 and it is available on my YouTube channel here!  I am so far behind on stuff and things...so I have decided to not put a picture tutorial on this blog, but rely on the video to do the tutorial.  It took soooooo much time, and there were sooooo many pictures!  I feel like the video was telling the same story in a better way, especially for this album, so I just opted to go for the video this time.  Please go on over and check it out.  As always, if you have any questions I will answer them as soon as I can!

Enjoy the tutorial and have a crafty day!!!

Sunday, March 3, 2013

Tall Skinny Mini #3

Here we are, back with another tutorial.  We are doing pages 3, 4, and 5.   I also have the video for these pages up on YouTube .

I had a question about the assembly of this book.  I made the base pages (that we are doing here) first.  Then I will show you how to bind them.  Then we will decorate.  I find it easier whenever I construct my pages to do it in this way.  When I decorate, having them bound in the book first helps me to see the colors and plan my use of embellishments, etc.  I hope that you like this way too.  So, make the pages, but don't bind them yet.  You don't have to place them in the order that we are making them.  Do what is visually pleasing to you.  After all the pages are bound, then we'll decorate!  :)

This is going to be very picture heavy.  Sorry.
First, score your 12x12" card stock at 2", 6" and 10"
 Cut 6 1/4" up on the left side, and down on the right side, as shown on the red lines.
 Score the 2" sides as shown.   They are reverse of each other, so that one mini pocket is on the top, and one is on the bottom.  You could, however, reverse them, or make them both top or bottom pockets.  The choice is yours.
 For each side, fold the 2" side in...
 Fold the flap down, and the 1/2" tab under, this creates your pocket.  You just have to glue the outer edge and the tab.


 This shows the page folded and glued.
 First side of the page...the mini pocket and the first 4" page...
 ..turned over here is the second 4" page and the other mini pocket.
 Another view.
 Using card stock here...cover the card stock with papers to make it pretty.  This shows the left mini pocket not glued down, and the right pocket glued together.
 It is important to remember to fold the pocket piece flap to the back of the project when using card stock, so that your pocket doesn't compete with the score lines on the page it attaches to.


 If you are using straight patterned paper without card stock, you have to fold the pocket flaps OPPOSITE so that you can utilize the reverse pattern on the paper.  To make it fit nicely, and not compete with the score, cut out a SLIVER of paper on the side of the pocket.  Then the pocket will fold nicely into the score line.

 There it is...page 3 done.  Now lets look at page 4.
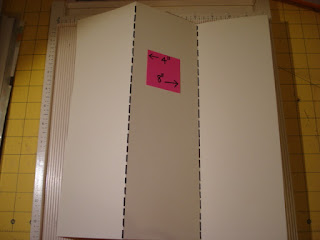
 This is a simple trifold.  Score at 4" and 8".  Fold as shown.
The space between the first 4" section and the second section will create the binding edge and the tall skinny pocket.  The third section is a separate page in this assembly.
 Here it is using card stock covered with patterned paper.
 Top view...
 What it will look like inside the book, this with be the 2nd and 3rd sections of this page assembly.
And the 4th section.
Just using patterned paper.  The first three sections will be the same paper, but the 4th will be the contrasting side.

Now page 5.
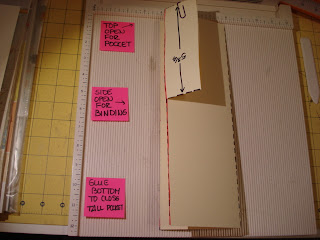
 Score as shown.  Can you see where this one is going?  This is going to create a pocket page, but one bigger pocket on one side.
 Cut on the red line as shown.
 Fold and glue, and there it is.  Simple.


 Here it is, made with the card stock and patterned paper.
 My hand is in the binding side.
 If you are using patterned paper only, remember to cut a sliver off of the paper on the pocket flap side so that when you fold it in it fits nicely into the score.
 Here it is, finished.
 I am loving how this is turning out.
 That's that for now.  Stay tuned.  More pages to come.

Stay crafty, my friends!!!