WELCOME!!

We are so glad you are here! We love making and sharing our projects, and we are excited to have you visiting our site. Please leave us a comment and let us know what you think!

Jackie and Michelle

Followers

Saturday, January 26, 2013

"SAVE THE DATE!!!"


Welcome everybody!!  This is the Just a Few Friends January Blog Hop!!!  I am sooooo glad that you all came over to check out what I have be up to in my Den!  We have all been super busy coming up with  purrfectly awesome projects to share.  By now, you have seen several of my Cub family's projects!  You should have come to by from RJ's den, here.  Elsa, our incredibly talented Den Momma starts the whole blog hop, and if you found me whilst you were prowling around the internet, please go to Elsa's blog and start pouncing along from the beginning.  I will have a list of everyone's blogs, in our Den's order, at the end of this post.

ALSO...We are announcing that we all have Fan Pages on FACEBOOK!!!
Click on this link http://justafewfriendz.blogspot.com/ and it will take you the PRIDES page where you will find everyones FAN PAGE address (See the sidebar on the left) so you can come and LIKE US!!! We will be posting not only PRIDE related hops but also other projects we created hoping to inspire you to create! 

This month, we were challenged to come up with a calendar in honor of the new year.  I have just finished my planner, so now I wanted to concentrate on a type of perpetual calendar.  I had inspiration from these sources I found on Pinterest.  Have I told you how much I love Pinterest?  I am sure you do too!  This perpetual calendar and this perpetual calendar really caught my eye!  So, that is what I based my design on.

Without further ado, here is my project...  I have a video on YouTube also, so please some check it out!

 This hangs on my craft room door.  You only have to more the "sticks" as I am calling them.  I figured out how many of them you need to make to create any month you want to create.
The month cards are double sided and interchange easily with the clips.
 Here is a closeup of the "sticks".  I love the fact that you only have to change 7 things, instead of 31 different squares for the days.  These are also double sided.  I made nine of these total.
Hee is the back view.  I made an envelope pocket to contain the extra month cards and sticks.
 This is a closeup of the embellishments I used.
I just love how it turned out!!!  The papers are Recollections (card stock) and Graphic 45.  I used Prima flowers, Recollections bling, Tim Holtz clips, Tim Holtz Distress Ink and Stickles.  The metal embellishments are also Tim Holtz.   I made the tiny black flowers ("Teeny Tiny Rose") by using the tutorial I found here, by Scrapalette.  We Are Memory Keepers made the eyelets I used to thread the ribbon through.

Now I'm going to attempt to explain how I made the "sticks".   If you want to make your own version of this you will need to make 9 of them altogether.  They are double sided.  They each have 6 squares for the numbers of the days.  Below is the  list of numbers, I'm using the * to represent a blank square.  If you look at the pictures above, it will make more sense.  The first row of numbers on one side, the second on the other and so on.   (I realize that these are horizontal and they should be vertical but I couldn't figure out how to do it...sorry!!!  If you have questions, please let me know.)

1     8     15     22     29     *   (Then, on the other side do the following numbers)
1     8     15     22     *       *   (There is no day 29 unless it's leap year.)

2     9     16     23     *       *
*     2       9     16     23     *    (This stick is for February only, as it has 28 or 29 days

2     9     16     23     30     *
*     2      9      16     23     30  (For all other months)

3     10     17     24     *      *
*      3      10     17     24    *  (Some months have no 31st)

3     10     17     24     31     *
*      3     10      17     24     31

4     11     18     25     *     *
*      4      11     18     25   *

5     12     19     26     *     *
*      5      12     19     26   *

6     13     20     27     *     *
*      6     13      20     27   *

7     14     21     28      *      *
*      7      14     21      28    * 


So, that is that!!  I hope you enjoyed your stay in my Crafty Den.  Please go on over to Sherain has in store for you in her Den.

And, as promised, here is the list of my Den Family, in order of appearance in the blog hop.


Don't forget to leave a comment and let everyone know what a ROARINGLY GOOD JOB they did!


Wednesday, January 23, 2013

Happy Birthday, Susan!

Hi everyone!  I have been sooooo busy!  I have a couple  of announcements to make, and then I want to share a card that I made.

You all know that I am involved in a great group of crafty folks, we are called "Just a Few Friends."  We all are in the process of preparing "Fan pages" on Facebook.  Mine is located here.  Please stop by and "Like" my page!  When all of our our Fan pages done, I will have their page links here as well so you can visit their pages too!  We are going to have our projects as well as information on our blog hops and other activities.

The next blog hop we are doing is THIS SATURDAY!!!  Please come on by and check it out!  It is going to be AWESOME!!!

 I am working on the tutorials for the pages in my "Tall Skinny Mini" and am planning on getting them to you soon.

Now for todays project...


A friend of our had her 50th birthday, and this is the card that I made for her.
 I used Graphic 45's "Ladies Diary" collection for this card.  I didn't want to do the "over the hill" kind of 50th birthday, I wanted it to be classy and elegant.
I printed this sentiment in my word processing program.

Stay Crafty, My Friends!

Friday, January 18, 2013

Tall Skinny Mini


 Well, here it is.  Several months of work and such, coming up with a new "mini" album.  I say this loosely because it is 12" tall and 6" wide on the covers!  But the pages themselves are only 4" wide, hence the name "Tall Skinny Mini" album.  I love how it turned out!!!
 My inspiration came from the "Witches Journal" I saw on YouTube by CreaBoetiek.  She created a lovely album and I was fascinated by it, but one problem...she didn't do a tutorial on how she made it.  I decided to come up with my own album and here it is!  I am planning on doing a series of tutorial on this album, because each and every page is different!  I made 8 pages for this book, but I have come up with14 different combinations of how to create pages from a single 12x12" paper!
I have made a video on my YouTube channel, here.  Please come check it out.  I know that this post is long, but these pictures really don't show just how much fun stuff is packed in this album!
 I came up with a clever way to cover the edges of the 12" tall chipboard edges with paper, because I really don't like "raw" edges.  I also used the "Stack the Deck" binding system by Laura Denison.  I think in the video I said "Hidden Hinge".  FORGIVE ME!!  I used "Stack the Deck"!!!  I will definitely have to fix that or edit it or something.  Jeez!  I really don't want to have to do the whole video again!!
 There are multiple pockets and pages in all different sizes.
 There are tags, and tags that are actually booklets.
 Some of the tags come out of the top of the pages, and have flaps that fold down onto the page.
 I used Graphic 45's Old Curiosity Shoppe papers for this project.
 I also used embellishments by Recollections, Bo Bunny, Petaloo, Tim Holtz, and 7 Gypsies.
 Lots of places to put pictures, hide journaling, etc.
 Sorry...long post.
 Almost done.
 OK, maybe not, but isn't it beautiful!
 I made the covers so much wider than the pages so that things can stick out a lot with out being in danger of getting smooshed.
 Tall pockets, short pockets, skinny pockets, OH MY!
 I made pockets out of paper pieces too.
 OK, that's it for now.  Please check out the YouTube videos and see what inspired me, and see the whole explanation of all of the wonderful things I put in my album.  I hope you like it, and I will be doing a tutorial series soon!  Please, please, please, let me know what you think!!!

Stay crafty, my friends.


Wednesday, January 16, 2013

Happy Freezin' Season Mini Album


 After seeing Kathy Orta's YouTube tutorials on this "December Daily 2" mini album, I decided to make it. Here is my version.  I did not see all of the videos before I actually started making it.  Her album is supposed to be a gatefold style, I didn't wait, and mine is a regular style mini album, but it is wide!!!  The spine is 3 1/2"!!  It still turned out very awesome, and I love how it looks.  I am not using it as a December Daily, but as a winter themed mini album.
 I am going to put a list of the supplied I used to make this at the end of the post.
 It has 12 "page sets" in all.  I didn't even count how many pockets and tags there are.  This book can hold a TON of pictures.  I used kraft envelopes from Michaels to make my pages.  Those made the "page sets" very thick.  Next time I will use the thinner envelopes that she used.  It will make them less thick, and then I can embellish more.  But, I used what I had in my stash, so that's why the kraft envelopes and cards.
 Since the envelopes are thick, I used thin papers to cover them, which helped.
 There are lots of pull outs and different size pockets created.  There are 3 styles of "page sets", and you make 4 of each style.
Watch all of her videos FIRST, half of the pages are supposed to be made "reverse" for the gatefold style.  I made all of the pages before I knew that, which is why this style of binding suited my pages better.  Patience is sometimes not one of my virtues.  I used the "Stack the Deck" style of binding by Laura Denison.
 I am only showing you the first three "page sets".  I tried to make them all different.

Most of my page embellishments, like this "Winter" one, is adhered on the bottom edge only so that pictures can be tucked behind them.
 This polar bear cracks me up!

Well, I hope you liked it!  Here is a list of supplies:

Papers:  DCWV and Echo Park
Envelopes and Cards:  Recollections
Stickers:  Echo Park and EK Success
Die Cut Snowflakes:  Pink Paisley
Rhinestones:  Queen and Co.
Brad:  Bo Bunny
Distress Ink:  Tim Holtz
Punches:  Fiskars, EK Success
Clear Plastic Snowflakes:  Imaginisce
Glittered Plastic Snowflakes:  Sierra Pacific Crafts
Other:  Chipboard, ribbon, Scoretape, Liquid Glue

Stay Crafty, and Warm, My Friends!!

Saturday, January 12, 2013

A card for Max!

I was surfing all over Pinterest the other day and came across this cool tutorial on how to make a "Zipper Card" by PapertreyInk.  This link will take you to her video.  In it, she used dies specially made to make this card.  But, unfortunately, I didn't have the die, and I needed the card that day...so I had to figure out how to make it on my own.
 I got out my supplies, and went to work.  The paper cutter I have above has a perforated blade attachment, so I thought maybe I could use that instead of the die.
 The front of the card ended up looking like this...I stamped "Pull" on the tab that I created using the perforating blade.
 Underneath ( and this is my practice piece, so I didn't ruin the card!!!) I stamped the sentiment.
On the inside I hand cut the spot where I wrote the message, then I punched the border paper, creating a pocket to put Max's birthday cash in.

He loved the card!!  It turned out great, and worked perfectly.  Obviously it would have been soooooo much easier if I had the die, but this turned out pretty good.  Go check out her video, and see what you think!

Stay Crafty, My friends!

Wednesday, January 9, 2013

Old Envelopes into New

I found these gorgeous envelopes while I was surfing the net looking for recycling ideas.  When I saw them, I knew I had to try them out.  I have played with recycled business return envelopes before, but these were too cute to pass up.

Here is my version of these awesome little gems.

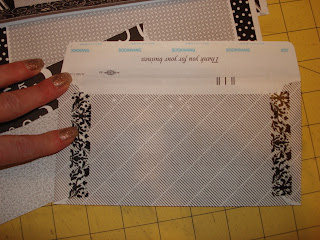
 What you do is to carefully tear apart the envelope, reverse it and put it back together so that you can reuse them for fun mail!
 I refastened the sides with various pieces of washi and washi-type tape from my stash, then to reseal the envelopes when it comes time, I used a strip of Score-tape...I'll just peel and stick when the time comes.
I raided my stash of black and white papers, and covered the flaps of the envelopes.  They all had the gummed edge, and it is on the outside of the envelope when you reverse it.  I thought this was a pretty way to cover that up!
Then, on the front of the envelopes I had to do something to cover up the windows in the envelopes were the business address usually ends up.  Cathy Holden of Just Something I Made has a link to a bunch of free printables she has created and these were perfect.  They are meant to be printed on label sticker paper, but I didn't want to close the envelope, so I just printed them on regular paper.  I added tape to the edges of the label, and taa daa!!  Now I have beautiful recycled envelopes to use for sending fun things in the mail!!!

This is easy to do and fun.  Save business return envelopes that have pretty security designs and see what you can create!!!

Stay Crafty, My Friends!!!

Saturday, January 5, 2013

5 Year Journal

New Years Resolutions...I always have them, seldom get around to doing them.  NOT THIS YEAR!!  I have a few resolutions that I already showed you in my new planner post here.  One of my projects that I wanted to start was a five year journal.  I already am working on one that is just a sentence about what you did for the day, this one is a daily question to ask.

Last year I saw this blog post, in the middle of the year, and decided to collect all of the journal prompts and start this year.   (This is not a link, but does show you what the questions look like).  Tammy Taylor wrote this awesome article about the project and there is a link to all of the PDF sheets of questions you can check out.
So, I made my journal and got busy!  I'm actually up to date on it, haven't missed a day yet!

 I found this journal on sale at Michaels.  I paid $1!!!  I bought it a while ago, knowing I would find a use for it.  The cover looks like leather and is actually quite nice!  The pages are also heavier than you would think for a $1 journal, and when I use my Uniball 207 Micro pen (MY FAVORITE) it glides like butter.
 I set it up so that there are two days per page, and I wrote each question on the side of the day.  It gave me ample room to have space to write 2-3 sentences.  Now, some of the questions are "thinkers" but some are "What does a gallon of gas cost?"  That will be fun to look through in five years, seeing the progression of the cost!
This is the four day spread.  Nice, huh?  I could also see this in a junk journal/smash book style, making the pages prettier.  Maybe I will make one like that for the next five years.

Go check out the project...its not too late to start, it's only the 5th!  HURRY!!!

Stay crafty, my friends!!!