WELCOME!!

We are so glad you are here! We love making and sharing our projects, and we are excited to have you visiting our site. Please leave us a comment and let us know what you think!

Jackie and Michelle

Followers

Monday, October 31, 2011

A Food Tutorial!

First, before I do anything...

HAPPY HALLOWEEN!!!!!

OK, this is completely different, but here it goes...This is not a Trick, it is a Treat!

My husband and I are on a low carb diet, so that means no bread.  Which, when making casseroles, means no bread crumbs to grace the top...until now.


I love these Mission Carb Balance Tortillas. They are only 6 net carbs per tortilla, and are delicious.  We use them for wraps, enchiladas, anything you can do with a tortilla.  I have made tortilla chips and shells for taco salads also.

I decided to try an experiment.  It worked beautifully!

I took one tortilla, cut it up, and dried it.  I just left it to sit out overnight, but you could do it in the oven also.


I broke up the pieces, and ground them in my food processor.


One tortilla made about 1/2 c of crumbs. Regular bread crumbs are about 20 carbs per 1/3 c, these are 6 carbs per 1/2 cup.  It doesn't sound like much, but those nasty little carbs add up.


I added the crumbs to some butter, and some Italian Seasoning.


I made Baked Sour Cream Chicken and topped them with my crumb mixture.  It was awesome!!!!  The crumbs provided the crunch that we love on a casserole!  (PS:  How do you like my Halloween kitchen in the background?)

Stay hungry, my friends!

And, for the kiddies...Have a SAFE AND FUN HALLOWEEN!!!

Friday, October 28, 2011

Recipe Mini Album by the Button Farm

When Jackie and I went to the CK Convention last year, we took this class by The Button Farm.  You should really check them out, they have magnificent album kits, and they have a monthly kit club.  I am waiting impatiently for that to start!
The album was an acrylic album, which I had never worked with before.  I learned a lot of tricks in dealing with these little beauties.  The paper is by Basic Grey.  I actually had more recipe cards than pages, so I created a few more out of cardstock when I got home.
Because I tend to write big, I made each recipe card a pocket, then added a double sided tag behind it so that I could  have plenty of room to write.  Now the problem is, what recipes to put in here!!

Stay hungry, my friends!

Wednesday, October 26, 2011

A Halloween Pumpkin

When I was on Paper Craft Planet where they were having a 3D Challenge, I saw a link to Archivers, where they have a tutorial for a pumpkin, and this is my attempt:


I think it turned out very cute!  I have it out for Halloween, but I can also use it throughout fall and Thanksgiving!!!  I used plain Bazzill cardstock, and inked the edges.  Others have used double sided papers.  It was fun and easy to make.  I am thinking about all sorts of other possibilities.

Stay Crafty My Friends!

Monday, October 24, 2011

An Old Halloween Project

Back in 2005 my husband and I had a Halloween Party, and I made a book for keeping the recipes I wanted to use, party planning papers and such.  This is that book.  I found it today, whilst I was getting ready for our Halloween this year, and I thought you all would like to see it.
 This is a paper bag book, made out of full sized grocery bags, folded in half and the edges trimmed.  It is big enough to hold 8 1/2" x 11" papers!
 This was pre-Cricut days...so I created the recipe tombstones on my computer.  I hand cut all of the letters with stencils to make the titles for my pages.  I even created the tags, which I will show in a later picture.
 I don't know the line of papers I used, that was 6 years ago, sorry!
 I made up the "spooky" recipes by myself.
 The binding was a simple ribbon binding.
 Here are the tags I made.
This is just an example of what I have in my pockets.  It held magazine clippings, printouts from the net, and I even have pumpkin carving templates in here!  It was cool to find it buried under my cookbooks.  It was a mini time capsule.

Stay Scary, My Friends!

Friday, October 21, 2011

Halloween Jewelry Box Tutorial

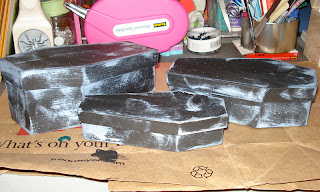
I found the coolest nesting paper coffin boxes at Michael's, and I got another idea.  I needed a jewelry box to house all of my Halloween baubles and bangles.  So, here is what I came up with.
 First, while watching the season one marathon of "The Walking Dead" I painted the boxes with black acrylic paint.
 When they were dry, I inked them with white.
 When that was dry I sprayed them inside and out with Haunted Shadows Glimmer mist.
 I also used the mist on these flowers, they started pink, but after spraying and using some black ink on them, they ended up like this.
 I stacked them all wonky and hot glued them down.  I cut the rings off of spider rings, and used the spiders in a couple of places.  Two of them look like they are coming from either underneath a coffin, or from the inside of them.
 I figured that the poor skeleton that was supposed to be in the box had to be moved out, so I took a skeleton from a dollar store garland, cut it up, and scattered various pieces.
 For the top two boxes, I used Tim Holtz charms to decorate.  I placed my flowers and added a little bling.  You can never have too much bling, right?
 My hubbin said it was creepy.  I thought that was awesome, because that was what I was going for!
 Here are the boxes with my collection of Halloween jewels!  You will recognize a couple of the pieces from a previous post!  Some of these are over 20 years old.  I started out with cute stuff, because my son was little, but now, I can creep into the more scary stuff.  (Yes, pun intended!)
Just a shot of it sitting on my dresser.

Stay Scary and BEJEWELED my friends!

Wednesday, October 19, 2011

More Stuff for my Junque Journal

I made the Faux Washi Tape, and then I decided I needed hinges.
 I cut strips 1" wide, they were 3 1/2" long, but you could do any size you wanted.  You could make long strips and tear them (that's the beauty of score tape, it rips easily), or you could use edge scissors to cut pretty ends on the strips.
 Score them at 1/2".
 Apply two strips of 1/2" score tape and fold.
 Use them to adhere whatever you want, creating another "page" for your projects.
I added another envelope/page to my book.

Stay Crafty, My Friends!

Monday, October 17, 2011

Jewelry!

They say diamonds are a girls best friend, but for me, all jewelry is pretty OK!!

I made some baubles for myself with some of my scrapbooking supplies.


From left to right:  The Witch necklace was made at a make-and-take at the Scrapbook Expo that my BFF Jackie and I went to.  The back says, "Sometimes you have to be a Witch".  LOVE IT!  It was my first time soldering, and I think I may have to do that again!  We also make the swirl paint necklace at the show.  That was fun to do.  I love the pattern that came out.  The mini butterfly used a piece of my Mariposa paper from DCWV.  I bought the necklace piece from my local stamp store, Stampadeedoodah. The Skull and Angel necklaces were made from the same type of necklace supplies.  The Angel was another make-and-take, we bought some additional pieces, and I used a Recollections piece of paper for the Skull.  It is Halloween after all! The earrings are pretty fun...Darice has come out with a line of bottlecap stuff to make jewelry out of.  I used my Tim Holtz punch to make holes in the bottlecaps, and used a piece of Authentique Halloween music papers.  They are covered with a clear epoxy top.  Lastly, I finally put together the bracelet kit from Making Memories that I bought last February.

Stay crafty, scary and bejeweled, my friends!

Friday, October 14, 2011

Spells and Curses

I made another Halloween decoration. I needed something for the dining area.
 I had an old blue canvas book, and I painted it black.  Then, I sprayed it with some Art C copper spray. I wrote the title on the spine with a silver pen.
 For the front cover I used a Tim Holtz Halloween charm, and put Stickles in the eyes and nose.
 I sprayed the pages with a variety of things...I used the Art C spray, walnut ink, and I also got a distressing ink pad in on the fun.

This is the display in the dining room.  We covered the antique sewing machine table with creepy cloth.  We have a variety of props.  Under my spell book is "The Secret Journals of Dr. Victor Frankenstein", by Jeremy Kay.  If you are a monster buff, I say run out and get it, it is COOL!

I also have this Raven's Haunted Bird House that I made.  I just painted a wooden birdhouse black, then added Recollections flowers to the bottom.  I used Stickles on the roof and the chimney of the house.  The Raven sticker is from Recollections.

Have a scary day!

Wednesday, October 12, 2011

Faux Washi Tape

I have seen this stuff all over the internet, in craft stores, and I even own a few rolls.  I didn't know what to really do with it until I saw Smash books, and started using them.

I have seen some tutorials on how to make your own.  I loved this tutorial, here, so I basically did the same thing.  I decided to make some to match my journal.   This is my  take on  how to do it.  SUPER EASY!
 This is my junque journal I started working in.  I used the scraps of papers left over from the pages I put into this book.

 I love score-tape.  It is super strong, and you can rip it.  You don't need to cut it at all, and that makes for a cool effect when you use this stuff.  I just put lines of it on the backs of the paper and cut them out.
 Presto, faux Washi tape.
I used it on this magazine clipping to add it to my book.  COOL!  I didn't use it on the photo on the right, but wanted to add it in, because I like this quote by Mother Teresa.

The other cool tutorials are everywhere, including here for a printable one that is genious.

Stay Crafty, My Friends!

Monday, October 10, 2011

Gigantic Envelope Mini Album

How's that for a title?!  I found some huge 12" x 15 1/2" envelopes at the local thrift store, I snapped up 6 for  $0.99, the whole time thinking I could do something with these.  I came up with this.  Now, please forgive the lack of embellishments...I was doing this as a first model, working out some bugs.  I am going to do another one soon.
 Front Cover...
 Back cover...
 Top View...The closure is a simple ribbon closure.
 First and Second Page...Hard to see but page one has two pockets and page two has two, one tall skinny one and one shorter side pocket.
 Third Page and the Flap...This page has two pockets, one tall and one small and short.
 Flap Opened...Page Four revealed with two pockets, one large and one small on the bottom.  The inside of the flap created two pockets for two smaller tags.
And another pocket.  The black cardstocks are showing the pockets, they are going to be tags.  The envelope was never closed so that one more large tag can be place in there.

Here's how I did it...

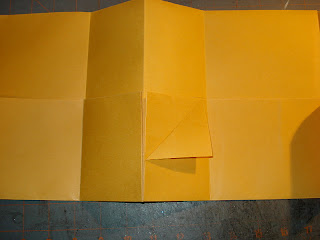
 I put the envelope so that the flap is on the right. Scored it at 5", 7 3/4" and 10 1/2".  Then turn so that the flap is on the top and score at 8".
 Turn it back onto its side, fold the bottom up, and the middle in, as shown.  This is the base of the book.
 On the first left handed bottom piece, cut a slit in the envelope only to the first score line to open up the pocket as shown above. I put a piece of paper on the main body of the book, a smaller piece of paper inside the pocket, in between the main body and pocket sizes, adhered it only on the two sides to create another pocket. You totally don't have to do that.
 Cut the middle score line to the score, on the pocket part only. I glued the pocket piece only on the right side of page two, the side is split open, giving that side pocket.
Cut the next side only to the score as shown to open up that piece of the pocket.  I glued the left side of the pocket piece on page three, giving the tall pocket, and the front piece folds down to give the other pocket.
 Cut the envelope flap only to the score line.  I used the top part of the envelope flap to attach papers to make the almost full size page flap.  The envelope remains open on the right side, for another large tag.  The bottom piece folds to the front of the pocket, making the piece I used to create the small pocket on page four.
 Fold the pocket piece down, as shown.
Turn the book over, apply glue to the inner portion of the half pages, and glue together.

It holds 11 tags in all!

I hope that this made sense.  I will make another model so that you all can see another version.  If you make one of these, a little hint, use thinner papers!  Thick papers that are double sided are not recommended.  The nature of this book is that very thin embellishments will be used as there isn't a lot of gusset space.

Stay Crafty, My Friends!