WELCOME!!

We are so glad you are here! We love making and sharing our projects, and we are excited to have you visiting our site. Please leave us a comment and let us know what you think!

Jackie and Michelle

Followers

Showing posts with label DIY Smash Book. Show all posts

Monday, September 3, 2012

Another Smash Book!

I just can't seem to get enough of these smash type books.  I found the coolest scrapbook in the thrift store, and I knew that it would make a very nice new Smash type book.  

WARNING:  VERY PICTURE HEAVY!!! (Sorry, I was having FUN!)  
 I found this great book, and then got my basket of junk journal/smash book goodies.
 Look at this, it's ridiculous!  I filled it with all sorts of odds and ends for just this type of thing.  Some of this stuff is YEARS old!

The pages are 10x10".   The cover was a bit beat up, but I loved the title, it is hard to see but it was open (the white areas) showing off the first page of the book.  I needed to cover it, but loved that piece.  So, I cut it out, filled the void with a piece of chipboard, and used it for the new cover.  
 I used Graphic 45's Kraft Reflections for the covers.  
 I took the cut out piece, used Stickles on it, and adhered it back onto the cover.  From there...I just went to town decorating pages using whatever was in the basket.
 October Afternoon Miscellany
 Melody Ross
 Cavalline and Co. Stickers on an envelope pocket.
 Unknown bits cut out of papers I had collected.
 Basic Grey and Creative Imaginations.  I adhered one page to the other to create a pocket (on the right).
 Scenic Route
 House of Three, My Mind's eye ("polaroid" tags), We R Memory Keepers, watercolor postcard with Cavallini Stickers.  I made pockets on each page with leftovers from the papers I used.
 Dutch Boy paint chips with envelope pockets
 Unknown...a present from Heather at Craft Happens.
 Graphic 45 and a time card in the pocket created out of a page of the book (from Heather).
 October Afternoon
 Daisy D's
 Unknown tickets.
 Rebecca Sower
 Echo Park
 Melody Ross and a flash card (thrift store find).  The page pocket actually is two, I folded one page in to the center, adhered top and bottom, then cut a triangle off, and adhered that to make a pocket on the pocket.
October Afternoon.

I hope you enjoyed this little obsession of mine!!!   

Stay Crafty, My Friends!

Wednesday, May 9, 2012

Stuff, Smoosh, Squish


 I made another homemade "Smash" type book.  The one I am working on is getting full.  I think I will need another one.  I also wanted to play in my "Mom Cave", so I decided to use up some of my stash.  {OHHHHHH, another "S" word for these books..."Stash"!!!}

 The book is made entirely of K and Company papers (except for the two pieces of kraft paper I used for the covers).  I had 5 stacks that I chose from.  I also made pockets for the book.  I have a tutorial for those at the end of this post.  For the binding, I chose the biggest O-Wires I had, since I plan on filling this book to capacity.  I made a dangle out of some ribbon from my stash jar and a wooden spool that I put some Tim Holtz tape on.  I put glue inside the spool to adhere the ribbons.  I used this bee charm also, and I believe it is from 7 Gypsies.  I also used some book binding tape from Memory Makers for the edges of the covers.
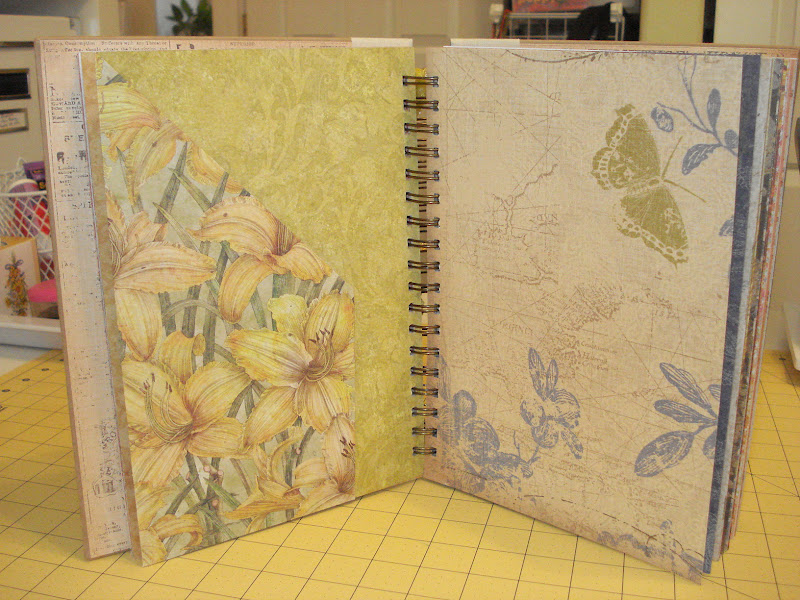
 Some inside papers.  They are all blank, ready to fill.
 Here, on the right, is the front of the pocket page...
...and here is the back.
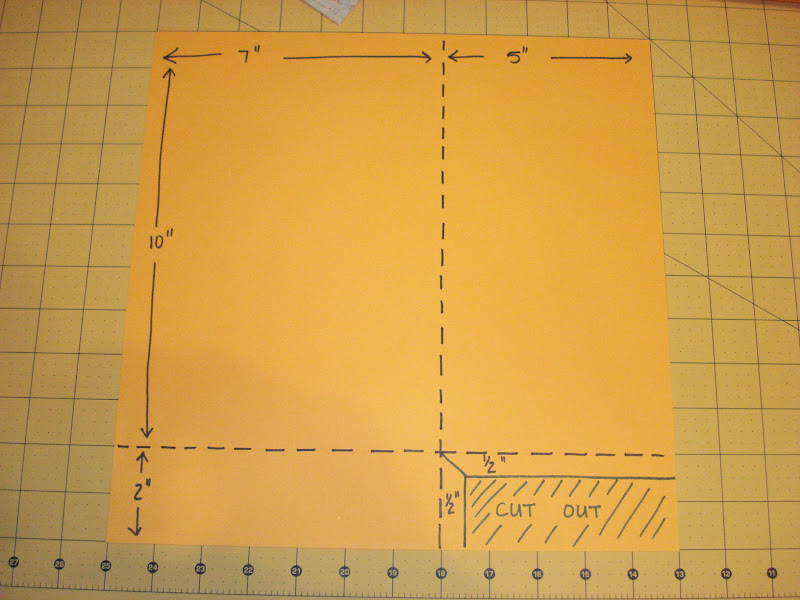
 Here is how I made them. I took a 12"x12" paper and scored it at 7" from the left, and at 10" from the top, as shown.  Then I cut out the bottom as shown.
 I cut a diagonal slit to create two flaps at the corner I cut out.
 Fold the bottom left up, using the flap to close the pocket.  The binding will close the left side.
 Turn the paper over, fold the flap on the bottom up, creating the bottom of the pocket.  Then fold the top corner back diagonally, being careful to not get it into the crease.
This will create this pocket on the back of the pocket page.
This is the pocket on the front of the pocket page.

Stay Crafty, My Friends!

Friday, March 9, 2012

My Newest Smash Book Project

Well, my Daily Junque Journal is getting full.
It has also evolved into more of an inspiration journal than a "Smash Book."  So, I decided to shift gears a bit.  I am going to finish this book up, using the clippings and printouts from magazines, the internet, etc, and keep this as an inspiration journal.  I am going to leave the personal things in here, though, as I don't want to rip those pages out!

I am going to start another "Smash Journal" and I am going to use a book I put together 2 years ago, and then set aside to wait for the perfect project.

 I bought this kit from Creating Keepsakes at a convention 2 years ago.  It is full of fun things.  The only thing I did different was to use bigger bookrings, when I decided to make it a "Smash Book".  I figure it is going to get big!
 It is a big book, the pages are 6x12".  It has a ton of them!  Some are cardstock, some are transparencies...
 There are envelopes...
 And chipboard pieces.
 There are tons of possibilities.
 I used a chipboard ribbon slide "Remember" and used ribbon and score tape to adhere it to the plastic cover.
 This is the first "entry."  My husband gave me these BEAUTIFUL flowers for Valentine's day!  I saved the cellophane paper from it, and the card.  I printed  a picture and put it on an envelope.
 I doodled one day at work, and the shopping bag has some stuff I saved from a girly shopping trip with my BFF.
I added a menu from the coolest burger place around here, and a bunch of tags from some clothes that I recently bought.

That's it for now.  What do you think?

Stay Crafty!!

Friday, September 23, 2011

A Swap Junk Journal!

This is for swap I was in, at Mini Album Scraps, making a Junk Journal.  You all know I have become addicted to them. Now, I got to make one for my partner, and she is making one for me!  My partner wanted one so that she could record memories of her two boys, who are 3 years and 18 months old.  That was her only requirement...the rest was up to me, and here is what I came up with.  This is super pic heavy, but there are a lot of cool things in here.  I apologize right now!
 The cover paper is by My Mind's Eye.  The ribbons are from the collection.  I stickled the "brothers and the eyes of the dinosaurs.  It is hard to see, but the light green guy and the pterodactyl are lifted with foam.  The bushes are made with Prima leaves.
 I glued buttons to the ribbons for a little "bling."
 The dividers are from plastic dividers I found at the thrift store, I just cut them down.  I put two clips on each divider.  The words on the tabs are from Creative Imaginations.
 I made a pocket for each section.  The variety of stickers throughout are also by My Minds Eye.

 I made this pocket and pullout at a make-and-take a while ago, but never used it...so I put it in the book.


 I glued the bottom of the paper bag to create a pocket for tags.

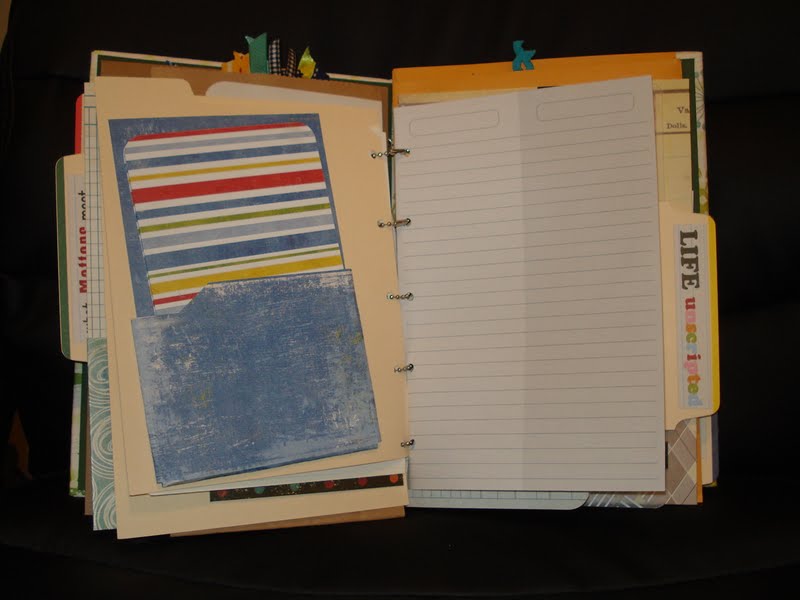
 I have had these bright library pockets and cards forever, from the Learning Palace.  I used a few of them.  The Life Documented paper came in handy for a variety of journaling spots.
 I found a deck of Old Maid cards, so I stuck a couple in here.


 The library pockets are also from Learning Palace, and I put journaling cards from K and Company in them.
 This pocket is from Daisy D's.
 Here is another pull out...But I left it blank for my partner to decorate.
 A mini file folder...
 An old grade book page and a desk name card...

 I folded a huge envelope in half, and on the inside put pages from an old Lady and the Tramp Book.
 I cut the end of the envelope off to create another pocket, then added the "Rough and Tough" making yet another pocket.


 The back of the bingo card had advertising stuff on it, so I attached a coin envelope and two more mini tags.

 The "Little Man" sticker is on the back of a piece of file folder.

 I added a page from an atlas book that I have.
Taa Daa, the end of the book!  The tally:  50 pages, 27 pockets, and 19 tags!

On Monday, I will show you the book I made just for her, and on Wednesday, I will show you the book she made for me...it is AWESOME!!

Please, let me know what you think. And, Stay Crafty, My friends!