WELCOME!!

We are so glad you are here! We love making and sharing our projects, and we are excited to have you visiting our site. Please leave us a comment and let us know what you think!

Jackie and Michelle

Followers

Showing posts with label Christmas card. Show all posts

Saturday, November 23, 2024

Fun Flap Christmas Card Tutorial, #MerryMakersCraftyCollab


Hi all!  Today the Merry Makers are making Christmas Cards!  Please come and check it out!  These are so easy and can help smash your stash!

Merry Makers Crafty Christmas Collaboration
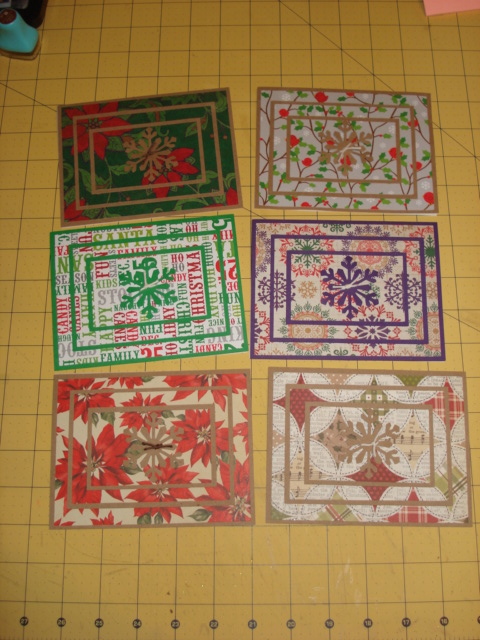
#MerryMakersCraftyCollab Hi and welcome to the Merry Makers Crafty Christmas Collaboration! Do you have Christmas Paper in your crafty stash? Well, we do too. In the next 4 weeks we are going to make several projects that we hope will inspire you. Here is the schedule: Week 1 Saturday November 9: Holiday Planner, journal, junk journal, mini album or folio Week 2- Saturday November 16:Tags, Atc’s Embellishments, Ornaments Week 3- Saturday November 23 Christmas Cards, Holiday Cards Week 4- Saturday November 30: Gift Card Holders
Each week at 1:00pm eastern we will share our projects. If you want to show your support, please hit the thumbs up and we would appreciate it if you subscribe to our channels! Thank you! Super bonus: We have an entire playlist where we will add our videos as they go live. All of this crafty goodness in one playlist! It doesn’t get any better than that! #MerryMakersCraftyCollab Don't forget to visit the collaborators on the list below, like and subscribe so you can see what we all have in store for you!
                                                 List of Collaborators:
 Your Hostess Debbie
Michelle (this is me!)

Saturday, July 27, 2024

Two Fun, Quick and Easy TUTORIALS!

 I did two tutorials recently and I think you will love them.

They are super quick and easy, and best of all, you can use up scraps to make them (which is what I did).

This first one is a card tutorial that I revamped from tutorials I have seen, changed things to inches from centimeters, and added my hints and tips to make them successful for you do do.  And, I made another Christmas card, so YAY, CHRISTMAS IN JULY PROJECT!


In the second tutorial I did a pop up album that I have seen in multiple places, but again added a little spin on the cover, and used my scrap Doodlebug Halloween papers to make it.  I think it turned out amazing, and I think you will love how easy it is.


Thanks so much for checking these out and I hope you have fun trying them out.  I loved them so much, and plan to make more!

Stay crafty, my friends!!!

Sunday, July 21, 2024

Pop Up Card Tutorial, A Christmas in July Project!


 Hi all, and welcome. I recently saw a video by Shrushti Patil on YouTube with a new variation of a pop up card that has been around for a while. I loved the additional page so I sat and worked out a version in inches and added a pocket on the back for a gift card. I made several birthday cards with this design and came up with some hints and tips for you so that you can make the cards successfully. I know that for those of us who don't use centimeters the inches conversions can be tricky. Here's what I came up with. I've made 5 so far and they work perfectly. If you want to see the original video it is here. Please check it out.

I did use papers from my stash. The patterned papers were leftovers from a retreat I did with Country Craft Creations, and they are older, so I don't know if they are available any more. I also used cardstock from Country Craft Creations. Check it out if you are interested. Thanks so much for watching! I hope you enjoy it! Cut List: All scoring and how I cut my patterned papers are in the tutorial 1 - 6 1/4 x 9 1/2 2 - 1 1/2 x 4 3/4 2 - 4 5/8 x 3/4 2 - 3 1/16 x 3/4 2 - 7 x 3 1/8 The envelope is cut from patterned paper. It is 7 x 3 1/8

Monday, November 23, 2020

Hello Christmas Card Keeper Tutorial

 Hello!  Are you like me and do you love Christmas Cards?  I love to send them, and I love to receive them.  For years I have made my Christmas cards, and every year I keep the cards I receive.   I created this project to store my received cards for this year.  Click here to check out my latest tutorial!


I am doing this as a bonus design team project for Country Craft Creations.  I am involved in an upcoming virtual retreat called "Journey to the North Pole."  I had leftover papers from the project I designed for that, and created this project.  I am using Carta Bella's "Hello Christmas" paper collection, and it is ADORABLE!  Please visit Country Craft Creations if you haven't already and check out this store.  It is amazing!  

This year I have created a Christmas Card Keeper.  It's not really a mini album, it is more of a storage binder.  It will fit all sizes of cards and photo cards and letters.  It has a variety of pockets and a fun type of page that is has a string binding integrated into it.


I think you will like this project and the tutorial is available on YouTube.  I have the supply list below for you. 


Supplies/Cut List: Chipboard: 2 at 7 1/2 x 9 1/2 and 1 at 2 1/2 x 9 1/2 Cardstock for covering chipboard: 2 at 9 1/2 x 11 1/2, one at 5 1/2 x 11 1/2, and one at 5 1/2 x 9 3/8 Inside Cover Pocket: 2 at 8 3/8 x 12 (this is cardstock or patterned paper and will be described in the tutorial) Pages (Cardstock): 2 at 12 x 12 and 2 at 7 1/2 x 9 Several yards of bakers twine of choice Ribbon for closure, approximately 2 feet Ribbon or Washi Tape for the cover, approximately 2 feet (this is also explained in the tutorial) Patterned papers: I used approximately 8 sheets total for the project made in the tutorial. This included 4 x 6 cutaparts. Score tape (sheets and 1/4" roll), Art Glitter Glue

Wednesday, August 28, 2019

Updates and Such!

Hi, Crafty People!

I hope all is well with you.  I thought I would give some updates and share some other projects that I have been working on.  This is a long post, but I think you are going to like it.

I have been busy with the design team projects I do for Country Craft Creations, but I have also been making some cool projects as well.

Remember the Christmas in July projects I did with the design team?  Well, I decided that my goal is to make every project that these talented ladies made.  I started with the awesome project by Christina Aubin.  She created these adorable mini Christmas album ornaments and they are just the cutest thing.  I made two of them.
 I used scraps that I had and it really used up a lot of the pieces I couldn't bear to throw away.

 There are pockets all over the pages, and the pages themselves are also pockets that have pull outs in them.

 SOOOO CUTE!  They measure about 3x3".

I had some of these bells and Christmas lights and I put them on the ribbon hangers.  I love them!  Check out her tutorial on YouTube.  You can find it here.

I also made some 3D card folios by Tamra Merill-Kilgore of Country Craft Creations.  She made these great cards that can double as albums and gift card holders.  Super fun to make...so much so that I made a bunch of them and busted my Christmas paper leftover stash!  The tutorial is available on the Authentique Paper Facebook Page.  Here is the link.


Last, but not least...by the end of this  weekend I will have my tutorial for my "Endless" Never Ending mini album up and live on YouTube.  I am finishing up things, and will have a walk through also posted.  It turned out awesome.  I am using the "Endless" collection by Authentique and it is amazing.  This is the 3rd August design team project for Country Craft Creations.  


I think you are going to like it!

Thanks for stopping by.  I do appreciate all of your support.  Y'all are amazing!

Stay Crafty, My Friends!
Michelle

Wednesday, March 20, 2019

Project Share!

Back on New Year's Eve, the group from Country Craft Creations had an evening of fun scrap-a-long projects that they did live tutorials on.  I finished a couple of these projects and thought you would like to see them.  Click on the link above and check out their store, and go on the YouTube channels.  They have a ton of awesome tutorials and the design team is out of this world!

 The first project I made was a "Scrapper Keeper" designed by Bobbie Weaver.  Her YouTube channel is The Paper Jungle.  The project is designed to keep scraps of papers from projects used.
 It took just a few sheets of paper and some card stock.  She also has a genius way of making her pockets that I am going to incorporate into my books from now on!
 I used the keeper to store my scraps from this paper kit.  I think it turned out awesome!  There's even a tall "slot" so you can keep your 12" scraps in order!
I also made the following "Weight Loss Folio" by Kim Blank Rannells.  Her YouTube channel is called Kim Kan't Stop Krafting.
I love this paper by Simple Stories, and thought it would make a cute album.  I'm not sure exactly what I will use if form but I love it and I really want to make more of them.
She incorporates page protectors into her design.  There are envelopes and pockets and plenty of room for pictures and notes.

Isn't this just adorable?
On the inside back cover she put a pocket that you can slip a notebook into.  LOVE THIS!

Last, but certainly not least, Sandy Trefger had a tutorial for a Christmas Card Book.
Her YouTube channel is here.  If you are a card saver, this is a great project!  I made two of them, for 2017 and 2018.

 You don't just put the cards in these albums, she is super creative and scrapped them!  This is my take on a page, the first one.  I used cards and some of my scrap supplies.

Here is a picture of the second one I made, all fanned out.  I love it!  I totally intend on doing this every year from now on.  My first two were simple but I am going to get more creative next year.

Sorry I was late this week.  I usually try to post on Monday's but I was super busy, so Wednesday it is this week.  Have a great week, and remember to stay crafty!

Michelle

Wednesday, January 8, 2014

Christmas Cards

Welcome to 2014!!!!!!!!!!  

I am so happy to be here with you, starting yet another year of crafting fun!  I have a lot of fun stuff already planned...some awesome projects already made, and some in progress.  I have lots of new and fun ideas to share with you, and I can't wait to get started...but first, we must finish up with some Christmas stuff I didn't get to show you.  

Yes, I am sharing Christmas cards that I made for 2013.  I know Christmas is over...but for those folks who like to plan ahead, Christmas of 2014 will be here before you know it, and this might give you some ideas!!!  

 I used scraps from my pile of stuff that I am using for my December Daily book.  As soon as I get all of those bits and pieces put together, I'll show you the rest of that book...I promise!
I Love how these turned out, so simple but so gorgeous!
I think this is my favorite...I used patterned papers on the "Santa Suit" to give it a little more interest.  I love how it turned out!

Ok, that's it for today.  I will be back soon.

Stay Crafty, My Friends, in 2014!

Wednesday, January 2, 2013

The Last of the Christmas Cards!

Since I think that everyone has received them now, I think it's safe to post them.  I wanted these to be a surprise!

I made these cards for my den siblings at Just a Few Friends...I followed an example I found from A Path of Paper here through my Pinterest Christmas Board.  Have I told you how much I love Pinterest?
 I made a total of 12 of these, 3 each of the different papers from DCWV.  I used the Happy Hollydays stamp that I used in my other Christmas cards I made for this year.
Instead of making the snowman the card, I used my circle punches to create the snowman to put on the card.  I used a scalloped flower punch to make the nose, and a tree punch cut up to make the twig arms.  I used rhinestones for eyes and taa daa!!

Then, I needed to make cards for my nieces and my nephew.  I began making them fun cards a long time ago, and now it has become a must-do for every occasion.
 The paper collection is by Dear Lizzy.
I used a tutorial I saw here by Julie of Julie's Stamping spot. I did the "star" and the trunk a little different on mine.

Thanks for looking, and here's hoping you all had a wonderful Christmas, and all of my best wishes to you for a wonderful new year!!

Stay Crafty, My Friends!!


Saturday, December 1, 2012

2012 Christmas Cards!

Well, here they are...my Christmas cards for 2012.  I have been making my cards for several years now, and this year's design is super fun and easy to do.

 I used the tutorial I found here on Bobbi's Treasure.  She adapted the triple stamp layered card to use paper instead, and I used her measurements on my Gypsy/Cricut to create my own cut file for them.
For the center of each card I punched a snowflake using a Martha Stewart punch, and tied a string by Lion Brand around them.  Inside, which of course I didn't take a picture of, I stamped with a stamp that says "Happy Hollydays".  I was able to get 4 cards from each set of one sheet of patterned paper and one piece of card stock.  These pieces were then adhered to a standard greeting card.

I had a lot of fun doing this.  And, since I am not a HUGE stamper, I got the same kind of look with my papers.

Stay Crafty, My Friends!

Friday, December 10, 2010

The Family Christmas Card, 2010

I have been making my Christmas cards for about three years now.  Every year I pick a color scheme, and design a card, then make massive quantities of them.  This is the "winner" for this year...
And here is what I did to make it:

I used papers from Bella Road.  It is called Wintertime.  It is an awesome line of snow themed papers!  I made my own cards, 4 1/4" x 5 1/2",  from white cardstock that I get from the office store.  The brown Bazzill is 4" x 5 1/4".  I cut some white, 3 3/4" x 2 1/2", and ran it through my Cuttlebug with my new Sizzix folder.  The bottom paper is cut the same as the embossed white.  I found this great glitter ribbon at the Craft Warehouse, it is made by Darice, and it is called Glitter Garland.  I attached it to the card with Scoretape.  I made the folded Christmas tree, using a 5" half circle cut by my Gypsy and Cricut.  I added the rhinestone for the "star".  This line of papers has sheets of journaling cards.  I cut them out, rounded corners, and stamped the sentiment with a stamp that I got in a goodie bag at the CK Convention.  The stamp is by Unity.  This card is placed on the inside.

Stay cozy, my friends!