WELCOME!!

We are so glad you are here! We love making and sharing our projects, and we are excited to have you visiting our site. Please leave us a comment and let us know what you think!

Jackie and Michelle

Followers

Sunday, April 28, 2013

Project Notebook

After trying several methods of keeping my project ideas and notes, I have finally, I think, stumbled onto the one that will work.

You all know I love the ARC notebook by Staples, that I am currently using for my planner.  Well, I had a coupon, 40% off no less, and I marched right on over to the store and picked up a full size notebook.

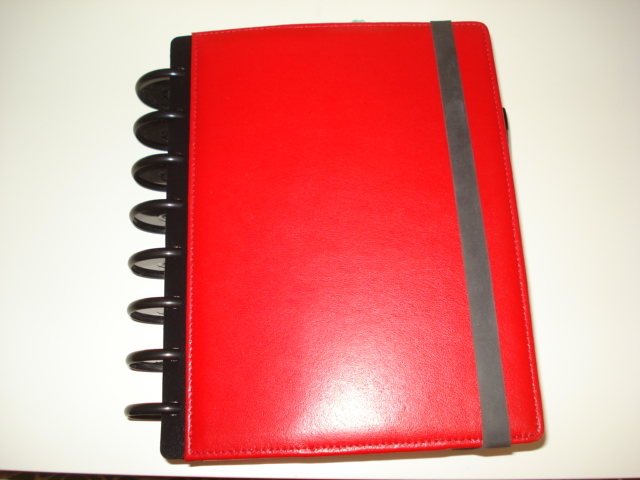
 Sorry the picture is soooooo bright!  Well, the notebooks come with very small rings, so I changed them out to the largest rings.  I love the pink color on this one!  I also like that the covers are sturdy, and will protect my pages very well.
 I bought a pack of grid paper, so that I can sketch out my designs.  I also added several sheets of plain printer paper to the mix.
 This is what I had before, a moleskin that was a mess.  It's very hard to add things to this book.  Although I do love me some moleskin notebooks, this was not a very practical solution.
 There are things clipped to the back of the notebook, again, not a very good system.
 I have a lot of notes.
Since I use the ARC system for my personal planner, the papers are interchangeable.  I can start the idea in my planner, and transfer it into my notebook without a problem.
I just thought you would love this.  This is a gallon size jar, that I have my discs stored in.  I always seem to discover and fall in love with a product, only to have it disappear from the store shelf on me.  So, every time I go to Staples, I buy discs.  I will not run out, for a little while anyway!

So, what do you think?  How do you keep track of your ideas and sketches?  I would love to hear your feedback!

Stay Crafty, (and organized) my Friends!

Sunday, April 21, 2013

Mom's Diner Menu Planner

Hi everybody!  I hope that this post finds you all doing great!  I, as you all probably have noticed, have been doing some organizing and planning lately.  My new Arc by Staples planner that I created is working BEAUTIFULLY!  I love it and will continue to use it!

I have also been wanting to plan out my menus and get more organized about shopping and dinner planning. We have recently changed from a low carb diet to a Mediterranean/lower carb type of diet, and it has really changed what we are eating.  I need some help to get my brain readjusted to it.   I came upon this GREAT idea by Ursula, here at her blog, Home Made by Carmona.  IT TOTALLY ROCKS!  Here, let me show you.

 It starts off with a simple three ring binder.  I decorated it simply with this paper I had in my stash.  I think it is fitting.
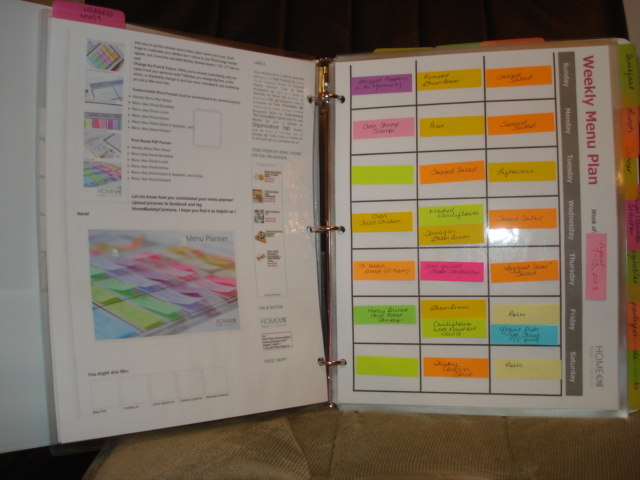
 Inside the front cover I put some lists of our meals were were keeping track of, this was helping me to write down all of the foods we like.  I also have a stash of post-it notes.  Then, I put the printout of the post that Ursula did.  All of the pages are laminated.  I have a laminating machine, so that made it super easy to do, but you could take these to a Kinko's or office store and have it done as well.  This helps preserve them, AND the sticky notes stick so well on them.

 She includes FREE printouts to help you get your own planner started.  Here is the first week of my dinners. She has three columns, Breakfast, Lunch, Dinner...Our breakfasts are usually the same, so there's not a lot of planning.  Lunch is usually leftovers from the night before, that we take to work.  Again, not much planning.  So, I decided to use all three columns to spread out my little food stickies.
 The second week plan.  I covered up the empty spaces with the post-its, just because I wanted to cover up the words on the printouts.  You'll see what I mean in the next picture.
 This is the plan, so far, for this week.  I have Wednesdays off, so I plan basically twice a week, Sundays and Wednesdays.  So, now you are probably asking where these little slips of food choices live...well, check this out.
 There are printouts for dinner ideas, lunch ideas, breakfast ideas, and more.  What you do is what she calls "populating" the boxes with the foods your family eats, and maybe even foods you want to try.  Keeping them color coded helps you put things back where they belong and keeps your categories
 Close up view..
 I made my own categories.

That's mine in a nutshell.  It's an awesome system. I love that you can move things around at will and rearrange and reuse everything.  It took a little bit to set it up, but now it's totally piece of cake to use.   I pulled out the weekly meal plan page, went through my categories and matched what I bought at the store.  As I go, I will figure out what I want for the rest of the week and make a shopping list accordingly.  I'm thinking Spaghetti Squash Boats are in my future.  I am going to add some paper for lists so that everything is in one place.

GO CHECK OUT HER BLOG!!!  She has the post, a video explaining the system, and all of the printables you need.  I think you'll like it!

Stay crafty, my friends!

Saturday, April 13, 2013

Craft Room Update

I have been working on my craft room and tweaking it as I go.  I LOVE having my room to do whatever crafty idea comes into my head.  I also like keeping it as pretty as I can.  So...whilst at our local Lowe's store, I had an idea.


 This was how my work table looked as you enter my room.  You walk around this to my other desk where my laptop lives.  I love these baskets (Clearance at Fred Meyers), the wire and the fabric lining are beautiful, but below my desk looked sort of messy.  I have filled these baskets with lots of stuff to do.
 This is the view from my desk.  I'm sitting between my work table and my desk, and here is some of my paper organization.  It is organized, and I can find things super fast.  This long table (as I call it) is a nice place to put projects in the works, also, it holds my Cricut and all of my Cricut stuff when I need it.  I also have lots of other toys here.  Again, organized, but not too pretty.

So...at Lowe's I got an idea, and here is what I did with it.

 It is hard to see, but I used some Command hooks on the side table here, and hung a cafe curtain rod.  At Lowe's, I say this curtain panel, and thought it fit with my color scheme in my room.  So, I bought it, and got out my trusty Pfaff, and made some "desk curtains".

Now, when you come into my room, this is what you see!!!  It is so much prettier, it hides my stash a little better, AND it is sort of protecting my stuff from dust and dogs!  It also created a small hiding place for the birthday decorations I bought for my Husband!!  (Tee Hee!)  The curtain rods just hang in the hooks and are easy to move and take down to get stuff I need out of there.  I think it looks much prettier!  The whole project took about 1 hour, and cost me about $30.  One panel did the entire job, with a bit left over...I think I will make a couple of pillows for my chair, because the fabric is pretty heavy duty!

I love my room, did I mention that??

Stay Crafty, my friends!
Michelle

Sunday, April 7, 2013

ARC Disc Planner Update and a COOL TRICK!

This post is to "update" you on what my planner is doing lately, and at the end of the post is a cool trick I found by happenstance and I wanted to share!!!

 You may remember my planner that I created, here on this post.   I made a few adjustments to it.  I decided not to use the Franklin Covey bag I was using for it, as it was way too heavy and couldn't hold all of the stuff I wanted to put in it.  So, I found this cool little satchel at Target, and it totally fit the bill!
 I also got the "real" cover for my planner.  The one I made was very cool, but the paper wasn't holding up to the "wear and tear."  I really like this cover, it totally is durable and  holds all my stuff in!
 Inside my bag are my goodies.  Planner, post it notes, note cards, stickers, a variety of pens, some Smash Scissors, score tape, etc.  All of the necessities I need to take this with me and work on it.
 These are just a few of my pages.  This one was a free-for-all.  I really didn't have a theme.
St. Patrick's day was coming, and while at Hallmark I saw these stickers, and this week was born.
 I love this list that I found at Michaels.  On the left side I attached it with "washi" tape so that it opened and I could use the back side to write on as well.
This one was another kind of "free-for-all".  No real plan, although I did like how the right side turned out.
 I am diggin' this layout.  I have used the "Stuff. Things" a lot lately.  I love that "phrase" if you will.  It is a quote that  came from "The Walking Dead."  Rick likes that saying.  He's doing stuff...things...and so am I.
 This is the current week, and I am doing it primarily in black, red and white.
 HERE'S THE FUN PART!!!  I had this Rolodex punch and thought to myself, "Self, I wonder if it would work in this book?"  IT DOES!!!!!!!!!!!!
I punched this tag to enter it into the book and it FITS PERFECTLY!!!!!!!!  I put the punch in my bag, now I can add anything I want into my book!!!  WOO HOO!!!!

That's it for now, I hope you liked this post.  I love my planner and am using it all of the time.  It is really helping me get things together.

Stay Crafty, My Friends!!!

Wednesday, March 27, 2013

The last of the Tall Skinny Mini

I have done a video walk-through of the mini album I love to call the "Tall Skinny Mini."  You can find the video here.  In it, I show all of the embellishments, and give out the dimensions of all of the tags and pull outs for this album.  Here are a few pictures to entice you...


Head on over to check out my video!  As always, if you have questions, please let me know!!

Stay Crafty, my friends!!

Saturday, March 23, 2013

Happy Easter!!!

Welcome to our Easter Basket Parade Blog Hop!!!

We are glad you could join us in our dens today, we are "roaring" to show you our projects!  We have been busy busy busy making creations with a basket theme, and we do hope you enjoy them!

You should have come to me by way of  Margaret's Den, here.  But if you happened upon my blog by accident, start at the beginning with Elsa in her Den here.  I left a full list of the line up at the end of my post.  We all hope you enjoy prowling around, hunting for our creations.  

Now for my creation.  I did a YouTube video that you can also check out.  I loved making this creation!


 The theme this month is to do something with a basket, in honor of Easter.  I went a little bit literal with the theme, but decided to create a door "wreath" with the idea!  I used Bazzill card stock and wove a front to the basket, after inking the paper strips with Tim Holtz Distress Ink.  I then attached it to the front of a 1" wide box I created to hold all of the goodies.
 The box that I used is the height and width (at the bottom) of the basket front, and 1" wide.  I used extra pieces of the woven paper to create the handle.  
 I bought the cute bunny and chick, but created the eggs and the flowers.  The eggs and the chocolate bunny are cut from my "Easter 2010" Cricut cartridge.  (Did you see the bunny already has a bite out of it's ear?)  I made doubles of everything, then stuck skewers in-between the "sandwich" of the cutouts, so that I could stick them into the basket.  The grass is paper grass I bought at Hallmark.  
The lovely trim that I put on the basket was an awesome RAK from Elsa, and I was waiting for the right project to use it on...here it is!  The flowers are Recollections and Petaloo.  The bling is Recollections, the the butterfly is unknown.  The papers I used for the eggs are from K and Company.  

I sure hope you liked this project.  Please let me know what you think.  Now, please go on over to stalk Sherain and see what she has in store for you in her den!

Thanks for looking!!!  Have a wonderful Easter!!!


Saturday, March 16, 2013

Happy St. Patrick's Day

From our blog to yours...


Enjoy yourselves, have fun, and be safe while you're doing it!!  We will be seeing you next week with an Easter treat blog hop that you don't want to miss!!


Thursday, March 14, 2013

Tall Skinny Mini, Pages 9, 10 and Binding!!!


Hey everybody.  I just finished the video for the last two pages and how to bind them!!!  WOO HOO!  I have the video on YouTube, so go on over and check it out!!!  The next video will be all of the tags and goodies to put in the pages we created!!  Then will come the decorating and embellishing!  I'm so happy, this is almost finished!  Now...what do I do with the book I am making during this whole process...any ideas??

Stay Crafty, My Friends!

Saturday, March 9, 2013

Tall Skinny Mini, Video Available!

I have made the video for pages 6, 7, and 8 and it is available on my YouTube channel here!  I am so far behind on stuff and things...so I have decided to not put a picture tutorial on this blog, but rely on the video to do the tutorial.  It took soooooo much time, and there were sooooo many pictures!  I feel like the video was telling the same story in a better way, especially for this album, so I just opted to go for the video this time.  Please go on over and check it out.  As always, if you have any questions I will answer them as soon as I can!

Enjoy the tutorial and have a crafty day!!!

Sunday, March 3, 2013

Tall Skinny Mini #3

Here we are, back with another tutorial.  We are doing pages 3, 4, and 5.   I also have the video for these pages up on YouTube .

I had a question about the assembly of this book.  I made the base pages (that we are doing here) first.  Then I will show you how to bind them.  Then we will decorate.  I find it easier whenever I construct my pages to do it in this way.  When I decorate, having them bound in the book first helps me to see the colors and plan my use of embellishments, etc.  I hope that you like this way too.  So, make the pages, but don't bind them yet.  You don't have to place them in the order that we are making them.  Do what is visually pleasing to you.  After all the pages are bound, then we'll decorate!  :)

This is going to be very picture heavy.  Sorry.
First, score your 12x12" card stock at 2", 6" and 10"
 Cut 6 1/4" up on the left side, and down on the right side, as shown on the red lines.
 Score the 2" sides as shown.   They are reverse of each other, so that one mini pocket is on the top, and one is on the bottom.  You could, however, reverse them, or make them both top or bottom pockets.  The choice is yours.
 For each side, fold the 2" side in...
 Fold the flap down, and the 1/2" tab under, this creates your pocket.  You just have to glue the outer edge and the tab.


 This shows the page folded and glued.
 First side of the page...the mini pocket and the first 4" page...
 ..turned over here is the second 4" page and the other mini pocket.
 Another view.
 Using card stock here...cover the card stock with papers to make it pretty.  This shows the left mini pocket not glued down, and the right pocket glued together.
 It is important to remember to fold the pocket piece flap to the back of the project when using card stock, so that your pocket doesn't compete with the score lines on the page it attaches to.


 If you are using straight patterned paper without card stock, you have to fold the pocket flaps OPPOSITE so that you can utilize the reverse pattern on the paper.  To make it fit nicely, and not compete with the score, cut out a SLIVER of paper on the side of the pocket.  Then the pocket will fold nicely into the score line.

 There it is...page 3 done.  Now lets look at page 4.
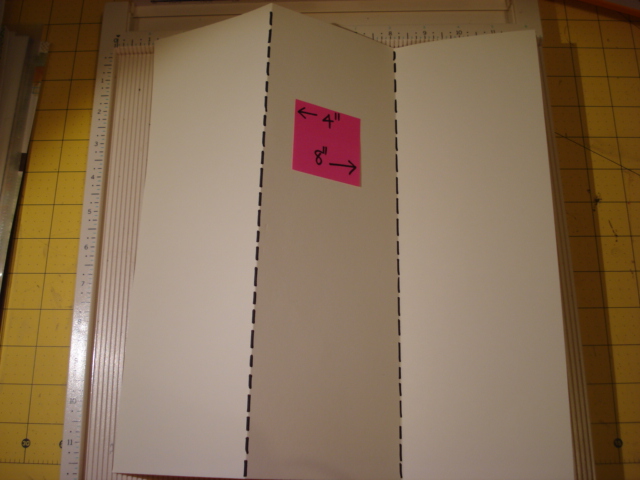
 This is a simple trifold.  Score at 4" and 8".  Fold as shown.
The space between the first 4" section and the second section will create the binding edge and the tall skinny pocket.  The third section is a separate page in this assembly.
 Here it is using card stock covered with patterned paper.
 Top view...
 What it will look like inside the book, this with be the 2nd and 3rd sections of this page assembly.
And the 4th section.
Just using patterned paper.  The first three sections will be the same paper, but the 4th will be the contrasting side.

Now page 5.
 Score as shown.  Can you see where this one is going?  This is going to create a pocket page, but one bigger pocket on one side.
 Cut on the red line as shown.
 Fold and glue, and there it is.  Simple.


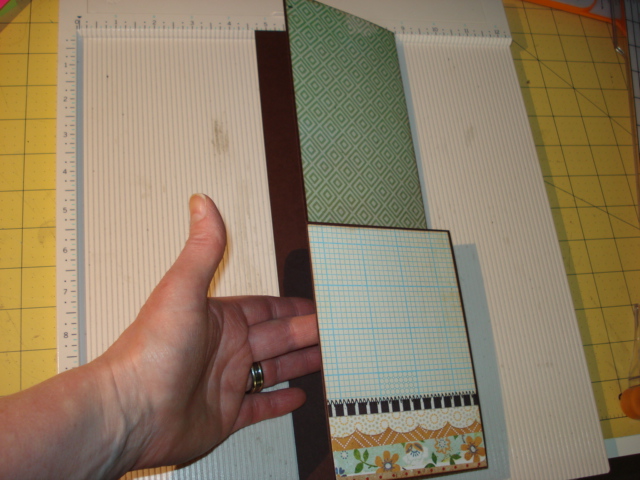
 Here it is, made with the card stock and patterned paper.
 My hand is in the binding side.
 If you are using patterned paper only, remember to cut a sliver off of the paper on the pocket flap side so that when you fold it in it fits nicely into the score.
 Here it is, finished.
 I am loving how this is turning out.
 That's that for now.  Stay tuned.  More pages to come.

Stay crafty, my friends!!!