WELCOME!!

We are so glad you are here! We love making and sharing our projects, and we are excited to have you visiting our site. Please leave us a comment and let us know what you think!

Jackie and Michelle

Followers

Saturday, March 28, 2020

What to do with your leftover paper packaging

Good afternoon!  I have come by today to share with you my ideas for using up leftover paper packaging.
 I used this kit by Authentique some time ago to create an album.  The first in that tutorial series can be found here.    I had the leftover packaging, and I loved the images, so I kept it, knowing that I would use it in an additional project.
I also had these stickers leftover.
 I grabbed my box of leftovers from Artisan Cardstock (from Country Craft Creations) and started creating.  
These are just a few of the things I did with this paper.  On YouTube I have a short video ( > 6 minutes) in which I talk about how I did these, and other things that I made.  

I hope you like it and I hope you have a crafty day!!!

Michelle

Monday, March 23, 2020

Farmhouse Market Stacked Page Mini Album and Bin Tutorials

HI!  I hope you all are doing well!  This is a very strange time and I just hope that you all are safe, well, and that this will be over soon.
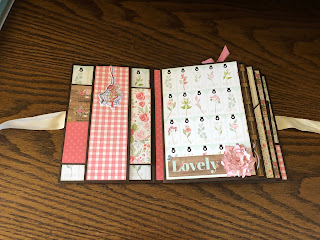
Today, I am sharing my 2nd design team project for Country Craft Creations using the Carta Bella paper collection "Farmhouse Market".  It is a beautiful line of papers and I had a lot of fun designing this album.  I also used Artisan Cardstock from Country Craft Creations.  The fun part is that it only takes 3 sheets of cardstock!

 I did use almost a full 6x6 pad of patterned paper along with assorted embellishments that I got in the design team package.

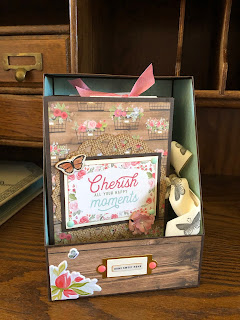
 The album was made to go into the bin you see in the first picture.  I have a tutorial for that here on my YouTube Channel. 
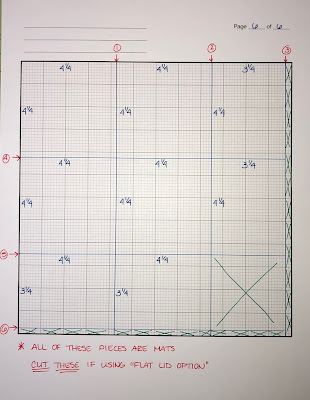
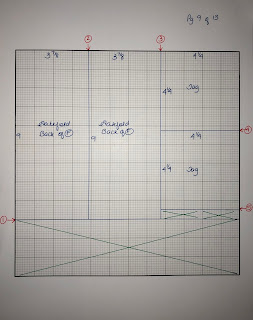
Here are the cutting guides for this project.


Come on over to the YouTube Channel to see this mini album tutorial.  I think you will love how easy it is to put together!  I also share a few ideas a tricks to use for this and other album you may want to make.

Have fun, take care, and stay crafty!
Michelle

Tuesday, March 3, 2020

Purebred Folio Tutorial

Hello, and good morning.  I have the tutorial available for my Purebred Folio available on YouTube today!  This is my 3rd design team project for Country Craft Creations.
 I am using Authentique's "Purebred" paper collection and you will LOVE IT!  It is sooooooo pretty!
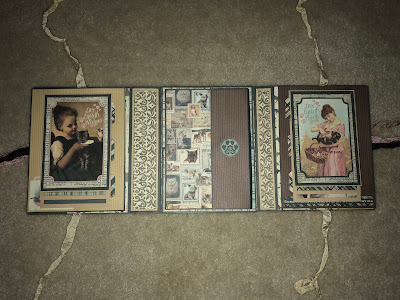
 This is a fun folio with a lot of space to put your pictures of your beloved pets.  
 It includes waterfall pocket features and an expandable envelope among other fun interactions.  
It also features a few new rethinkings  (is that a word?) of closures that you won't want to miss.

Head on over to YouTube for the tutorial here.

Head on over to Country Craft Creations for your supplies here.  

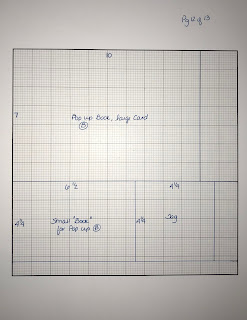
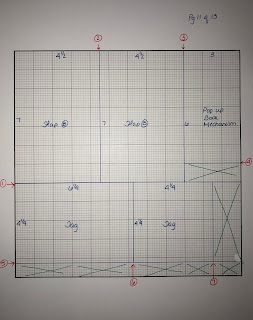
Below is the Cutting Guide in pictures, and following is a list of the pieces/supplies needed.


Folio Base Pieces:
A  1 at 9 x 8 1/2
B  1 at 8 1/4 x 8 1/2
C  1 at 6 1/2 x 8 1/2

Folio Flaps (Added on):
2 at 7 x 8 1/4

Horizontal Pockets:  
2 at 3 x 7 1/4

Vertical Pockets:
2 at 3 x 9 1/2

Midsection:
  Belly Band  1 at 2 x 7 1/2
Top and Bottom Flaps 2 at 5 x 6 1/4

Water Fall Pockets:
Pages 6 at 9 x 7 1/2
Tags 6 at 4 1/4 x 6 1/4

Accordion Pages:
2 at 6 x 12

Envelope:
A  1 at 11 1/4 x 8
B  1 at 3 1/2 x 8
Envelope Sides 2 at 3 x 5 3/8

Notes:


On the blog there will be a cutting guide to aid in the cutting of the card stock.  I used a total of 13 pieces of card stock, 7 in Grey and 6 in Kraft.  I used approximately 13 full sheets of 12 x 12 patterned paper (which included 3 of the Authentique Spectrum papers).  The cut parts are not included in the paper count.  I added more Kraft and Grey card stock for mats on the outer covers, spines, and for various cut aparts (not included in the total card stock count.)  II also used 3 large magnets and 14 lengths of seam binding (12” in length each).  If you only use two strands to do the folio closure (I used 6, 3 on each side), then the count would be 10 lengths.  I give this information to the best of my ability, and tried to keep track of the amount of supplies used.  If you have questions please let me know.  


Thanks for stopping by and have a crafty day!
Michelle

Thursday, February 27, 2020

An Update...

Hi, all!  I hope you all are doing well.  I have been very sick with the latest cold bug and have been out of commission.  I am hoping I am going to experience the emergence of this thing soon...

I haven't stopped crafting (well, maybe for the last week).  I will be doing a tutorial in the next couple days using Authentique's "Purebred" collection.  It will be the 3rd tutorial for my design team project for Country Craft Creations.  You will love it!  I have come up with a couple new surprises with this one.  It is ready to go, as soon as I am physically able to do it.

Stay tuned...I'll be back soon.

Michelle

Monday, February 3, 2020

A new design team project!

 I have a new package from Country Craft Creations and I have made my first design team project with it.
 I am using Authentique's "Purebred" paper collection and it is GORGEOUS!!!  I love the colors and the images are spectacular. It is suited for dogs and cats, and it inspired this project.
 I constructed a treat holder for your pet with this collection.  As you can see in the photo below, it holds a full bag and some!  Plenty of room to store treats and it looks beautiful!  I used flowers, bling, and buttons from my stash.  I also used Glossy Accents on the paws, hearts and the bone on the paper.    Foam tape raises up the front element to give some more dimension.

 I have a tutorial on YouTube and you can find it here.  I hope you like it, I had fun with the construction, and I even came up with a different lid construction that I think you will like.
 Pop on over to Country Craft Creations to get your supplies, and go on over to YouTube and see how to make it.  You will love it!
Stay Crafty, My Friends!!!🐶

Monday, January 13, 2020

Hello!

It's been a little while since I have been on the blog and I just thought 
I would catch you up on some stuff.

The following projects were my design team projects for Country Craft Creations.  
Check out this store here, you will love the selection, quality and the service.  

I have done a few videos on YouTube and I didn't get a chance until now to post them, 
so here they are...

The first video was this one.  I created what I called the "Home Again Traditions Recipe Album".  I did this project for Country Craft Creations and it was a super fun and quick project.  We had a New Year's Eve Crop, and my project was one of the two "pre-crop" projects. I share a fun way to make pockets, and a different way to make a waterfall assembly.  


Next, I did a video sharing how I go through my process for making patchwork papers out of scraps,  I used some of these in my album shown above, because I had a ton of scraps and not enough 12x12 paper sheets to finish the album.  


Then, today, I shared a video on how I created the book assembly in the "Home Again Folio" that I created.   I did share this in the tutorial, but some commented that it was hard to see because of the brown paper.  I recreated that piece of the tutorial using multiple colors to demonstrate it better.


Thanks again for stopping by.  I hope you enjoy the videos, and I look forward to seeing you all again soon.  Have a wonderfully crafty day!!!

Michelle
Saturday, December 21, 2019

The tutorial for my "Home Again" Explosion Album is LIVE!!

Please join me over on YouTube for the tutorial on how to make this awesome little album! 

This is the second design team project I made for Country Craft Creations and I am using the "Home Again" paper line from Carta Bella.   I also used brown and ivory Artisan Cardstock.   Please visit Country Craft Creations for the supplies by clicking this link.

There is a little disclaimer I need to add...the video music is weird for a few seconds on the video, but then it is OK.  I'm not sure what happened, and I will try to fix it.  Please forgive me, I am not sure what to do or why it is that way.  UGH, technology!!!


Below is the cutting guide and the cutting list. 

I did not include the cutting guide for the "yard" base tray.  It is an optional part of this project.  If you do want to make it, you will need one piece of cardstock at 9 x 9", and strips of cardstock at 1 1/2" wide and a fence cutting die  (I used the Tim Holtz die), or a fence cutting file on a Cricut or Silhouette program.  

Here is the cutting list:  

PLEASE NOTE:  There are two lid options.  You do not need to cut out both the Flat and Roof Lid Pieces.  Only cut the one lid you choose to do the project with.  

Cutting list: Box Base: 2 at 12 x 12 Box Side Add On Pieces: 2 at 6 1/2 x 6 Album Pages: 10 at 5 1/2 x 6 "Flat Lid" Option: 1 at 11 5/8 x 11 5/8 "Roof Lid" Option: 1 at 7 1/8 x 12 "Roof Lid" Option Front and Back: 2 at 6 1/8 x 4 1/2 Mats for Inside of Box: 4 at 4 1/4 x 4 1/4 4 at 4 1/4 x 3 1/4

Here are the pictures of the cutting guide.  

PLEASE NOTE: There are two lid options. Please read the notes on the pictures to make sure you are cutting out the proper pieces for the lid option you choose.


Wednesday, December 18, 2019

"Home Again" Explosion Box Album

I have the walk through available on YouTube for this fun and easy album
 I am using the "Home Again" collection from Carta Bella that was given to me as part of my design team package for Country Craft Creations.  It turned out SOOOOOO CUTE!!
 I show you how to make the box/album, and two different lid options, the roof or a flat lid.  I will also show you how to make the "yard" tray.
Go on over to Country Craft Creations to get the fabulous papers, and the Artisan Cardstock.  The tutorial will be up soon!

Stay Crafty, My Friends!
Michelle

Saturday, December 14, 2019

"Home Again" Folio Tutorial is LIVE!

 Good morning!  The "Home Again" Folio Tutorial, which is my design team project for         Country Craft Creations, is LIVE!  Please visit my YouTube Channel for the tutorial.  I know you will like it!  
Below you will find the cutting guide (visual) for the cardstock used in making the base of this project. I also have a cutting list if you prefer that method.   I used brown Artisan cardstock that I purchased from Country Craft Creations, and it is a dream to work with.  I know you will love it!  

And if you are on Facebook, check out the Country Craft Creations page.  It is an amazing community of crafters, tutorials galore from all of the designers, and they are all free!

Thank you for looking and I hope you have a crafty day!
Michelle

CUTTING LIST: FOLIO BASE PIECES: Labeled A, B, C, D, E, and F. The video explains exactly what this means. A and D: 2 at 9 x 8" B and C: 2 at 9 x 8 1/2" E and F: 2 at 9 x 7 3/4" ADD ON'S TO THE BASE PIECES (Labeled per piece it goes on) A: Belly Band: 1 at 1 1/2 x 7 3/4" B: Side Flaps: 2 at 6 1/2 x 5" Top and Bottom Flaps: 2 at 4 1/2 x 7" Pop Up Book Mechanism: 1 at 3 x 6" Pop Up Book Card (Large): 1 at 10 x 7" Pop Up Book Card (small inside): 1 at 4 1/4 x 6 1/2" C: Pop and Twist Pop Up Card (inside): 1 at 4 1/2 x 12" Pop and Twist Card (outside): 1 at 7 1/2 x 5" 1 at 7 x 5" Pop and Twist Mechanism: 1 at 4 1/2 x 11" D: Belly Band: 1 at 1 1/2 x 7 3/4" E: Horizontal Pocket: 1 at 4 x 7 3/4" Gatefold Pieces: 2 at 5 x 6 3/4" Slider Closure Pieces: 2 at 3 1/4 x 4 1/4" Slider Closure Mechanism: 2 at 2 5/8 x 3 1/4 F: Vertical Pocket: 1 at 3 1/2 x 10" Gatefold Pieces: 2 at 9 x 3 7/8" Gatefold Closure: 1 at 4 1/4 x 4 1/4" Tag for Closure: 1 at 3 x 6"

Below is the visual Cutting Guide: