I have been busy mass producing Birthday invitations for my 8, soon to be 9 year old's party! I wanted something bright and cheerful, the total opposite of our weather around here! It was created using the old cricut cartridge, My Community. Okay, only 24 more to go!
Monday, May 9, 2011
Sunday, May 8, 2011
Happy Mother's Day!
I made this for my awesome Mom, Jo Ann!!! I gave it to her last night, and she loved it.
I found the printable here, at A Proffittable Life. Thank you so much for sharing, Amy!! She has different colors to choose from. I liked the red!
I printed it out at about 3 1/2" by 5 1/4", matted it with black and then with some yummy papers from DCWV's Bella Boutique Stack. I had a wooden frame that I painted, then covered with some coordinating papers from the same stack. I used a floral spray from Recollections, and used a rhinestone photo corner that I cut up to create the bling. I punched a MS butterfly and added pearls for the body.
Happy Mother's Day, Mom! I love you!
I found the printable here, at A Proffittable Life. Thank you so much for sharing, Amy!! She has different colors to choose from. I liked the red!
I printed it out at about 3 1/2" by 5 1/4", matted it with black and then with some yummy papers from DCWV's Bella Boutique Stack. I had a wooden frame that I painted, then covered with some coordinating papers from the same stack. I used a floral spray from Recollections, and used a rhinestone photo corner that I cut up to create the bling. I punched a MS butterfly and added pearls for the body.
Happy Mother's Day, Mom! I love you!
Saturday, May 7, 2011
Counterfeit Kit Challenge for May
This month, the Counterfeit Kit Challenge blog's inspiration comes from Works in Progress, and you can find them here.
This is their main May kit.
This is their Mother's Day kit add on.
I was inspired a little by both kits. I loved the colors in the first kit, and I loved the mini album in the second. I have to admit that I had a hard time with this kit. But, after looking at it for a couple of days , I decided to just combine them and make one big kit for myself.
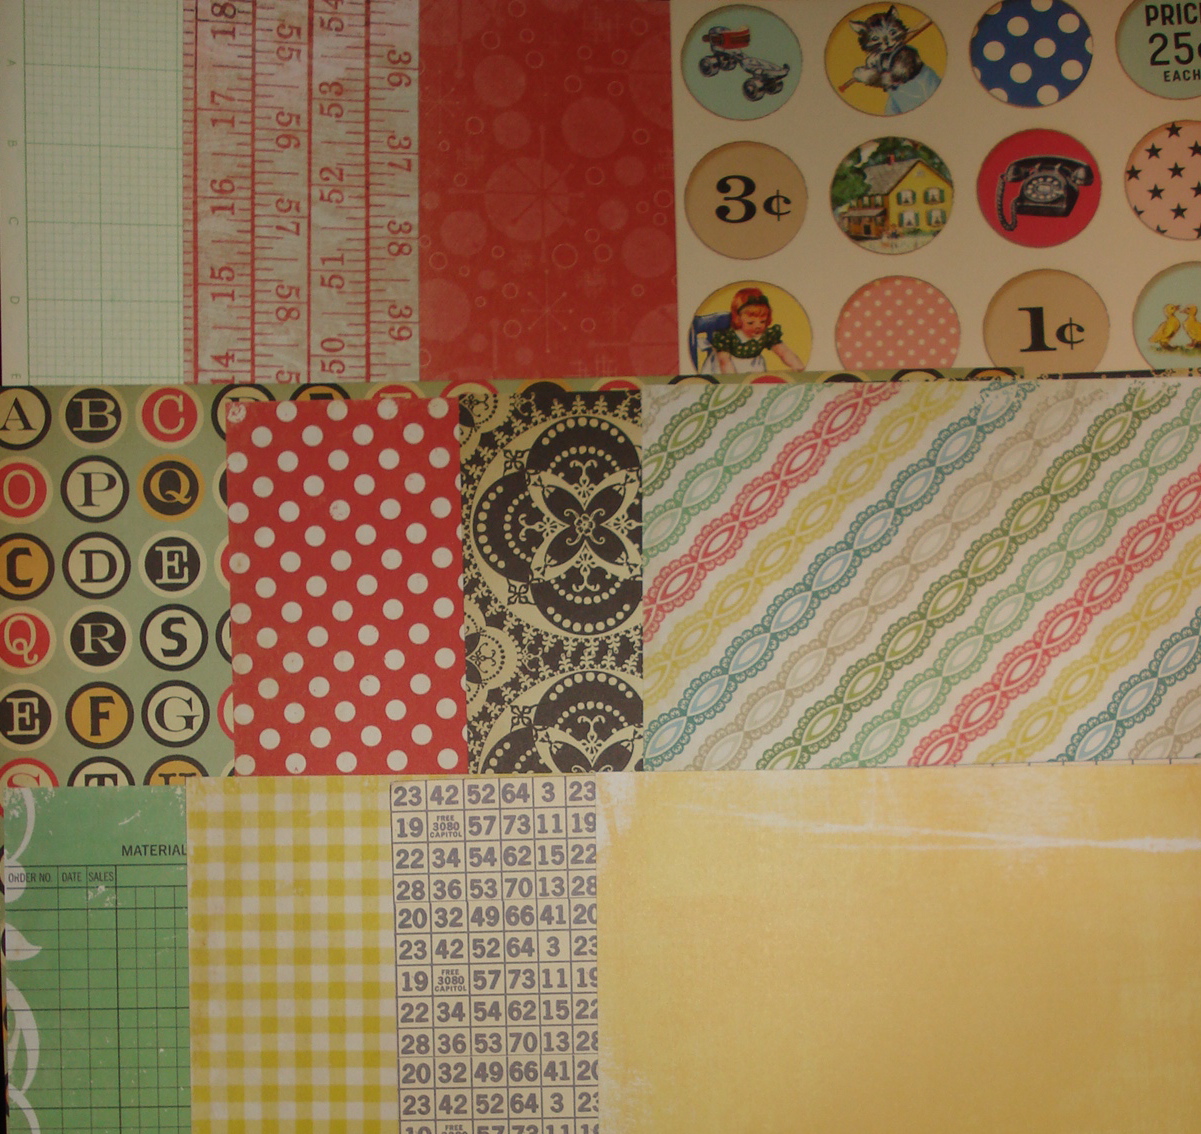
My papers come from Basic Grey, Sassafras Lass, Echo Park, Cosmo Cricket, October Afternoon, and DCWV.
Most of them are double sided, so I have these choices too!
I have to admit that I raided my past kits and chose some unused ribbon and the letter stickers (that I never even used) to join this kit. I added Chipboard buttons and felt flowers. I had 7 Gypsies tags, and added to large manilla tags. I had Tim Holtz tickets, and a Junkitz file folder mini album that I thought would be fun to add. I found a few buttons and threw them into the mix as well...you just have to have buttons somewhere don't you?
So, what do you think?
Stay Crafty My Friends!
This is their main May kit.
This is their Mother's Day kit add on.
I was inspired a little by both kits. I loved the colors in the first kit, and I loved the mini album in the second. I have to admit that I had a hard time with this kit. But, after looking at it for a couple of days , I decided to just combine them and make one big kit for myself.
My papers come from Basic Grey, Sassafras Lass, Echo Park, Cosmo Cricket, October Afternoon, and DCWV.
Most of them are double sided, so I have these choices too!
I have to admit that I raided my past kits and chose some unused ribbon and the letter stickers (that I never even used) to join this kit. I added Chipboard buttons and felt flowers. I had 7 Gypsies tags, and added to large manilla tags. I had Tim Holtz tickets, and a Junkitz file folder mini album that I thought would be fun to add. I found a few buttons and threw them into the mix as well...you just have to have buttons somewhere don't you?
So, what do you think?
Stay Crafty My Friends!
Friday, May 6, 2011
Two Sheet Wonder Cards
I recently found a post by The Scrapoholic from here, where there were cutting guides for two sheet wonder greeting cards. I like this idea, so I sat down, took the striped paper from my April Counterfeit Kit and the yellow paper from my March Counterfeit Kit, and decided to have a go at making cards.
I must confess...I didn't measure twice and cut once, so some of the cards do resemble hers, but I have to say that I finally gave up trying to fix it, and just made up some of my own combinations. So, here they are.
I did use some orange, pink and white cardstock from my stash. I raided my buttons. I raided my bling. I raided my flowers. I made some heart punch flowers that I saw here, on the October Afternoon blog.
I used some of my punched paper doilies that I made for the March Counterfeit Kit. I used stamps that my birthday swap sister from Splitcoaststampers gave me last month.
I also used ribbons that I received in that birthday swap from another swap sister.
That's it. My cards are done. What do you think?
Stay Crafty, My Friends!
I must confess...I didn't measure twice and cut once, so some of the cards do resemble hers, but I have to say that I finally gave up trying to fix it, and just made up some of my own combinations. So, here they are.
I did use some orange, pink and white cardstock from my stash. I raided my buttons. I raided my bling. I raided my flowers. I made some heart punch flowers that I saw here, on the October Afternoon blog.
I used some of my punched paper doilies that I made for the March Counterfeit Kit. I used stamps that my birthday swap sister from Splitcoaststampers gave me last month.
I also used ribbons that I received in that birthday swap from another swap sister.
That's it. My cards are done. What do you think?
Stay Crafty, My Friends!
Wednesday, May 4, 2011
Counterfeit Kit Challenge Leftovers!
I love leftovers! They make great lunches for work the next day, they make great dinners when you are just too tired to cook, and they make great scrapbooking projects!!!
I have participated in the Counterfeit Kit Challenge for the last three months. But, hard as I try, I haven't used up all of the supplies each month...I had leftovers. What to do?!
I raided the three kits and picked the following papers...
February's Kit...
March's Kit...
April's Kit. There was a theme...I seem to like the black and red a lot...what do you think?
Anyway, first, I finished the book that I made a tutorial on here...It is the tutorial on how to make a mini album out of a grocery sack sized bag. The original book was out of the grocery sacks, but, if for the tutorial I just used a lunch sack so the pictures would be easier to take, but the whole process is the same.
Here is what my mini book looks like...
I added the bling, and the flower was another leftover from another project. I used the letter stickers from the February kit, as well as the rosette ribbon flowers. The leaf was from the April kit. I covered the spine with paper from HOTP, called Crocodile Black. I think it makes a great spine.
The closure is simply two eyelets set on the front and back cover, and I used some 7 Gypsies bling chain with clasps to close it. I had red ones in my February kit, but thought the pearl looked better.
I also added some Jenni Bowlin journaling blocks to the pages, creating pockets on some pages for tags.
This one is just adhered in the middle, so that pictures can slide behind the butterfly.
Another pocket...
The star was too big, so I cut it and adhered it only on the side.
This was adhered in the middle also.
Blurry picture, sorry, but each page has a tag.
THEN...I found a cool OSW here on Splitcoaststampers.
I used more of the leftovers to create these cards.
I used stamps from Autumn Leaves and Just Rite. The bling came from my various kits. I used the tutorial she gave to cut the pieces, but used my scraps instead of one sheet of paper cut up. I think they came out pretty cool.
LAST BUT NOT LEAST...I know, long post...
I make cards for my husband, just because, and leave them usually on the nightstand for him to find. I used the rest of the leftovers to make this...I found the original tutorial here. It was kind of confusing, but if you scroll down on that post, I have pictures of an easy way to make this...I am "GrammaM" on Splitcoast.
This card folds into a star, but starts as a triangle! TOO COOL!
OK, I am done now. Have a very crafty day!
I have participated in the Counterfeit Kit Challenge for the last three months. But, hard as I try, I haven't used up all of the supplies each month...I had leftovers. What to do?!
I raided the three kits and picked the following papers...
February's Kit...
March's Kit...
April's Kit. There was a theme...I seem to like the black and red a lot...what do you think?
Anyway, first, I finished the book that I made a tutorial on here...It is the tutorial on how to make a mini album out of a grocery sack sized bag. The original book was out of the grocery sacks, but, if for the tutorial I just used a lunch sack so the pictures would be easier to take, but the whole process is the same.
Here is what my mini book looks like...
I added the bling, and the flower was another leftover from another project. I used the letter stickers from the February kit, as well as the rosette ribbon flowers. The leaf was from the April kit. I covered the spine with paper from HOTP, called Crocodile Black. I think it makes a great spine.
The closure is simply two eyelets set on the front and back cover, and I used some 7 Gypsies bling chain with clasps to close it. I had red ones in my February kit, but thought the pearl looked better.
I also added some Jenni Bowlin journaling blocks to the pages, creating pockets on some pages for tags.
This one is just adhered in the middle, so that pictures can slide behind the butterfly.
Another pocket...
The star was too big, so I cut it and adhered it only on the side.
This was adhered in the middle also.
Blurry picture, sorry, but each page has a tag.
THEN...I found a cool OSW here on Splitcoaststampers.
I used more of the leftovers to create these cards.
I used stamps from Autumn Leaves and Just Rite. The bling came from my various kits. I used the tutorial she gave to cut the pieces, but used my scraps instead of one sheet of paper cut up. I think they came out pretty cool.
LAST BUT NOT LEAST...I know, long post...
I make cards for my husband, just because, and leave them usually on the nightstand for him to find. I used the rest of the leftovers to make this...I found the original tutorial here. It was kind of confusing, but if you scroll down on that post, I have pictures of an easy way to make this...I am "GrammaM" on Splitcoast.
This card folds into a star, but starts as a triangle! TOO COOL!
OK, I am done now. Have a very crafty day!
Monday, May 2, 2011
M for Melanie
I found these giant letters at Michael's craft store and decided to decorate my daughter's room! I used the Euphoria line by Basic Grey and the matching stickers. The letters are 2"x12" and a sheet of paper with the boarder stickers worked great! I embellished with rhinestones and the white Uniball pen. She loves it!
Friday, April 29, 2011
Dollar Store Configurations Box
First of all, I just wanted to say that I am working on finishing the mini paper bag book that I posted the tutorial for on Wednesday. I decided to use leftovers from my Counterfeit Kit Challenge kits for the months of February, March and April. That will be posted soon, and I think it is turning out CUTE!
For todays post...I just want to start off with the fact that I love the Configurations Boxes from Tim Holtz. I used some to make this...
I collect thimbles and I ran out of room in my other thimble display case. I saw this box set and knew it would be perfect ford showcasing some of my favorite thimbles. I used K and Co. papers, with Tim Holtz tissue tape and corners. I used a 7 Gypsies door knob also.
Then, the other day I was in the local dollar store looking for a plastic platter and I found these...
And guess what my brain said!
I used the bottoms of the boxes, because they had a deeper side, stuck them together with score-tape, inked the edges with Tim Holtz Distress Ink, and covered them with the same papers from K and Co. I used some Prima ribbon around the edge.
I covered the back with papers, even though no one will see it. The boxes themselves were a little flimsy, but once covered and wrapped with ribbon, they were pretty sturdy!
I had some vintage die cuts from K and Co. so I gathered up some and went to town! I used pop dots and foam tape to add dimension to some of the pieces.
I had a K and Co. metal frame that I used to frame a butterfly paper scrap. The picture was cut out of some paper, and I used dimensional glaze to go over the "frame" of the paper, then added a cardstock easel on the back to get it to stand up like a photo frame.
I was thinking of all sorts of ideas with these little jewelry boxes. I still have the tops of the boxes to do something with. What could you come up with?
Stay Crafty!!
For todays post...I just want to start off with the fact that I love the Configurations Boxes from Tim Holtz. I used some to make this...
I collect thimbles and I ran out of room in my other thimble display case. I saw this box set and knew it would be perfect ford showcasing some of my favorite thimbles. I used K and Co. papers, with Tim Holtz tissue tape and corners. I used a 7 Gypsies door knob also.
Then, the other day I was in the local dollar store looking for a plastic platter and I found these...
And guess what my brain said!
I used the bottoms of the boxes, because they had a deeper side, stuck them together with score-tape, inked the edges with Tim Holtz Distress Ink, and covered them with the same papers from K and Co. I used some Prima ribbon around the edge.
I covered the back with papers, even though no one will see it. The boxes themselves were a little flimsy, but once covered and wrapped with ribbon, they were pretty sturdy!
I had some vintage die cuts from K and Co. so I gathered up some and went to town! I used pop dots and foam tape to add dimension to some of the pieces.
I had a K and Co. metal frame that I used to frame a butterfly paper scrap. The picture was cut out of some paper, and I used dimensional glaze to go over the "frame" of the paper, then added a cardstock easel on the back to get it to stand up like a photo frame.
I was thinking of all sorts of ideas with these little jewelry boxes. I still have the tops of the boxes to do something with. What could you come up with?
Stay Crafty!!
Wednesday, April 27, 2011
April Birthday Bash Paper Bag Book Tutorial
As promised, here it is, but I apologize for getting it to you so late! I made this book with my March Counterfeit Kit, and if you want you can see the whole post here...I think it turned out awesome, with lots of places for journaling and pictures!
I used grocery sized bags to create this book, three in all. Two were for the pages of the book, and one was for covering the covers, which were made of chipboard, covered with grocery bags, and decorated with my March kit papers. It created 6 pages with pockets in each, then with papers I created two more pockets on the inside covers. To bind it, I punched holes in the pages and the spine and used ribbons to bind. Because grocery sack are so sturdy, it made for nice thick pages.
Here is how I did it. I used a smaller lunch sack this time for the tutorial...the concept is the same.
You will need three sacks, two for pages, one for covering the book covers.
For the pages, decide how tall you want them, and add 1/2". I trimmed off the rough edge (recycle this), then decided I wanted my pages to be 6 1/4" tall (which fit this size bag perfectly), so I cut off a section that was 6 3/4". This gives you the page size and the 1/2" you need to create the tabs forming the pockets. Save the bottom of the bag, we will use this for hinges.
I cut the bag open on one of he existing creases to create one long strip. It came out to be 6 3/4" x 21". On one long end, score at 1/2" all the way across. Each bag made me three pages. If you want wider pages you can, you will get less pages per bag, but just add another bag to the book if you want.
I figured that three pockets with 21" of paper gave me pages of 3 1/2". You will have six of them, because two make the pockets...does that make sense? So I scored all across at 3 1/2" intervals, and accordion folded the paper. At the 1/2" score mark, cut out tabs. I angle corners to make them fit nice.
Once the accordion fold was done, and the tabs were cut, I just folded the tabs up to adhere to the next 3 1/2" page, and taa daa...the bottom of the pocket was formed. Do this across and you will have three pages with three pockets.
Top view showing the three pockets. Don't worry about the openings at the spine side...binding takes care of this. If I allow 1/2" for that, I will have a pocket that is 6 1/4" tall by about 3" wide. Plenty for a journaling card!
Remember this bottom piece I asked you to save...cut off a 2" x 6 1/2" piece, recycle the bottom...
Then score at 1" down the middle...
Adhere to the last page to make a hinge...make another set of pages, and attach them to this hinge to create more pockets.
DONE! Cover with your gorgeous papers of choice, make a cover, bind and you have a recycled mini album using grocery sacks!
I used grocery sized bags to create this book, three in all. Two were for the pages of the book, and one was for covering the covers, which were made of chipboard, covered with grocery bags, and decorated with my March kit papers. It created 6 pages with pockets in each, then with papers I created two more pockets on the inside covers. To bind it, I punched holes in the pages and the spine and used ribbons to bind. Because grocery sack are so sturdy, it made for nice thick pages.
Here is how I did it. I used a smaller lunch sack this time for the tutorial...the concept is the same.
You will need three sacks, two for pages, one for covering the book covers.
For the pages, decide how tall you want them, and add 1/2". I trimmed off the rough edge (recycle this), then decided I wanted my pages to be 6 1/4" tall (which fit this size bag perfectly), so I cut off a section that was 6 3/4". This gives you the page size and the 1/2" you need to create the tabs forming the pockets. Save the bottom of the bag, we will use this for hinges.
I cut the bag open on one of he existing creases to create one long strip. It came out to be 6 3/4" x 21". On one long end, score at 1/2" all the way across. Each bag made me three pages. If you want wider pages you can, you will get less pages per bag, but just add another bag to the book if you want.
I figured that three pockets with 21" of paper gave me pages of 3 1/2". You will have six of them, because two make the pockets...does that make sense? So I scored all across at 3 1/2" intervals, and accordion folded the paper. At the 1/2" score mark, cut out tabs. I angle corners to make them fit nice.
Once the accordion fold was done, and the tabs were cut, I just folded the tabs up to adhere to the next 3 1/2" page, and taa daa...the bottom of the pocket was formed. Do this across and you will have three pages with three pockets.
Top view showing the three pockets. Don't worry about the openings at the spine side...binding takes care of this. If I allow 1/2" for that, I will have a pocket that is 6 1/4" tall by about 3" wide. Plenty for a journaling card!
Remember this bottom piece I asked you to save...cut off a 2" x 6 1/2" piece, recycle the bottom...
Then score at 1" down the middle...
Adhere to the last page to make a hinge...make another set of pages, and attach them to this hinge to create more pockets.
DONE! Cover with your gorgeous papers of choice, make a cover, bind and you have a recycled mini album using grocery sacks!
Monday, April 25, 2011
Black and White Gift Bags
I stopped by my local Big Lots store Friday and found these Black and White Alphas by Colorbok! I paid a wopping .25 for these 1" chipboard letters! So I bought about $3 worth!
My daughters birthday was Saturday, so I grabbed a bag, inked the edges and voila! Instant gift bag!
Friday, April 22, 2011
The Ultimate Recycle Project
I sometimes get weird ideas and come up with something that is kind of different. I decided one day, while taking out the recycle, that I could, and should, make something pretty. So, I gathered up a bunch of random things, and chose some Anna Griffin papers and embellishments that I scored at Ross's...and this is what I came up with. The covers are from a box that a guitar pedal came in and some scrap lace that I had. The medallion is made from a coaster, some scrap paper to make the rosette, and an embellishment that came with the paper pack.
This is the side view...I closed with a ball and chain scrap I had with a bulldog clamp. All of the lace, ribbons and buttons are from my scrap stash. The only thing "new" used on this project was the paper and embellishment packs that I had purchased some time ago, and used for this project.The inside cover, and on the right, the page is made from cardboard from a Halloween package. I used a CD envelope and a CD as a tag. The embellishment came from the papers I bought. When you take out the CD, the inner envelope was covered with the backing from an embellishment package.
The right is the back of the CD Envelope page. I made a pocket with a bookmark insert that comes in packaging from stuff we use at work. The tags are from the paper pack I used. On the left, I used a mini business reply envelope, and made tags from fake credit cards that you get with credit card application offers.
The back of that envelope...the embellishment came from the paper pack. The left page is made from a cardboard insert from the nursing support hose that I buy, I scored and folded it to make a flip out page.
This is the open view. The tag was punched from the papers, and the mini envelope was a button envelope I got with a shirt purchase.
The back side with another button envelope pocket. The next things are a TP roll pocket with a tag made from more packaging from work stuff. The bottom pocket is a soap box with a tag made from a brad package piece.
The backs of those pocket pieces. The right, is a fold out page from some shopping bags.
This fold out page is made from two paper bags from World market that I put together and made a trifold page, and inserts from packaging from work that I made tags and pockets from.
On the left, this pocket was a return envelope cut to make a pocket, and a Tombo adhesive package made the tag. On the left, the small pocket page is made from a powdered drink box, and the tag is from a Sizzix package that I ran through the Cuttlebug.
A closer picture of the tag.
The drink package on the left again, and on the right, a medication envelope from the vet with a piece of file folder attached to make a fold out, and...
a glue stick package made the tag.
The left, the back of the envelope. On the right, the page was from a Ziploc container package. I used a bill envelope for the pocket, and the embellishment came with the papers I got.
The tag booklet is made from file folder scraps that I sprayed with a glitter spray after stamping with some stamps from Autumn Leaves. The ball chain came from a clothing tag.
This page is the back of the Ziploc container page, the tag is made from a file folder covered with papers from the packaging from the Anna Griffin embellishments. The pocket is a plastic wrap from the embellishments.
So that's it. What do you think? Stay Crafty!
Subscribe to:
Posts (Atom)